Key cutting
Key cutting is quite quick once the bits are assembled together. It requires precise grinding, needing decent eyesight. DIY key copies do have a failure rate.
This article deals with copying keys for night latches (eg by Yale) and Eurolocks. The principles are the same for 2,3 & 5 lever deadlocks too.
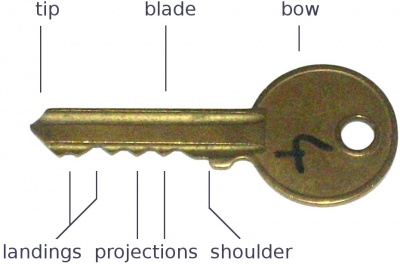
Anatomy
- Blade
- The pattern of longitudinal grooves determine whether the key can enter the lock
- Bow
- The handle
- Landings
- The lock's pins land on these when the key is inserted. Their position determines whether the key can turn
- Projections
- Projections between landings are an artifact of punched key cutting. They make keys operate much less smoothly, and can be removed for better operation.
- Shoulder
- This determines how deep the blade goes into the lock. Landings must be in the right place relative to the shoulder, not relative to the tip
Blank
Key blanks can be bought online from 3rd party sellers or lock manufacturers. The 1A key profile is by far the most popular for domestic locks.
Anodised aluminium blanks come in pretty colours, but aren't as tough. Chrome plated brass are most robust. Steel blanks aren't usually used because they wear the internal lock mechanism.
Clamp
Clamp the 2 keys, original and blank, together firmly. A mole grip works well. Align the key shoulders accurately, ensuring both key blades are exactly parallel. Don't worry about the key tip positions, which sometimes don't align (copied keys can be longer or very slightly shorter, and its often not a problem.)
Mark the original, eg with a big black marker, its too easy to end up grinding the wrong key otherwise, then you've got no working keys and need a new lock.
Its also best to mark the original permanently so you can copy from it. Copies of copies are less reliable.
Cut
A die grinder with a small carbide bit works well, or a rat's tail file can be used by hand. File/grind the key down accurately to match the original.
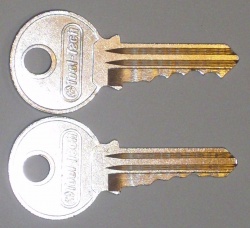
Removing any projections between the key landings makes a key work much more smoothly. The picture to the right shows the same key, once with these projections, and again with them removed.
Check the sloped sections between the pin landings are all suitably sloped. It only takes one little bit of one of these slopes with too steep an angle for the key to refuse to come out again.
A few strokes of a file at 45 degrees over each edge then removes any sharp edges and swarf. Or a rotary wire brush can be used.


