Sawboard
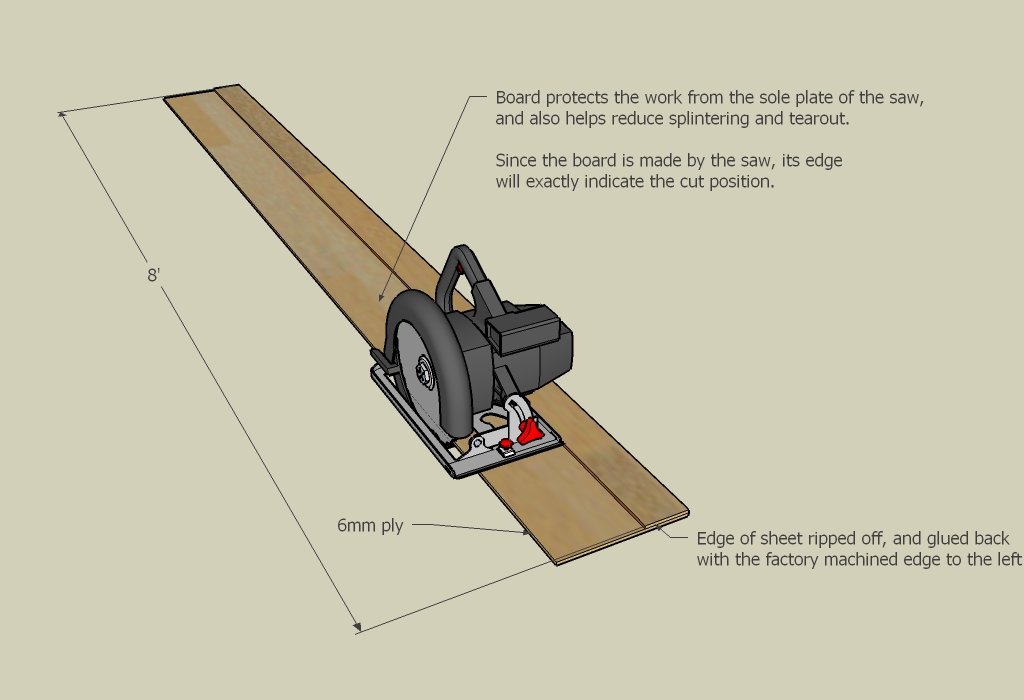
A sawboard is an easy to use guide for a hand held circular saw, which will allow you to make perfect straight cuts with pinpoint accuracy. Particularly useful when cutting up large sheet materials. Its more accurate than by following a pencil line, and less error prone than using a traditional straight edge to cut against since you don't need to account for the offset of the blade.
The effect is similar to using a rip fence guide, but unlike a rip fence guide you are not limited to only making cuts near the edge of the timber.
Materials
The device is be made out of two strips of wood, and each board is for use specifically with the circular saw and blade that made it. (A suitably-made sawboard could also be used with a jigsaw (although some jigsaws can suffer from blade wander or bend when the cut is guided too rigidly)).
You will need a thin sheet of good quality WBP plywood to make the guide (6mm is ideal). You don't need the whole sheet, but having at least a full length with one original undamaged factory machined edge is important.
(you can use thicker material, but you will sacrifice more maximum depth of cut if you do, alternatively a sheet of hardboard would make a cheaper alternative)
Construction
- Mark the factory edge of the board before cutting it.
- Cut a 4" to 6" piece of wood off the side of your sheet. (this section wants to be wide enough to allow clamps to be used on it without then interfering with the passing of the saw motor)
- Spread PVA wood glue or similar over the top surface of the section you have just cut.
- Place the remainder of the sheet on a flat surface, and flip the glued section over lengthways. Apply it to the top surface of the remainder of the sheet, with the two cut edges aligned. weight or clamp it in place an allow the glue to dry.
- Finally, using the saw that the guide it to be used with, cut the sawboard free of the remainder of the sheet. It is important that you place the side of the saws baseplate that is furthest from the blade against the edge of the glued on part. (you may need to retract the saw guard manually to allow easy positioning of the saw at the start of the cut).
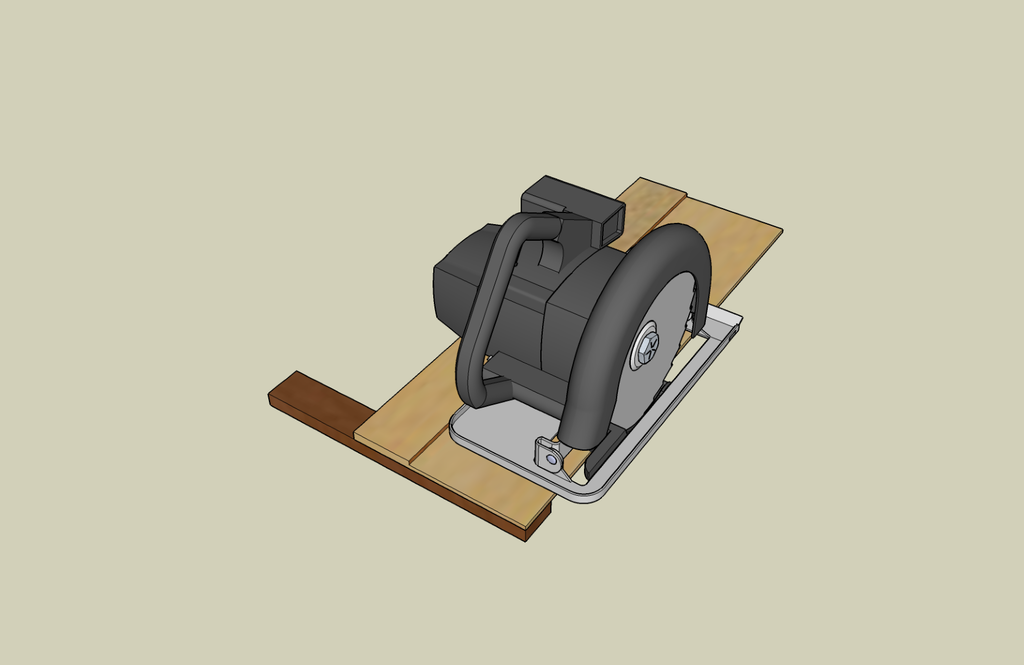
Cross Cut Version
You can make a short version that is ideal for cross cutting timber to length. To make it even easier to use, fix a batten to the underside at one end, and take care to make sure that is square to the guide, and it will make perfectly square cross cuts every time:
Use
Mark the two ends of your required cut line. Place the sawboard in place close to the marks. Now adjust the first end to the exact position required, and clamp it to the material being cut (small one handed auto clamps are ideal for this). Now position the other end (the clamp 8' away on the other end will not stop you moving the free end), and clamp that. You now know that the cut will be exactly on the edge of the sawboard.
Place your saw on the board with the motor side of the machine's sole plate against the guide section of the sawboard, and the sole plate sat on the base board section. Cut in a smooth fluid movement from one end to the other, keeping the saw tucked against the edge of the sawboard. The sawboard will:
- Keep the cut straight and true.
- Protect the surface of the timber being cuit from being marked by the saws sole plate
- Help reduce splintering and breakout along the top of the cut line (more so on the side of the cut that has the timber protected by the sawboard).

