DIY Loft conversion
This is the story of a DIY Loft Conversion project that I carried out in the early 2000s on a 1950's semi detached house. Previously hosted on the main Internode Ltd web site, it has been moved here, lightly updated, and some a few new photos included along the way.
One point to note is that some of the regulations relating to loft conversions have changed in the time since the work described here was done. So while the comments made about UK building regulations made here were correct for the time, they will not necessarily be an accurate reflection of the regulations as they stand now. Either see the current approved documents, or take proper advice.
Introduction
The usual story: too much stuff, too many people, and not enough house! Not saying the place is small, but you do get the feeling you need to step outside just to change your mind. So In late 2003 a plan was formed, at the start of summer in 2004 we would rip the roof off, stick in another layer, and put the roof on again. How difficult could it be?
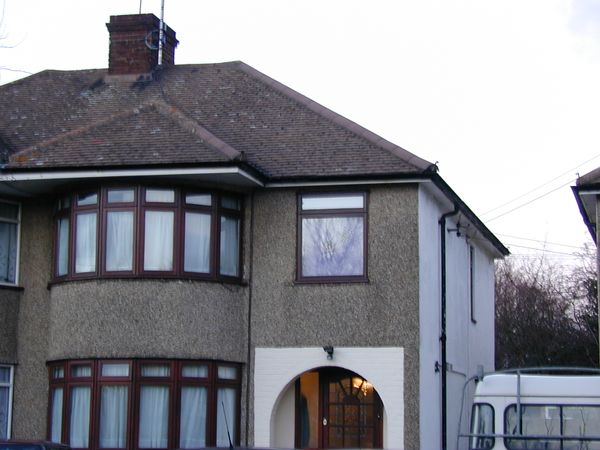
The obligatory "before" picture:-
Being brave I thought I might tackle this project myself ;-) However not being that brave I thought it might be a good idea to seek help from someone who has done this before. Not only that we need the space sooner than Christmas 2006 (which is how long it might take if I did it all myself!) Hence my mate Trevor, a joiner and builder by trade.
The Research Phase
For a job like this planning is essential! It does not take long to realise there is a lot to learn either. A good starting place is the hugely talented and helpful collection of regulars over at the uk.d-i-y usenet group. You can also find some other articles I have written here in the DIY Wiki inspired by some of the work done here.
Planning and Building Regulations
Many loft conversions do not actually require planning permission (PP), and this one is no exception. However, they do require a "Full plans submission" to the local district council. PP would typically be required if you wanted to make changes to the roof line the faces the road (by addition of a front dormer for example). Oddly converting a hipped roof to a gable end wall does not seem to count as a change in this sense!
Hence the first requirement was getting some plans drawn. Finding an architect with time available was also tricky.
If I were doing this again (now having seen a set of plans and the associated structural calculations) I might be tempted to do them myself. The plans are pretty straight forward diagrams of the property from each elevation, and the structural calcs are produced straight out of superbeam. The only tricky bit would be coming up with the source data to use for beam loadings. Having said that, most of the "industry standard" figures can be had from a book like this.
Having got a suitable set of plans, these were submitted to the council (along with a cheque for £88 to pay them to look at them!). The building control officer (BCO) will usually reply to these and suggest any alterations to bring the plans in line with current regulations and "best practice". If there are any changes required these are then made to the plans and they are resubmitted. Usually at this stage approval will be granted, or, if there are problems with the resubmitted plans you can go through the adapt -> submit -> comment cycle for a few more iterations.
In our case the BCO replied (in almost illegible hand writing - how quaint), with a few minor comments which could be easily added to the plans. The resubmission was approved and we were under starters orders. You can now pay a further £264 to building control to have them come and OK each stage of the build.
[Editors note, check your local authority web site for their building control department - they probably publish a set of prices for full building notice and full plans submissions]
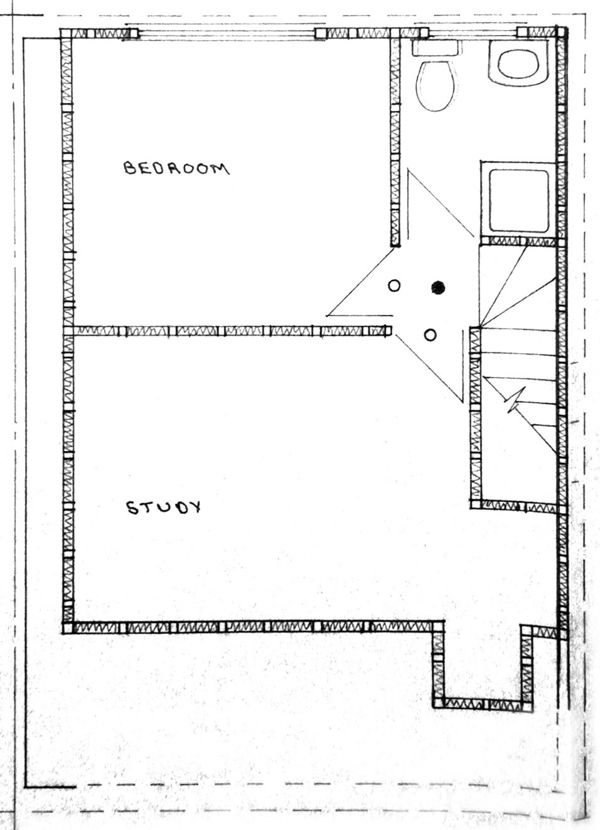
Anyway the plan is to add three new rooms:
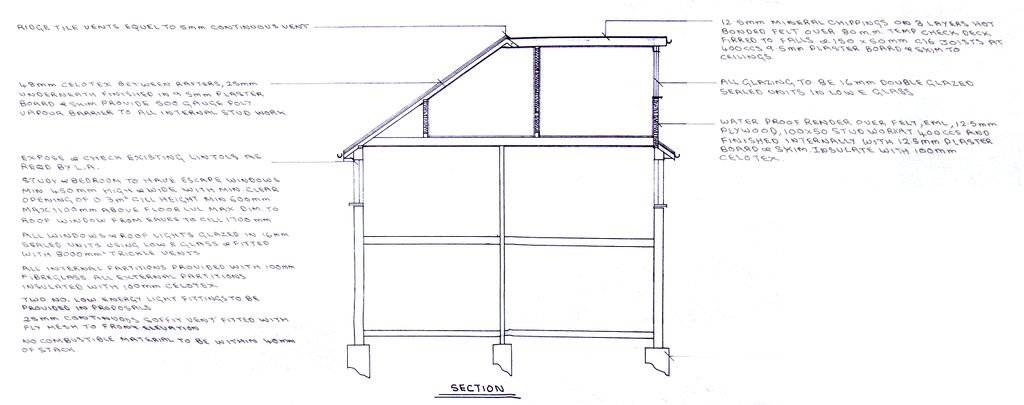
And they will fit into the new envelope like this:
Since the front roof will still retain its slope, the wall to the front is a dwarf wall that will have doors providing access to the remaining storage space at the front of the loft.
(note that both the above piccies don't show the big bay window that runs the full height of the house and sticks out of the front, or its associated bonnet roof).
The new floor
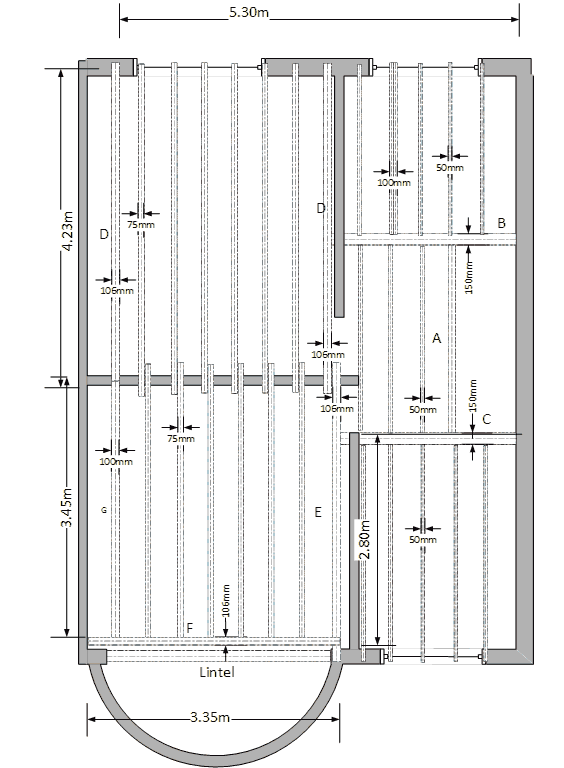
The first major job is strengthening the floor. Although the existing loft floor is comprised of 4x2" timber (which is quite good for a loft by modern standards), this is nowhere near strong enough for a new floor. Hence the need to play a game of inserting lots of 8" deep beams into a space while dodging all the existing beams.
Some of the longer joists also need to carry point loads from other joists or "stringers" that meet them. As a result, a simple timber beam is not always going to cope without deflecting too far (too meet limits imposed by building regulations), or being dangerously overloaded.
Hence in these situations "Flitch" beams are used. These are made with a steel plate sandwiched between two timber beams, and the whole lot bolted together every 600mm.
The plans called for a 6mm thick plate - the steel supplier gave us a free upgrade to 8mm (fine except it makes the things a bit more difficult to manhandle). They also take care of drilling the holes and painting them with a (red) passivating paint.
Most of the windows in the house are of a span of under 2m with a nice concrete lintel over them. The main bay window at the front however is much wider. Rather than pull apart the rooms below to establish the construction of the lintel over these windows we decided to use another flitch beam as a stringer to carry the front floor joists. This first photo shows it being manoeuvred into position. It is deliberately placed over the existing loft floor joists since these are being used in a cantilever to hold up the front bonnet roof over the bay. The front floor beams will be hung from this flitch beam on long joist hangers.
The beam is supported at one end on the longitudinal flitch beam, and at the other in a heavy shoe rawl bolted to the party wall.
Note the original loft floor had "tie" beams that ran across the width of the loft to keep all the other floor joists ridged and add extra support for the weight of the ceilings below. Each time we crossed one of these, we needed to batten the beam to the purlins above before we cut it. This is to ensure that we do not introduce any more sag into the ceilings below. Once the joist was in place "noggins" could be added between the new joists to hold the old floor joists instead.
The new floor beams sit on a 1" thick wood plate laid on the top of the supporting walls. In this way the new beams sit a little above the existing ceiling level and do not come into contact with it. This way there is no danger of them causing cracks or damage to the ceilings below when they are loaded.
It is interesting to see however just how far the ceilings have sagged over the years just from their own weight (plus that of any stuff stored on them). The 1" gap at the end can be as much as 4" in the centre of the span. Not that this is actually noticeable from the rooms below.
Getting close to done.
The new floor joists are now in place. This picture also shows the noggins that replace the original tie beam that steadied and supported the original ceiling joists. These are nailed between the new joists and also onto the old ceiling joists. The only downside of this is that you now couple the new floor to the old ceiling slightly which will increase noise transfer a little. (in reality the effect is small and noise transfer is far less between 2nd and 1st floors than it is between 1st and ground).
The ends of the beams poke out through the rear of the roof through a strip of tiles we have removed. Ultimately this whole rear roof section will go and be replaced with a large dormer.
In total we only had to remove one of the existing floor joists close to the party wall so we could get the main rear flitch beam into its proper place. This was a delicate operation of chain sawing the original beam into short sections (without going through the plasterboard ceiling that is nailed to the underside of it), and then pulling up each section so that it rips the plaster board nails through the back of the board, hopefully leaving the finish to the ceiling below undamaged. Remarkably we only damaged one small section of ceiling when we hit a nail with the chain saw, and a 50p sized bit of artex and skim decided to jump off the ceiling!
All done!
Final visit from the BCO was arranged, and the completion certificate followed in the post a few days later.
Conclusions
So was it all worth it? Yup, I think so!
How long did it take
Hmmm, difficult to answer. We started work in April 2004, and had most of the structural building phase done by August. We lost a few weeks due to poor weather, and another week or two in delays getting materials. We had scaffolding for approx 13 weeks in total.
Progress slowed a little from then, and came to a complete stop as real work interrupted toward the end of 2004. Work resumed about April 2005, and by July 2005 all that remained was decorating and snagging.
What did it cost
About £10K for materials (and that includes carpets and decorations etc).
Fees of about £2,200, That's for the BCO, Architect, Roofer, and about five skips.
The boiler replacement cost about £1,250 all in (including a few tools)
Total spend on other tools and consumables is about £1,200 although they are not such a direct cost since I still have the tools!
Did it add value to the house
There used to be a time where conventional wizdom said that you would not recoup the cost of this sort of work on selling. Well conventional wizdom is not always right, and times (and property prices) have moved on!
From our point of view most definitely. The alternative would have been moving, and that was likely to amount to extra mortgage to the tune of £110K or more to find a place nearby with five bedrooms.
In terms of financial return, the answer is also very probably yes, in that other similar local properties with similar conversions seem to fetch £40K - 60K more than the unconverted ones. (see hindsight section below!)
Unplanned changes / additions
I added some jobs along the way. Replacement of all the soffits, fascias, guttering being one of these activities. This probably added about £500 to the costs (included in the above). Although neighbours who have had this work done professionally have paid between 2 and 2.5K typically.
While adding the new electrics I took the opportunity to bring the aging consumer unit up to current standards, This probably added a further £350 over and above what was strictly necessary for just the loft work. However it has hopefully improved the general safety of the electrical system for the whole house.
We went for a different shower room layout from that shown on the plans. This made better use of the space, and also added a small airing cupboard behind the shower. Not only is this handy in its own right, but it also makes for simpler access to pipes and wiring in the future if required.
Things I would have done different
Looking back, the main addition I think I should have made, would be the addition of a front dormer. This would have delayed the start of the project since planning permission would have been required, and it would have pushed costs up a little (but probably less than £2K). The benefit would have been a better proportioned front bedroom with more headroom.


