Drilling Techniques
If you ever need to drill a technique, here's how.
Workpiece materials
Wood
Many bit types will drill wood successfully.
Standard universal twist drills have poor angles for woodwork, they cut but make an unnecessarily hard job of it. However they are the most common wood drilling bit, as one low cost bit type will drill many different materials.
If you struggle to drill a hole in wood, either the bit is blunt, or wrongly angled, or simply an unsuitable type for wood. Struggling is common with twist drills, as are the causes of it. Switching to a more suitable bit type can transform the wood drilling experience. Sharpening blunt bits can really help. Regrinding them with more aggressive angles can make a hard going hole quick & effortless.
Lip & spur bits, aka brad point or dowel bits, perform rather better in wood than standard HSS twist drills. The point stops bit wandering, the cutting angles are faster, and the outer edge angles cause less damage to the remaining wood.
The fastest lowest energy use bits for wood are steep angled twist drills. These are a few times quicker drilling than lip & spur bits. Its important not to push these bits, they make fast progress without being forced.
Masonry bits are useless on wood, they have no cutting edge.
Augers cut clean holes in wood rapidly and energy efficiently, and are often used for large holes. They are high torque low rotational speed bits, so low power cordless drills can struggle with them (eg 3.6v etc). Low power mains drills are generally ok.
Spade bits aka flat bits are basic low cost low performance bits. They damage the surrounding wood surface, use a lot of electrical energy per hole, and sometimes misbehave. Their main advantage is low cost for large holes. (The other advantage is that they're the easiest type of bit to make, but diyers seldom need to make their own drill bit nowadays.)
See Drill Bits for the many other wood cutting bit types.
Masking tape is often applied to wood before drilling. Marking out is done on the tape, leaving no mark on the wood afterward.
Pilot hole, clearance and countersink can be drilled in one go using a 2 or 3 stage drill bit.
Large hole in wood
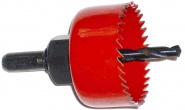
Large holes are generally drilled with a holesaw. Take care to not move the drill alignment while drilling, it can cause a thrown or damaged workpiece, and in some cases wrist injury.
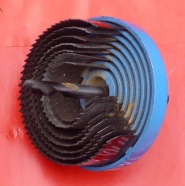
There are 2 main types of holesaw. Stay away from the interchangeable strip type if possible, they're very weak.
Chain drilling is also possible, but slow & messy. Simply drill a ring of small holes & chisel to finish.
Mild Steel
Standard HSS twist drill bits are designed & optimised for drilling steel. Harder bits such as cobalt or titanium coated bits also work, but cost more.
Titanium coated bits have much better life than HSS on steel. They also remain sharp much longer, making the work quicker and easier.
Tables of drilling speeds for steel are available, and the closer to these speeds one uses the less likely problems are to occur.
First use a centre punch to indent where drilling will happen. This stops the bit from wandering. If you don't have one, a nail will do.
Drill a small centre hole all the way through first, then enlarge it to full size with a bigger bit. The reason for this is that standard twist drills have a small relatively blunt section in the centre.
Stainless Steel
Stainless steel is harder to drill than mild steel. HSS bits are not very successful. Cobalt steel bits will drill ss, but don't last long.
See Superhard Drills for other bit options.
Aluminium
Aluminium bonds to HSS bits. This problem can be reduced with a lubricant, such as paraffin.
Titanium coated bits perform much better than HSS with aluminium, as they don't bond to the ali.
Its common to see advice not to use titanium on aluminium, as there is a compatibility problem with an aluminium alloy used on aircraft. However most of us are unlikely to encounter such alloys on DIY tasks, so premature bit failures shouldn't occur when drilling aluminium.
Cast Iron
Glass & Tiles
Only use glass & tile drills. A masonry bit just isn't usable on tiles.
- Apply masking tape to the surface to be drilled, and mark the hole. The tape reduces wander & thus prevents scratching
- Some bits used with tiles need to be pressed into the tile before drilling until a very slight crack is head, some don't
- Drill the tile. But don't try and drill masonry behind it with the tile bit, its necessary to change to a masonry bit for that.
Masonry & Stone
The best option is an SDS drill with a standard SDS masonry bit. SDS delivers far better performance than non-SDS hammer drills, resulting in holes produced in a fraction of the time, and with minimal effort. The holes produced are much cleaner too, with much less surrounding breakup than with more basic hammer drills.
The low budget option is a TCT masonry bit with a drill set to hammer action. Much less hammering force and lots of noise, and good enough for quite a lot of masonry, but not all.
The pauper's option is a drill with no hammer facility plus a TCT masonry bit. Failure to use hammer action causes very short bit life sometimes, and this approach will only drill some masonry.
Rarely is it necessary to drill masonry by hand today, but its possible. See Drill_Bits#Manual_Hammer_Drill
Clearing the hole
Holes in masonry tend to be left with a lot of dust in them after drilling. This blocks some of the hole and reduces the security of wallplug fixings. Its possible to fit wallplugs without clearing the hole, but failures to insert and to fix securely will occur.
Debris may be removed by:
- blowing in the hole - eyes shut!
- hoovering the hole, with the nozzle covering half the hole only
- Use the drill bit to scoope out the dust (slow)
- Put a bendy drinking straw in the hole and blow
- A blower consisting of a rubber bulb with stalk
- bicycle pump with a thin tube
The first 2 will only clear holes of limited depth, the latter 2 are best used for deep holes.
Large masonry hole
Large holes are drilled in 2 ways:
- with a core drill
- drilling a chain of holes & chiselling out
A core drill provides a neat smooth sided hole. Its far faster than chain drilling. The cost of the core drill often rules it out though, and there is a risk of wrist injury if the drill doesn't have a safety clutch and consistent drill alignment isn't maintained at all times. TCT is cheaper than diamond.
Chain drilling is simple, but clearing up the resulting messy hole is time consuming.
Some core drills are designed for use in hammer mode, some aren't. They're mostly used without it.
Reinforced Concrete
Masonry bits will not drill through steel reinforcement, and HSS bits that drill steel will not drill concrete. The solution is a bit designed for both, such as Irwin cordless, Bosch multi-construction, etc.
Butter & Soft Cheeses
3 for £1 long drill bits are suited to these materials. Don't be tempted to try them on anything harder, like toast crusts. People do occasionally have success with them, but mostly the result is dismal failure.
Plastics
Twist drills all work on plastics. HSS or titanium coated are fine. Beware of the tendency to dig in and jam; use low pressure and pull the bit back frequently.
With very shallow holes, eg 2mm sheet material, the jamming problem can be avoided by moving the drill around while drilling. This is a quicker option.
Some clear plastics are brittle and tend to crack when drilled. To minimise the crack risk, use minimum force. Or eliminate the risk entirely by drilling with an abrasive stone in a die grinder. The latter grinds then melts its way through - pull the bit out asap when it penetrates though, as the plastic quickly hardens again.
Melamine
Melamine, aka Formica, suffers badly from surface chipping. See Drilling Techniques#Chipping to avoid this.
Methods
Removing Bits
In nearly all cases a drill bit is best rotated forwards while the drill is pulled out. Augers must be rotated backwards to remove them.
Never waggle the drill from side to side to aid bit removal. This greatly increases friction, making removal much harder. The bending results in many damaged and some ruined drill bits. Damaged bits put greatly increased forces on drill bearings, causing reduced tool life. Damaged bits are much more likely to break in use, sometimes causing hand injuries. Damaged bits also wander badly, drill less well and make misshapen holes.
Drill press
Force applied to the feed lever on a drill press is multiplied several times by the lever effect, so don't be tempted to give it a push to get the job done.
Beware of an insufficiently clamped workpiece, which can spin out under force and hit you.
Vertical Drilling
Discussion of methods to get holes accurately vertical without a drill press
No drill
Ways to drill without a drill bit include:
- Wood can be drilled with a screw. Rotate the screw anticlockwise to drill and apply pressure when possible (can't apply much when initially entering the wood).
- Masonry can be drilled with a chisel. Just rotate the chisel a bit between each hammer blow. Its slow though.
- Thin sheet metal can be drilled by nailing it. Then waggle the nail to loosen it and remove. Holes can be misshapen.
- Wood & metal can also be drilled & screwed in one go by self drilling screws. Very thin sheet metal can be drilled with a plasterboard screw.
- Some materials can be holed with a punch.
Chipping
Chipping of the top entry surface can be more or less eliminated by clamping a piece of wood over it, and drilling through both pieces.
Chipping of the bottom exit surface can be tackled the same way.
Some people just apply masking tape to reduce surface chipping. Reports on effectiveness are mixed.
Type of drill bit much affects top surface damage too. Augers are relatively clean cutting, flat bits are some of the worst.
Reamer
If you need a hole in metal that's a precise size, and/or smooth sided, drill it about 0.2mm undersize, then finish it off with a reamer. The exact undersize to use varies from one reamer to another.
Plug cutter
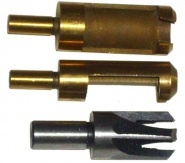
Plug cutters remove a slug of wood that's then used to plug a hole, most often to cover a screw head. The result is barely visible.
- You need a drill press to use a plug cutter
- The size of plug cutter and size of drill bit used to make the original hole are different, not the same
- Some plug cutters currently on the market just don't work.
- Some need sharpening before use


