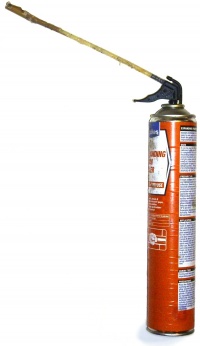
Expanding foam
Uses
- Fills gaps between sheets of rigid insulation, to make the whole layer draughtproof & insulating
- Fitting windows
- Fills holes where pipes go through walls
- cement mortar is a more traditional option
- Foam accomodates small amounts of movement
- Insulates awkward to reach small spaces
Types
Open cell versus closed cell, aka half pound & 2 pound foams
- Closed cell has more resistance to passage of moisture, insulates more, and is stronger & denser
Some foams expand a lot, low expansion foam only expands a little.
Some come in a can with delivery mechanism, some are intended for use with a separate better quality foam gun. After use the gun must be cleaned out with solvent while the foam's still liquid.
Basic foams are flammable, and can produce toxic smoke in a fire. Fire rated foam gives fire resistance time.
Cans can be either Hand Held or Gun Grade. Gun Grade requires a separate application gun, which gives finer control over the rate of delivery
Gotchas
Things can go very wrong with expanding foam... canoe story.
The high level of expansion can catch people out, resulting in spilt wet foam & damage.
Some foams generate very high forces as they expand /after/ solidifying. Misused as cavity insulation it can bring down masonry walls with its expansive force. Don't fill enclosed spaces with expanding foam, it needs expansion space.
The stickiness of the wet foam can be a problem, resulting in it getting spread a lot unintentionally. Pay attention to stray wet foam blobs. Always put a dustsheet or newspaper down.
Set foam is strong enough to hold filler in place, but too weak to support it against cracking later. If significant force will be put on the filler later, allow enough room for a good depth of filler. This can be reduced some by reinforcing the bulk of the filler with any of:
Stories of Woe
Tips
Damping the material its applied onto can help it set faster.
Protect the cured foam from daylight, UV degrades it rapidly.
Set foam has a mess of a finish, but is easily trimmed with a knife.
If a longer delivery tube is needed and nothing's to hand, a short extension can be made with tape, as shown in the pic above. Longer extensions can be made with tube that fits into or over the original delivery tube. Such tubes can be got from some kids' toys - I've used a toy flag and a bubble blowing set before!
When using it to fix boards, squirt a bead of foam all round a few inches in fom the edge, and add a few dabs to support the open space. Let the stuff expand some for a minute or two, then push it on enough to squeeze most of the gas out. There's also a board fixing foam designed to expand less than usual.
An aerosol can of foam cleaner (acetone) cleans up the wet foam easily.
When using a gun, the gun can be left on the can for short periods of disuse but must be taken off and cleaned if left for longer periods. Cans of cleaner designed to fit the guns are available.
Economising
- Use cheaper fillers where insulation isn't needed, such as cement mortar.
- Cut sheet insulation to fit, rather than guesstimating. When possible hold it in position and draw round with a pen to see where to cut. Don't assume room corners are square, they're often not.
- Poke insulation offcuts or scrap expanded polystyrene into any big gaps so less expanding foam's needed. Its easiest to inject some foam then press the pieces in.
- Sometimes gravity can be a pain, with wet foam applications repeatedly falling out of position, wasting foam. Apply parcel tape to partially cover the gap to help it stay in place while wet, then apply the foam behind it.
Cleaning & Removing
Wet foam is sticky, drips a lot, and causes troubles.
Skin
Nothing removes set foam from skin other than determined scratching and peeling. If you ever wondered what waxing feels like, this is your chance to find out. Trouble is it takes lots of small tear-offs, and a lot of scratching, so expect the skin to look red for several days. Its not too evil, but avoidance is only sensible. Get all you can off before it sets! Lightweight gloves are recommended.
Foam can be tackled with vegetable oil if its not cured.
Clothes
Foam is bound to get on clothes... its just how it works. Pick clothes accordingly.
Its tempting to scrape the wet foam off, but don't. This pushes the remaining film of foam into the cloth, making it impossible to remove later. The result is ruined clothes. Remove the clothing and leave the wet foam to set untouched. The whole lot should peel off later leaving a clean result.
Carpet
Same principle applies to carpet, prevent anyone treading on it and let it set. That way you minimise penetration into the pile, and can get the maximum amount of removal in the end.
Hard Surfaces
Wipe the wet foam off, or let set and peel off.
Plastics
Wipe it all off immediately, or it bonds inseparably.
Storage
Shelf life is shortish. Once the can is opened, further storage is optimistic, but sometimes succeeds, especially with separate gun type foams.
Disposal
Left over foam can make fake turds for the kids. Don't move the nozzle while depositing, keep it completely still, and dump the foam onto polythene or newspaper. The can can go in the bin.
See Also
- Filler
- Insulation
- What to do when the foam won't come out - at your own risk!
- Foam & Naughty kids
