Difference between revisions of "Gas pipe sizing"
m (→Introduction: typos, minor reword for clarity) |
m (→Design Data: formatting) |
||
| Line 41: | Line 41: | ||
|Copper | |Copper | ||
| − | |Corrugated | + | |Corrugated |
| − | Stainless | + | Stainless |
| − | |||
Steel | Steel | ||
|PE | |PE | ||
Latest revision as of 15:13, 24 January 2022
Introduction
Pipework in the home is used to deliver gas from the gas meter to each of the your appliances. The manufacturer of each appliance will have specified the maximum rate of gas consumption for the appliance. The pipework must be large enough able to supply this rate of consumption to all the appliances at the same time, without excess pressure drop, for the appliances to work correctly and safely.
This article explains how you can calculate the sizes required, and for example, assess if the existing pipework will be adequate for a new or upgraded appliance.
Design Parameters
Your gas meter and the main gas rate governor, are pre-set to deliver a gas at dynamic pressure of 21 mBar (note the dynamic pressure is the pressure measured when gas is flowing - the static pressure may be a few mBar higher).
Gas appliances in the UK are typically designed to expect an input pressure of 20 mBar. So the pipework should drop no more than 1 mBar between the supply and the point of use.
Flow Resistance
The pressure drop of seen in gas flowing through a pipe will be dictated by:
- The bore of the pipe (usually specified in mm diameter)
- The flow rate of gas in cubic meters / hour
- The effective length of the pipe
Short restrictions in pipe diameter have far less effect on the flow resistance than long runs at the restricted diameter. So it is quite common and acceptable for a high gas rate appliance such as a combi boiler to require a 22mm copper pipe for the majority of its gas feed, and yet the boiler to only have a 15mm inlet connection. Hence the bulk of the pipe run would be 22mm, but then the pipe would reduce to to 15mm for a short section prior to connection to the boiler.
Likewise there may be other cases where the "show work" (i.e. the bit of pipe visible to the customer) is smaller and hence aesthetically more pleasing, than the rest of the pipe. This is typical with gas fires, where the visible connection to the fire from the gas cock, would be in a small bore chrome pipe.
Effective Length
The flow resistance of a pipe will be higher at a point where it changes direction. The easiest way to make an assessment of the higher pressure drops caused by direction changes, is to adjust the effective length of the pipe. The effective length is the actual length of the pipe, with an additional 0.5m added for each 90 degree elbow used, and another 0.3m added for each pipe bend or swept elbow included.
So 2m of pipe with one bend, and two elbows, has an effective length of 3.3m (i.e. 2 + 2 x 0.5 + 0.3)
Total Rate
When checking a pipe design, you will need to assess the total gas rate that needs to be delivered though each section of pipe. Some sections of pipe will likely branch to more than one appliance, so the section of the pipe before the branch will potentially carry the sum total maximum gas rates of all the appliances that follow the branch.
Design Data
This table (taken from BS 6891, "Installation of low pressure gas pipework of up to 35 mm (R1¼) in domestic premises (2nd family gas) — Specification"), contains a typical gas discharge rates for various pipe types and sizes:
| Nominal Pipe size (Ø in mm) | Length of Pipe | ||||||||||
|---|---|---|---|---|---|---|---|---|---|---|---|
| Steel (medium) | Copper | Corrugated
Stainless Steel |
PE | Discharge (cubic meters/hour) | |||||||
| BS 1387 | BS EN 1057 | BS 7838 | BS 7281 | 3m | 6m | 9m | 12m | 15m | 20m | 25m | 30m |
| 6 | 8 | — | — | 0.29 | 0.14 | 0.09 | 0.07 | 0.05 | — | — | — |
| 8 | — | — | — | 0.8 | 0.53 | 0.49 | 0.36 | 0.29 | 0.22 | 0.17 | 0.14 |
| — | 10 | 10 | — | 0.86 | 0.57 | 0.50 | 0.37 | 0.30 | 0.22 | 0.18 | 0.15 |
| 10 | — | — | — | 2.1 | 1.4 | 1.1 | 0.93 | 0.81 | 0.70 | 0.69 | 0.57 |
| — | 12 | 12 | — | 1.5 | 1.0 | 0.85 | 0.82 | 0.69 | 0.52 | 0.41 | 0.34 |
| — | 15 | 15 | — | 2.9 | 1.9 | 1.5 | 1.3 | 1.1 | 0.95 | 0.92 | 0.88 |
| 15 | — | — | — | 4.3 | 2.9 | 2.3 | 2.0 | 1.7 | 1.5 | 1.4 | 1.3 |
| — | — | — | 20 | 4.0 | 2.7 | 2.1 | 1.8 | 1.6 | 1.3 | 1.2 | 1.05 |
| 20 | — | — | 25 | 9.7 | 6.6 | 5.3 | 4.5 | 3.9 | 3.3 | 2.9 | 2.6 |
| — | 22 | 22 | — | 8.7 | 5.8 | 4.6 | 3.9 | 3.4 | 2.9 | 2.5 | 2.3 |
| 25 | — | — | 32 | 18 | 12 | 10 | 8.5 | 7.5 | 6.3 | 5.6 | 5.0 |
| — | 28 | 28 | — | 18 | 12 | 9.4 | 8.0 | 7.0 | 5.9 | 5.2 | 4.7 |
| — | — | 32 | — | 29 | 20 | 15 | 13 | 12 | 10 | 8.5 | 7.6 |
| 32 | 35 | — | — | 32 | 22 | 17 | 15 | 13 | 11 | 9.5 | 8.5 |
Examples
The table can be used to work out what pipe size is required for a given gas rate. So for example a 15mm copper pipe of 6m effective length can supply a maximum rate of 1.9 cu m/h at a 1 mBar drop in pressure. Stepping up to a 22mm pipe, and it can supply that rate (and more - 2.3) at 30m in total effective length.
The table is structured like this, so that in simple cases with only one or two appliances, you can lookup the required pipe sizes quickly and easily without calculation.
Worked Example
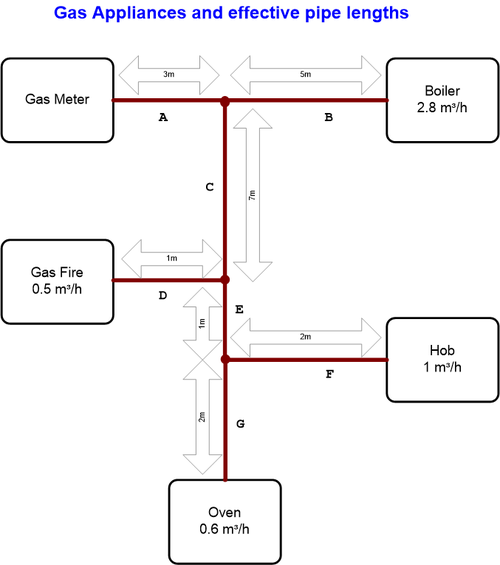
Here is a possible pipe layout as you might find in a home. A bit too complicated to just look up values in the table:
Calculate the gas rates in each pipe section
For each section of pipe, we need add up the total gas rate that may need to be supplied at that point. The manual for the appliance or the ratings plate stuck to it will normally include the gas rate. However you can also calculate the gas rate from other information if its not specified.
Its often easier to work back from the end points of the installation. We can include an educated guess of the pipe size likely to be required at this stage
| Pipe Section | Supplies Sections | Total Gas Rate (m³/h) | Effective Length
of Section (m) |
Estimated copper
pipe size (mm) |
Pressure drop |
|---|---|---|---|---|---|
| G | none | 0.6 | 2 | 15 | TBD |
| F | none | 1.0 | 2 | 15 | TBD |
| E | F, G | 1.6 | 1 | 15 | TBD |
| D | none | 0.5 | 1 | 15 | TBD |
| C | D, E | 2.1 | 7 | 22 | TBD |
| B | none | 2.8 | 5 | 22 | TBD |
| A | B, C | 4.9 | 3 | 22 | TBD |
In this application, the design of Table 1 is less conducive to a quick answer, since it would actually be more useful to simply have single value specified for each pipe that supplied the pressure drop per meter of pipe and cubic meter oh hourly gas flow. However since this is what we have to start with, and this is the process as usually described, we can work from the table with a little bit of massaging of the numbers.
All other things being equal, we can assume that the pressure drop in a pipe is proportional to its length and the rate of gas flow through it. i.e. longer pipes and/or higher rates of gas flow will result in more pressure drop.
So if for example we take pipe section G, and look at Table 1, we can see that a 3m pipe can discharge 2.9 m³/h using the full 1 mBar pressure drop available. So we can work out the actual pressure drop by scaling that 1 mBar by the actual gas rate and pipe length. To do this divide 1 by the length and discharge rates from the table, then multiply by the actual length and actual gas rate and we will get a pressure drop for our section of pipe:
or on your calculator, just type: 1 / 3 / 2.9 x 2 x 0.6 =
Design Iteration 1 - non compliant
So using this approach, we can now work out the pressure drop in each pipe section, and also check the total cumulative drop for each section (its normally easiest to do this in a spreadsheet):
| Pipe Section | Effective Pipe
Length (m) |
Pipe
Diameter (mm) |
Actual Gas
Rate (m³/h) |
Pipe Length
Table 1 (m) |
Discharge Rate
Table 1 (m³/h) |
Actual Pressure
Drop (mBar) |
Appliance, and
pipe route to it |
Total Pressure
Drop (mBar) |
|---|---|---|---|---|---|---|---|---|
| G | 2 | 15 | 0.6 | 3 | 2.9 | 0.14 | Oven: G, E, C, A | 1.24 |
| F | 2 | 15 | 1.0 | 3 | 2.9 | 0.23 | Hob: F, E, C, A | 1.33 |
| E | 1 | 15 | 1.6 | 3 | 2.9 | 0.18 | ||
| D | 1 | 15 | 0.5 | 3 | 2.9 | 0.06 | Fire: D, C, A | 0.98 |
| C | 7 | 22 | 2.1 | 9 | 4.6 | 0.36 | ||
| B | 5 | 22 | 2.8 | 6 | 5.8 | 0.40 | Boiler: B, A | 0.97 |
| A | 3 | 22 | 4.9 | 3 | 8.7 | 0.56 |
We can see a problem here, While the feeds to the Boiler and Gas fire are just inside the 1 mBar limits, the Oven and Hob will be out of spec. So we need to change pipe size(s) somewhere to compensate. Sections of pipe A, and C both feed other sections, and also introduce a fairly large drop due to the high flow rate. If we change those sections to 28mm pipe, and pull the new figures from the table we get:
Design iteration 2 - compliant, but expensive
| Pipe Section | Effective Pipe
Length (m) |
Pipe
Diameter (mm) |
Actual Gas
Rate (m³/h) |
Pipe Length
Table 1 (m) |
Discharge Rate
Table 1 (m³/h) |
Actual Pressure
Drop (mBar) |
Appliance, and
pipe route to it |
Total Pressure
Drop (mBar) |
|---|---|---|---|---|---|---|---|---|
| G | 2 | 15 | 0.6 | 3 | 2.9 | 0.14 | Oven: G, E, C, A | 0.59 |
| F | 2 | 15 | 1.0 | 3 | 2.9 | 0.23 | Hob: F, E, C, A | 0.86 |
| E | 1 | 15 | 1.6 | 3 | 2.9 | 0.18 | ||
| D | 1 | 15 | 0.5 | 3 | 2.9 | 0.06 | Fire: D, C, A | 0.50 |
| C | 7 | 28 | 2.1 | 9 | 9.4 | 0.17 | ||
| B | 5 | 22 | 2.8 | 6 | 5.8 | 0.40 | Boiler: B, A | 0.67 |
| A | 3 | 28 | 4.9 | 3 | 18 | 0.27 |
That is now a compliant design, its also a much more resilient one, that would allow addition of further appliances in the future, or the upgrade of existing appliances to more powerful ones, without the need for (potentially disruptive) pipework changes. However, it uses a fair amount of 28mm copper pipe which is significantly more expensive and also more difficult to work with.
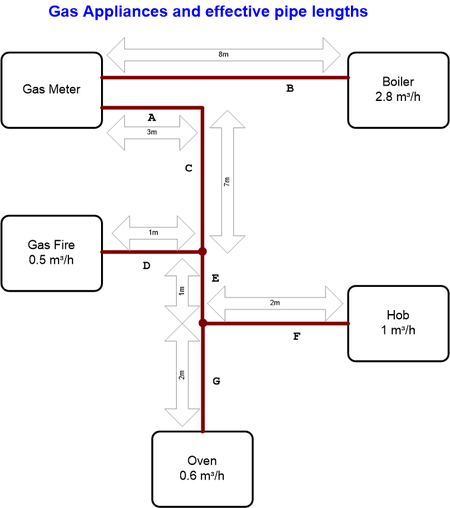
So let's try one more iteration, but with a subtle change to the pipe layout:
Design Iteration 3 - compliant, cheaper
| Pipe Section | Effective Pipe
Length (m) |
Pipe
Diameter (mm) |
Actual Gas
Rate (m³/h) |
Pipe Length
Table 1 (m) |
Discharge Rate
Table 1 (m³/h) |
Actual Pressure
Drop (mBar) |
Appliance, and
pipe route to it |
Total Pressure
Drop (mBar) |
|---|---|---|---|---|---|---|---|---|
| G | 2 | 15 | 0.6 | 3 | 2.9 | 0.14 | Oven: G, E, C, A | 0.56 |
| F | 2 | 22 | 1.0 | 3 | 8.7 | 0.08 | Hob: F, E, C, A | 0.86 |
| E | 1 | 15 | 1.6 | 3 | 2.9 | 0.18 | ||
| D | 1 | 15 | 0.5 | 3 | 2.9 | 0.06 | Fire: D, C, A | 0.65 |
| C | 7 | 22 | 2.1 | 9 | 4.8 | 0.36 | ||
| B | 8 | 22 | 2.8 | 6 | 5.8 | 0.54 | Boiler: B | 0.54 |
| A | 3 | 22 | 2.1 | 3 | 8.7 | 0.24 |
Rather than introduce 10m of expensive 28mm copper pipe, an alternative is to take the boiler's feed (the biggest user of gas) back to the gas meter directly with its own dedicated 22mm copper pipe. The output from the meter being split with a tee just after the meter. That then allows us to revert pipes A, and C to 22mm, since they now only need to carry 2.1 m³/h of gas. If we also swap pipe F to the hob for a 22mm, then we also have a compliant and resilient installation, using no 28mm pipe, 5m of extra 22mm pipe (and 2m less of 15mm).


