Installing a TV aerial
Practical advice on installing a TV aerial.
There are many choices to make in selecting and installing a TV aerial. These choices can make the difference between lousy reception with no digital channels and near perfect reception.
How hard
In theory this does not sound like a difficult task, but it may involve working safely at height. Also note that while some installations are straightforward and can be attempted by any competent DIYer using common sense and some educated guesswork, the more tricky installs present a not insignificant technical challenge, and may require access to special equipment. If you have doubts about your ability to complete the job safely, then its better to call for professional help than risk falling off a roof!
Loft, Rooftop & Set-top
Small set-top aerials vary in performance from poor to useless in most areas. In strong signal locations one may be ok. The advantages are minimal cost, no installation, and portability.
A loft aerial will be quite satisfactory in many cases, but this will not always be so. In practice roof mounting gives a much stronger and better quality signal. However, roof mounting is of course less convenient and more expensive. Outdoor aerials, poles and cables cables also have limited life, so the expense is repeated over time.
A rooftop gives the best vantage point for TV aerials for several reasons:
- Being higher up there's usually less to get in the path of the signal from the transmitter. Even trees will have an effect on signal levels - more so when in full leaf.
- There is no interaction with roofing materials.
- The aerial is further from sources of electrical interference in the house, improving the signal to noise (S/N) ratio
- TV aerials are affected to some degree by metalwork in the loft. Very high gain aerials are especially prone to this.
Aerial position
Aerial position can have a huge impact on the performance of an aerial. In a strong signal area, this may be of little concern, however in poor reception locations, it can make the difference between a good picture and something unwatchable.
Choose the first location in this list you can use. Each step down the list results in further loss of quality that can not be made up for in any way.
- Use a rooftop aerial whenever possible
- Loft aerial is 2nd best
- A medium gain indoor aerial mounted as high up as possible
- Set-top aerials are a last resort.
As an example of how much difference aerial location can make, here is an example of someone finding a 15-21dB difference between loft and roof mount.
About Aerials
CAI Approval
Many low cost "contract" grade aerials and related equipment lack features which, while not always necessary for good analogue reception, are important for good quality digital reception. CAI approved equipment meets the necessary requirements.
If in doubt when choosing an aerial, look for one which:
- Is CAI approved
- Has a strong construction if you're using it outdoors
- Has a reflector made from several elements and not a simple perforated reflector plate stamped out of a flat sheet of metal.
- Includes a balun to ensure proper matching to the aerial downlead (but log periodic aerials don't require a separate balun).
Wideband aerials
Many aerials currently being sold are wideband. Wideband means it will receive the full range of TV transmission frequencies used in the UK, making them a safe (but not necessarily optimal) choice. Traditionally all the TV transmissions from single transmitter were grouped together in a smaller subset of the available set of frequencies. This enabled the use of more efficient "grouped" aerials for reception. However with the changes being introduced to accommodate the switchover to digital transmission, it has not always been possible to stick rigidly to this plan. As a result there are some areas where a wideband aerial will either be required now (during the transition), or after switchover is complete, to receive all the channels.
There are two different types of wideband aerial you'll encounter. The commonly available Yagi design (this is the traditional TV aerial design) is available in a wide ranges of sizes (and hence gains) and qualities, and the log periodic. The log periodic offers less gain that the yagi aerials but does perform very consistently across the full range of frequencies used for TV transmission in the UK. Hence if you need wideband and are not in a fringe reception area, it is often a good choice.
Grouped aerials
A grouped aerial is a single aerial designed to receive only part of the frequency range used for TV transmission. These perform significantly better within their more limited frequency range (particularly noticeable on the lower frequencies). Hence where wideband is not needed, performance can be improved, or a smaller and cheaper aerial used, by selecting a suitable aerial for the group.
Its necessary to choose a grouped aerial that is the correct group for your local transmitter. All the channels you need to receive can be determined by looking up the channels on which you:
- receive analogue
- receive digital
- will receive digital after the switchover
The aerial you install will need to receive all those frequencies. In many areas this can be done with a grouped aerial, in some it can't.
Gain
Depending on the power of your selected TV transmitter, and how far you are from it (plus the effects of any obstructions etc) the strength of the signal available to you may vary considerably. This means that you need to select an aerial appropriate for the location. A strong signal will only require a modest aerial with a relatively low "gain" figure. Poorer reception areas however require an aerial with more gain. Fringe reception areas require a high gain aerial and some active amplification to get a usable signal.
In its simplest sense, the gain of an aerial is a measure of how much signal it can deliver for a particular strength of transmission where you are. However gain is a complex subject when dealing with TV aerials, since although many catalogues will quote the gain as a single figure (say 12dB), this does not really tell you much, since the gain of any aerial will vary with the actual frequency you want to receive - and the figure quoted will usually be just the peak figure.
Manufacturer's specs aren't always honest, so comparing manufacturer specs can be misleading. Also real life aerial performance varies widely with frequency, so a single dB figure is of limited use. Real aerial performance can be compared using a graph of frequency vs gain for the major types of aerial.
In reality you need to see a detailed graph of the response of the aerial plotted against frequency to make a meaningful comparison of any two aerials. Its not uncommon to find that a big high gain wideband aerial will have a larger gain quoted than a smaller far less elaborate grouped aerial, and yet the grouped aerial will outperform it at the frequencies that are of interest to you.
Have a look at the excellent ATV site to see how real aerials compare.
Lower gain aerials tend to:
- Physically smaller and lighter - and hence produce less wind loading on their mounting masts and fixings
- Be cheaper
- Last longer
High gain aerials tend to:
- Be larger
- Be more expensive
- Are often more fragile
- require more substantial masts, brackets, and fixings etc
- have a narrower angle of acceptance - and hence require better alignment
Very high gain aerials (CAI 1) are used for problem locations, but very high gain aerials can be very large and have all the issues described above as well as being ugly! So ensure all other installation issues are solved before resorting to one of these.
The CAI have some broad categories of aerials to give some guidance:
- CAI 1 are very high gain aerials, and are good for fringe reception areas, but are only suitable for rooftop use. They don't work well in other locations.
- CAI 2 aerials are suitable for most locations
- CAI 3 lower gain aerials are suitable for houses close to the transmitter
Aerial type
There are a few different design types of TV aerial in use, each with their own strengths and weaknesses.
Yagi
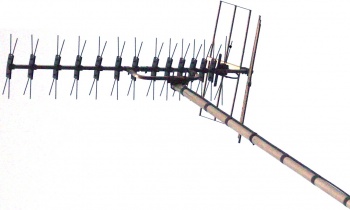
Yagis are the most common TV aerials. They have a long boom with many crossbars and a rear reflector. Advantages include high gain for a given size, and good performance as grouped aerials. A disadvantage can be the gain slopes quite noticeably with frequency, which can make getting similar signal levels from multiple channels difficult.
Log periodic
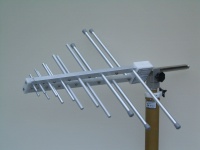
The log periodic looks somewhat like a yagi, but with twin aerial booms placed close together, and a different bar spacing. They are most easily recognised by the lack of the more substantial reflector of the yagi design. Advantages include a very flat wideband response. They have good directionality and interference rejection, and they are also typically smaller than yagi wideband designs. Disadvantages: no grouped aerials - all are wideband, and the maximum gain is lower than with a yagi, which may prove problematic in poorer signal areas.
Halo
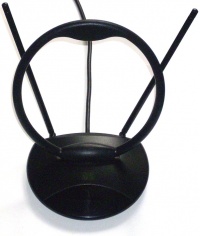
A single metal ring. These are often supplied with portable TVs. They're somewhat directional, small and very cheap, but performance is poor compared to a decent aerial. They can be sufficient for a portable set in strong signal areas.
Practical advice on installing an aerial
First choose your aerial, and suitable cable.
While not optimal, in reasonable signal areas a loft aerial may be fine. If you are unsure it may be worth trying anyway since installing in a loft is safer and easier, and the aerial will probably last indefinitely without being used as a rest stop by every overweight pigeon in the area!
Loft aerials
Tips:
- Keep away from wiring and metalwork where possible.
- Results looking "through" a gable wall may be dramatically different from looking through the tiles or slates.
- Don't choose a position where it will have your eye out every time you climb through the loft hatch!
- Try alternate positions if you're not getting the result you'd like
- If you have a metal roof, a loft aerial won't work
Be prepared to accept that a loft mount may just not be good enough.
Roof Mounting
Roof mounted aerials usually have the best chances of giving satisfactory performance. Aerials mounted on a gable wall or a chimney stack adjacent to a wall are the easiest to install. Mounting on a chimney that is in the middle of a hipped roof can present more of a challenge.
General Guidance:
- Choose appropriate mounting hardware - you generally need a lashing kit for fitting to a chimney, and you will normally need a bracket to hold the mast and provide some standoff to move the mast away from the building or chimney. Buildings with sizeable corbelled sections of brickwork or deep overhangs at the eaves may require longer brackets or a "cranked" mast (one with a double bend in it).
- Galvanised bracketing will last much longer than painted steel.
- Ali masts are light and easy to handle, but choose an appropriate size. 40 - 50mm diameter ones with 1.6mm walls are far stronger than a thin walled inch thick mast.
- Spread the load - with a gable wall fixing, use two brackets (often called T and K brackets) for the larger aerials and space them well out.
- Drill into the centre of the bricks, not the weaker mortar joints.
- Take care near the top of a gable wall - there is little weight of brickwork resting on it, so it is not that strong and you can easily dislodge a brick.
- Pay careful attention to the wind loading of an aerial - big aerials can exert a significant force in a strong wind that can pull out fixings, or snap masts that are too long or thin. In extreme cases you can easily bring down a slender chimney stack with an oversized aerial!
- Use appropriate fixings - ordinary wallplugs and screws may only be acceptable for smaller aerials in more sheltered locations. Bigger aerials may need coach screws and matching plugs or even expanding sleeve anchors.
- Take care when fixing near to the edge or top of brick and block walls to not dislodge bricks when drilling, or to fracture them with expanding fixtures. Remember that the top courses of a gable wall for example have little weight of bricks over them, and hence little strength.
Adjusting position for difficult reception conditions
- If more than one location is available, do a survey at each position to see which is best. The easiest chimney to get to might not offer the best results!
- Height is important - raising an aerial as little as a metre can make a big difference to the signal level (and may be preferable to using a larger aerial). The counterpoint to this advice may be where the problem is cause by tall trees. Using a lower location that can see under the branches may actually help here.
- If line of site is obstructed by a hill, try angling the aerial up slightly, or aiming slight to the side of the hill even if that is not as accurate as straight at it.
- If multipath is a problem (ghosting on analogue), try a more directional aerial, and try different bearings. It may be preferable to switch to a different transmitter if one is available. Try Digital TV. Digital terrestrial receivers are far less bothered by ghosting than analogue ones. (and you may as well get digital working now, since that will be your only choice soon).
Polarization
TV signals are usually broadcast from the main transmitters with horizontal polarization. Hence the TV aerial should be positioned horizontally. Some smaller relay transmitters however use vertical polarisation, and with these, the aerial will need to be rotated through 90 degrees (i.e. with its elements running up and down rather than across) when using these transmitters.
Check the polarisation of the transmitter you're receiving, or just turn the aerial to see which gives better reception.
Splitters, combiners, diplexers
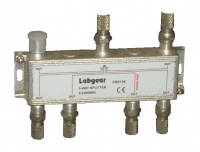
Splitters split the signal from one wire into 2 or more feeds. Simply connecting multiple wires together causes greater reduction of signal, impedance mismatch, and sometimes signal distortion.
Diplexers separate UHF TV signals from VHF or DAB signals sent down the same lead. Avoid using a splitter in place of a diplexer, as these cause an extra 3-4dB loss, often degrading reception.
Combiners combine the output from UHF and VHF aerials, feeding them both down the same lead.
Its best to avoid cheap unscreened plastic diplexers & splitters. These let interference into the aerial system, known for causing picture freezes on digital TV.
Extreme installations
To obtain long distance (DX) TV reception, the following methods can be used to boost reception range. They're not required for standard domestic setups.
Tower mounted aerial
These can achieve long distance line of sight reception, avoiding all obstacles. Generally speaking, increasing aerial height does wonders for signal reception. (Don't attach huge rods to chimney stacks, they act as a lever for the wind load, and will only cause a collapse.)
Phased aerial array
These combine the outputs of multiple aerials for greater output without the addition of noise that an amplifier causes. Designing and implementing them effectively normally requires specialist knowledge and test equipment, without which they tend to fail. Discussion of issues
One specific incarnation resolves several of these issues:
- Use 4 identical aerials
- Arrange them so they're attached to an imaginary flat sheet, and are all set at precisely 90 degrees to that sheet. Any rotation of the array requires that all are moved as one unit, to maintain their alignment with each other.
- Open the covers of the aerials to ensure all are wired the same way round
- If using high gain aerials, space them at least 8 feet apart
- Wire them as follows. Don't wire any one the wrong way round, or the array won't work satisfactorily.
- The wire run from each aerial to the combining point should be exactly the same length, and all kept short.
__________________
      |           |
      A______     A______
      E           E
      |           |
      |           |
      A______     A______
      E           E
______|___________|
Narrow band aerial array
Consists of an array of grouped frequency aerials - each covering a different group, with outputs combined as above. The result is full frequency reception with the better performance of narrow band aerials. This is often seen where it is necessary to combine reception from more than one transmitter in order to receive all the available channels.
Low noise Aerial amplifier
One with the lowest possible noise figure is used to amplify the signal with the minimum of noise introduction. System performance with an amplifier typically is at its best when the amplifier is placed close to the aerial on the mast, rather than close to the TV.
All components should be fully screened to avoid picking up interference, which would degrade the s/n ratio of the weak signal.
Testing
The simplest test is to "suck it and see". If the picture quality is fine, then there is a fair chance you have an adequate solution. You can add a little finesse to the testing process by trying the new aerial with a 6dB attenuator inline with the connection to the TV. Ensuring it still works with this should mean there is a little "headroom" to cope with days where signal reception is not as good generally, and with the slight drop in performance as the system ages. Try all the channels as well.
Test equipment
The simplest test equipment for an aerial installation is a TV. However taking this up onto a roof is another matter.
- A small TV (eg 5") can be very useful here.
- A large TV on the ground can be used. For decent results, if possible also have a camera with telephoto lens, binoculars or similar. Its not as easy to work with as the above, but better than not seeing the picture at all.
- A remote helper watching the TV while in voice contact (via mobile phone if necessary) can work, but its harder than it sounds.
- Signal strength & quality measuring devices work well, and need no tv, but most DIYers don't have access to them.
- Some digital TV set top boxes also have diagnostic capabilities that allow them to report signal strength and signal quality. Search the menus to see what yours has.
More tricky installs can be very frustrating to DIY, because much of the time you are working without adequate information. Alas a multimeter is not going to help here, and a set of professional TV reception test gear could set you back several thousand pounds. Rental may be an option, however there are some intermediate level test gear products that can provide massive assistance without breaking the bank such as Terry from Swires Research.
