Installing multipoint air conditioning
A part-DIY install of a traditional air-conditioning system in an extension.
This was fitted in an isolated off-grid 1-bed cottage (no gas or oil) with random stone solid walls in SW England. The main heating was from an ancient wood-burning back boiler and radiators, but even in the mild climate here, 20 miles from the sea, it was often damp and cold indoors if the stove was out.
Not an ideal property for a heat pump, but I was tired of tending the stove. It has a 2-storey rear extension, bedroom over kitchen, facing south-east. The inner walls were cement rendered with a strong mix, hard, cracked, uneven and ugly. But a lot of sun came through the small window. The two rooms were 2.6m by 3.2m, quite small.
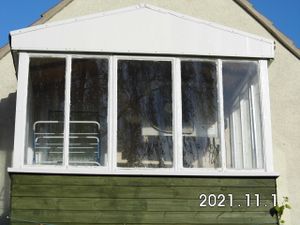
So I went for maximum insulation. 130mm thick in fact in two layers, giving the walls a u-value of 0.19W/m2K. I also cut out the upper window, fitted a door there and hung a balcony outside which I fully glazed in single glass between wood. This gave me a nice observation post, a warm planting space, solar gain and a clothes drying and ironing area too. On many sunny days I can open the door at lunchtime and get a blast of hot air into the upper room. Roof and floor are also heavily insulated.
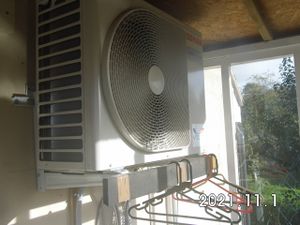
More to the point, it made a split-system multi-point heat pump feasible. I hung the compressor on the back wall inside the balcony, where it extracts afternoon sunlight heat all year round and is unlikely to ever freeze. I ran the refrigerant pipework inside the metal stud I used to dry-line the rooms, then stuffed the cavity with fibre insulation. I hung the two light-weight 2kW heaters directly onto the plasterboard. That was over a year ago and it worked fine over last Winter. Running cost about 50 pence a day rising to 250 pence in cold snaps.
Details
This was a part-DIY project as I had qualified air-conditioning fitters supply and fit the units after I had run all the cables and pipework. It took under two man-days for fitting, a few hundred in labour costs and I get warranty cover and certificates included.
Heat pumps are known as air conditioners in the pacific region, which is where they are mostly used, for cooling. They're relatively new in the UK for heating, mostly used for warehouses, supermarkets and commercial premises. The terminology is new here too. I chose to fit a 5kW japanese compressor unit, wall hung, and two high-level 2kW indoor units. I fitted three actually, the last in the main cottage room although I rarely use that. It's a multi-point system. They come as 1:1 (called a through-wall) or 1:3 (my version) or larger ones that self-stand in gardens. The 3-point can be wall-hung, so that's why I have a third heater, I saw no point in just blocking off the 3rd pipe outlet. This is a "split" system, meaning the refigerant runs into the building. There are also systems in which it doesn't called "monobloc".
Each indoor unit needs 3 pipes and a 4-core cable connecting it to the outside compressor unit. The gas pipes are mallable copper, bought in coils. My small system needed 1/4 and 3/8 inch piping (metric water pipes can't be used) and joins cannot be made with solder, they must be braised. That's not a DIY skill. It follows that I planned to run the copper without joins. The last pipe is the condensate drain. I used 21.5mm overflow PVC.
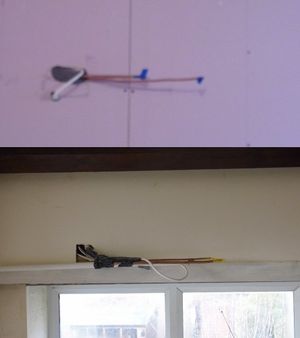
There's not much room inside the indoor units for pipework. I brought the pipes obliquely sideways through the plasterboard, close together, at a distance of 380mm below the ceiling, on the left of the unit template, with 200mm stubs angled to the right. The cable tail needed to be 1.0m as it connects on the right side of the unit. The fitter had only a narrow duct along the bottom of the unit for making the connections and I left the exact placement on the wall to him.
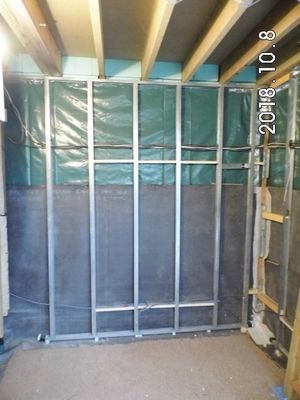
Running continuous tube through metal 50mm stud takes a bit of thought. You can't bend more than about 150mm radius, so a corner has to be two opposing bends, horizontal to vertical, then the reverse. So a corner turn means a drop of 300mm or more in levels. Studs have service holes every 600mm so that's what I bent to fit. That meant my upper heater's pipes, which were roughly on the same level as the outdoor unit on the balcony, did two corners - one drop of 600 and then a rise again. Actually threading the pipes I did before fixing the studs properly because they can be slid along the U-channel like a curtain while I bend the curves and feed the pipe ends through each stud-hole. Once the pipes were in place, I added the electrical services and insulation mat before screwing over the fireline plaster-board. The pipes run at 55 degrees, so I kept the cables away from them.
On the balcony, I hung a standard air-con wall bracket, fitted an isolator rotary switch, specified as within 1.0m of the compressor, and ran a 2.5mm TWE cable back to a 16A MCB at the consumer unit. I slipped some 9mm-wall pipe insulation over the pipe stubs, then left the rest to the fitter. The 5kW compressor is adequate for the two rooms I mostly use, kitchen and study/office above. I never need to have all three 2kW heaters run at the same time anyway, this is a one-person cottage.
Each indoor unit is 720 wide, 300 high and comes with a simple remote control, like a TV. It took me a while to understand how the rig works: The first unit you turn on dictates the mode for other units for the session. Start-up delay is a minute or more, the outside unit has a defrosting rest every half-hour or so, there's an automatic mode which can negate your commands (which I now avoid), et.cetera. I'll be using heating mode only, I expect: with so much insulation the summer heat outdoors will not intrude unless I let it. The balcony has windows, but I rarely needed to open them in Summer 2021.
Noise is no problem, I hardly notice the fans. I hope that doesn't change as the units age.
Grumbles
I don't like all the condensate drain pipes which I never use. I had to fit them, as there is no heat-only model made by the major manufacturers, which is a pity. But the UK isn't their main market.
I was intending to use the dehumidify mode too, but this isn't Japan. My rooms never get hot enough for it to function. The minimum temperature the unit will deliver is 17 degrees and if the room is only 19-20 then it can't really extract moisture. A normal pacific room is 24 degrees plus. I'm not used to rooms over 21 because I've always live in the UK climate.
The lack of a pre-warming timer is a slight niggle. I'd like to give the kitchen a morning boost before I get up. Not possible with the hand-held controllers, they only have an off-delay timer. Took me ages to realise it's because you can walk around and use the remote on several units but they don't store the commands. For a time function I should have fitted fixed wire controllers under each heater, which would have meant more expense and extra wiring. So I have to wait 5 mins or blast the room with a fan heater for a minute when I enter. With the good insulation, it warms up very quickly, luckily.


