Difference between revisions of "Overhead rail goods lift"
(→Hook repair: m) |
m (m) |
||
| (4 intermediate revisions by the same user not shown) | |||
| Line 1: | Line 1: | ||
| − | [[image: | + | [[image:Goods_lift_3.gif]] |
This is a design for a '''Goods Lift''' that occupies no floor space, is quick to construct, and costs very little. It uses an overhead rail and no goods cage, with goods being carried on a rope. The rope is fitted with hooks, and on these may be hung the goods to be lifted, or a sling or heavy duty bag. The lift mechanism fits overhead in a standard domestic stairwell. | This is a design for a '''Goods Lift''' that occupies no floor space, is quick to construct, and costs very little. It uses an overhead rail and no goods cage, with goods being carried on a rope. The rope is fitted with hooks, and on these may be hung the goods to be lifted, or a sling or heavy duty bag. The lift mechanism fits overhead in a standard domestic stairwell. | ||
| Line 9: | Line 9: | ||
[[image:Hilka hoist, lip 4266-3.jpg|right|250px]] | [[image:Hilka hoist, lip 4266-3.jpg|right|250px]] | ||
| − | The hoist is a standard 125kg electric hoist, and is fixed to the wall. | + | The hoist is a standard 125kg electric hoist, and is fixed to the [[wall]]. |
==Hoist Fixing== | ==Hoist Fixing== | ||
| − | Many hoists have M8 threaded sockets and can be fixed to the wall with M8 rod threaded throuh holes | + | Many hoists have M8 threaded sockets and can be fixed to the wall with M8 rod threaded throuh holes [[drill]]ed in the wall. For exterior walls the rods could be [[Adhesive|resin]] fixed into the wall. |
However such a basic setup makes for a noisy installation, and [[:Category:Noise|noise reduction]] is needed if its to be used more than just occasionally. | However such a basic setup makes for a noisy installation, and [[:Category:Noise|noise reduction]] is needed if its to be used more than just occasionally. | ||
| Line 18: | Line 18: | ||
[[image:Hoist wall fixing 2740-5.jpg|right|80px]] | [[image:Hoist wall fixing 2740-5.jpg|right|80px]] | ||
| − | To decouple hoist from wall the following are mounted on the threaded rod in order: hoist, 3/4" tap washer, wall, 3/4" tap washer, penny washer, [[nuts|locknut]]. The hole in the wall is lined with soft flexible plastic tubing to decouple the threaded rod from the wall. | + | To decouple hoist from wall the following are mounted on the threaded rod in order: hoist, 3/4" tap washer, wall, 3/4" tap washer, penny washer, [[nuts|locknut]]. The hole in the wall is drilled oversize and lined with soft flexible plastic tubing to decouple the threaded rod from the wall. |
| − | The 3/4" tap washers are drilled to produce a larger centre hole, enabling them to fit onto M8 rod. To do this the washer is held still by sandwiching it between a piece of wood underneath and a [[Drill Bits|predrilled]] piece on top (with a larger hole). | + | The 3/4" tap washers are drilled to produce a larger centre hole, enabling them to fit onto M8 rod. To do this the washer is held still by sandwiching it between a piece of wood underneath and a [[Drill Bits|predrilled]] piece of wood on top (with a larger hole). It's quicker to just stand on the wood pieces than to [[Clamps|clamp]] it all up. |
| Line 28: | Line 28: | ||
Hoists may have automatic endstop devices that can interfere with their use in this position. Electric hoists are mostly designed for vertical lifting rather than lifting at an angle to the horizontal. There are 3 ways to resolve this: | Hoists may have automatic endstop devices that can interfere with their use in this position. Electric hoists are mostly designed for vertical lifting rather than lifting at an angle to the horizontal. There are 3 ways to resolve this: | ||
| − | # Modify the mounting of the autostop sensor ring so that the lifting wire passes through it without fouling. | + | # Modify the mounting of the autostop sensor ring so that the lifting [[iron wire|wire]] passes through it without fouling. |
| − | # Mount the hoist at an angle to the wall, using a wood spacer behind the upper fixings, and wall holes drilled at the necessary angle for the threaded rods. | + | # Mount the hoist at an angle to the wall, using a [[wood]] spacer behind the upper fixings, and wall holes drilled at the necessary angle for the threaded rods. |
| − | # Remove the autostop device and make a manual power switch available. For this to be safe there must be a physical stop device that prevents the lifting hook from being pulled round the lifting drum, plus a suitable [[fuse]] used which will rupture if the motor is persistently stalled. | + | # Remove the autostop device and make a manual power switch available. For this to be [[safe]] there must be a physical stop device that prevents the lifting hook from being pulled round the lifting drum, plus a suitable [[fuse]] used which will rupture if the [[motor]] is persistently stalled. |
==Rail== | ==Rail== | ||
[[image:Overhead rail end 2648-6.jpg|right|200px]] | [[image:Overhead rail end 2648-6.jpg|right|200px]] | ||
| − | The rail is mounted above head height parallel to the stairs. [[Timber basics|2x4 PAR]] is good for 100kg loads, and is fixed at each end using coach [[screw]]s. The rail must be free of cracks. Much longer than usual | + | The rail is mounted above head height parallel to the stairs. [[Timber basics|2x4 PAR]] is good for 100kg loads, and is fixed at each end using coach [[screw]]s. The rail must be free of cracks. Much longer than usual lengths would require larger timber. |
Smaller timber is unsuitable, as not enough wood remains above the coach screws. | Smaller timber is unsuitable, as not enough wood remains above the coach screws. | ||
| − | 3 [[screws]] are used at each end of the rail to give redundancy, as a safeguard against fixing failure. Large load spreading washers are used. | + | 3 [[screws]] are used at each end of the rail to give redundancy, as a safeguard against [[fixing]] failure. Large load spreading washers are used. |
| − | The rail should extend upward a foot beyond the edge of the upper floor, as the trolley can | + | The rail should extend upward a foot beyond the edge of the upper [[floor]], as the trolley can't reach the end of the rail, and the load may trail a little behind the trolley. The rail also extends a little beyond the bottom of the stairs as the rope can't travel to the rail end. |
| − | The rail is spaced away from the wall using a small piece of wood behind the rail at each fixing point. Matching spacers can be cut off the rail end, or smaller timber used. | + | The rail is spaced away from the [[wall]] using a small piece of wood behind the rail at each fixing point. Matching spacers can be cut off the rail end, or smaller timber used. |
The 4 long corners of the rail are routed round or planed to 45 degrees like so: | The 4 long corners of the rail are routed round or planed to 45 degrees like so: | ||
| Line 60: | Line 60: | ||
In low strength walls, sufficient pullout strength may need to be tested. [[Adhesive|Resin]] fixing is the strongest option, if needed. | In low strength walls, sufficient pullout strength may need to be tested. [[Adhesive|Resin]] fixing is the strongest option, if needed. | ||
| − | + | It's also possible to use a heavy duty sliding [[door]] mechanism as an alternative to the rail & trolley, but they don't look as nice and cost more. Light rail mechanisms for cupboard doors are unsuitable. | |
The rail is fitted to the wall parallel to the stairs. | The rail is fitted to the wall parallel to the stairs. | ||
| − | For rails fitted at steeper than 45 degrees, load rating | + | For rails fitted at steeper than 45 degrees, load rating is reduced non-proportionally. See Load Rating section for details. |
| − | The rail and the trolley are polished with silicone furniture polish to minimise friction. | + | The rail and the trolley are polished with silicone [[furniture]] polish to minimise friction. |
==Trolley== | ==Trolley== | ||
[[image:Hoist trolley 2744-3.jpg|right|200px]] | [[image:Hoist trolley 2744-3.jpg|right|200px]] | ||
| − | The trolley is a small sliding piece that rides on top of the rail. When the hoist is above the line of the rail, the hoist cable is attached to the top or the front edge of the trolley. When the hoist is below the line of the rail, the goods [[Roll Materials#Rope|rope]] is looped under the trolley and the | + | The trolley is a small sliding piece that rides on top of the rail. When the hoist is above the line of the rail, the hoist cable is attached to the top or the front edge of the trolley. When the hoist is below the line of the rail, the goods [[Roll Materials#Rope|rope]] is looped under the trolley and the lifting cable attached to it. The latter case requires a bottom to the trolley to prevent its sides being squeezed against the rail. The rope loop must be long enough to not jam when pulled by the cable. |
The trolley is a U or O shaped wood or metal collar. If metal it has its edges bent outward slightly to avoid catching on the wood. It may be possible to make one from a joist hanger. | The trolley is a U or O shaped wood or metal collar. If metal it has its edges bent outward slightly to avoid catching on the wood. It may be possible to make one from a joist hanger. | ||
| Line 77: | Line 77: | ||
The goods lifting [[Roll Materials#Rope|rope]] loops over the trolley and is attached to it. The rope is attached at the bottom of the trolley's sides so that the weight being lifted prevents the trolley from tipping over. Rope may be attached to a wooden trolley by screwing through the rope with a couple of 3mm x 1" [[screws]] with washers. Rope is attached to a metal trolley using heavy duty cable ties, 2mm [[iron Wire]], or crimp fittings. | The goods lifting [[Roll Materials#Rope|rope]] loops over the trolley and is attached to it. The rope is attached at the bottom of the trolley's sides so that the weight being lifted prevents the trolley from tipping over. Rope may be attached to a wooden trolley by screwing through the rope with a couple of 3mm x 1" [[screws]] with washers. Rope is attached to a metal trolley using heavy duty cable ties, 2mm [[iron Wire]], or crimp fittings. | ||
| − | For testing, a temporary wooden trolley can be used. This is simply a small block of wood riding on the top of the rail with the lifting [[Roll Materials#Rope|rope]] attached to its top. This is not a permanent trolley as | + | For testing, a temporary wooden trolley can be used, as shown. This is simply a small block of wood riding on the top of the rail with the lifting [[Roll Materials#Rope|rope]] attached to its top. This is not a permanent trolley as it has no sides, and: |
| − | |||
* it can fall off | * it can fall off | ||
| + | * the rope would rub on the rail & eventually break. | ||
==Rope== | ==Rope== | ||
[[image:Rope with hooks 2708-4.jpg|right|200px]] | [[image:Rope with hooks 2708-4.jpg|right|200px]] | ||
| − | Like everything else, the [[Roll Materials#Rope|rope]] should be rated to well above 100kg. Since it can experience jerkiness under full load it should be rated to several times 100kg. Unrated rope can be tested. Sash cord has the advantage of a rounder profile, | + | Like everything else, the [[Roll Materials#Rope|rope]] should be rated to well above 100kg. Since it can experience jerkiness under full load it should be rated to several times 100kg. Unrated rope can be tested. Sash cord has the advantage of a rounder profile than typical twisted rope, and looks better in a domestic setting. The few brands used have all proven upto the job. |
S hooks are tied to the bottom ends of the [[Roll Materials#Rope|rope]], and the load is hung on these. Butcher's hooks are not suitable, they're too sharp & thin. | S hooks are tied to the bottom ends of the [[Roll Materials#Rope|rope]], and the load is hung on these. Butcher's hooks are not suitable, they're too sharp & thin. | ||
Rope ends can be kept neat & prevented from fraying: | Rope ends can be kept neat & prevented from fraying: | ||
| − | * Synthetic plastic fibre rope: hold the rope end in pliers with half an inch poking out, and apply a lighter to melt the end into a blob. The flame should not touch the rope, or burning occurs. Release in 20 seconds or so once the [[plastic]] sets, | + | * Synthetic [[plastic]] fibre rope: hold the rope end in pliers with half an inch poking out, and apply a lighter to melt the end into a blob. The flame should not touch the rope, or [[fire|burning]] occurs. Release in 20 seconds or so once the [[plastic]] sets, |
| − | * Natural fibre rope: apply [[Adhesive|pva]] to the cut end, and leave the end to dry while in locking pliers. | + | * Natural fibre rope: apply [[Adhesive|pva]] to the cut end, and leave the end to dry while in [[tools|locking pliers]]. |
| + | |||
| + | Rope assemblies can go in a washing machine when needed. It's best to include them in a full load to minimise the S hooks hitting the [[glass]]. | ||
| + | |||
==Maintenance== | ==Maintenance== | ||
| Line 97: | Line 100: | ||
Any type of lift should be inspected periodically. There are no failsafe mechanisms, so a broken [[Roll Materials#Rope|rope]] would result in dropped goods. | Any type of lift should be inspected periodically. There are no failsafe mechanisms, so a broken [[Roll Materials#Rope|rope]] would result in dropped goods. | ||
| − | Check for visible damage, including worn [[Roll Materials#Rope|rope]], loose rope knots, damaged lift wire, or loose hoist fixings. The parts most liable to damage are the rope and lifting wire. | + | Check for visible damage, including worn [[Roll Materials#Rope|rope]], loose rope knots, damaged lift wire, or loose hoist fixings. The parts most liable to damage are the rope and lifting wire. Hoist cover boxes are also prone to coming loose due to the vibration, and are best checked annually. |
| + | |||
==Safety== | ==Safety== | ||
[[image:8 pin plug socket 2730-3.jpg|right|200px]] | [[image:8 pin plug socket 2730-3.jpg|right|200px]] | ||
| − | The fact that these are only used for goods avoids many safety issues, but the lack of backup support | + | The fact that these are only used for goods avoids many [[safety]] issues, but the lack of any backup support system means that dropping of the load is possible if a fault occurs. Consequently the user should not walk under or below the load when in use, nor permit others to do so. |
| − | Although physically able to lift people, the design does not meet the safety and legal requirements for doing so. In situations where kids are liable to play with it, it should be fitted with some way to prevent use. Options include a key operated switch, or a removable control switch lead or power lead, preferably using an obscure connector, such as shown above. | + | Although physically able to lift people, the design does not meet the safety and legal requirements for doing so. In situations where kids are liable to play with it, it should be fitted with some way to prevent use. Options include a key operated switch, or a removable control switch [[Flex|lead]] or power lead, preferably using an obscure connector, such as shown above. |
Rope knot failure due to poor knot technique is possible, and knots should be checked and load tested before the machine is put into service. | Rope knot failure due to poor knot technique is possible, and knots should be checked and load tested before the machine is put into service. | ||
| − | The hoist's lifting | + | The hoist's lifting cable should be attached to the goods [[Roll Materials#Rope|rope]] as well as the trolley. This way, a trolley failure won't cause dropped goods. |
The risks involved with light goods lifts are tiny compared to passenger lifts, but in any DIY activity there is always scope to go wrong and end up causing injury. Falling or uncontrolled loads can cause injury, and only you are responsible for the results of your actions. | The risks involved with light goods lifts are tiny compared to passenger lifts, but in any DIY activity there is always scope to go wrong and end up causing injury. Falling or uncontrolled loads can cause injury, and only you are responsible for the results of your actions. | ||
| Line 120: | Line 124: | ||
A 125kg hoist with the above design gives a 100kg load rating. | A 125kg hoist with the above design gives a 100kg load rating. | ||
| − | For any given load rating, all load carrying elements must meet the rating, including hooks, [[Roll Materials#Rope|rope]], rail, hoist, and rail & hoist fixings. Some of these parts see higher forces than the load weight due to friction or forces acting in more than one direction, and these will need to handle above the system load rating. All items also need a large load safety margin. Note | + | For any given load rating, all load carrying elements must meet the rating, including hooks, [[Roll Materials#Rope|rope]], rail, hoist, and rail & hoist fixings. Some of these parts see higher forces than the load weight due to friction or forces acting in more than one direction, and these will need to handle above the system load rating. All items also need a large load safety margin. Note this refers to survival rather than ability to lift, so the hoist need only be rated to 125kg lifting capacity in order to carry 100kg. (A 125kg hoist can survive load forces of several times its lifting ability.) |
Hoists require a higher load lifting rating than the load to be lifted, since they have to overcome trolley friction as well as lift the goods. A 125kg hoist can lift 100kg with rail angles of 45° or less. | Hoists require a higher load lifting rating than the load to be lifted, since they have to overcome trolley friction as well as lift the goods. A 125kg hoist can lift 100kg with rail angles of 45° or less. | ||
| − | For rails fitted at steeper angles than 45° from the horizontal, load multiplication and increased friction occur, and the system load rating becomes significantly less than the load rating of each individual component. | + | For rails fitted at steeper angles than 45° from the horizontal, load multiplication and increased friction occur, and the system load rating becomes significantly less than the load rating of each individual component. If used with very steep stairs, such as alternating tread space savers, the hoist cable should not be too far from parallel with the rail, the cable pulling horizontally would not work. |
Don't overlook the carrying capacity of the wall itself. [[Wall Materials#Strawboard|Strawboard]] walls are inadequate for these systems. [[Partition Wall|Timber stud walls]] must be reasonably well constructed to be strong enough, occasionally they're not. If in doubt the goods lift can be briefly tested with double the desired load rating, while keeping a safe distance - but be prepared to fix a large hole. | Don't overlook the carrying capacity of the wall itself. [[Wall Materials#Strawboard|Strawboard]] walls are inadequate for these systems. [[Partition Wall|Timber stud walls]] must be reasonably well constructed to be strong enough, occasionally they're not. If in doubt the goods lift can be briefly tested with double the desired load rating, while keeping a safe distance - but be prepared to fix a large hole. | ||
| Line 130: | Line 134: | ||
==Noise== | ==Noise== | ||
| − | Many electric hoists are very noisy in use | + | Many electric hoists are very noisy in use. This is greatly improved for domestic use with a little [[:Category:Noise|noiseproofing]]. |
Ways to address this include: | Ways to address this include: | ||
| − | # pick a quiet hoist | + | # pick a quiet hoist (when practical) |
# Decouple hoist from wall with rubber washers & tubing | # Decouple hoist from wall with rubber washers & tubing | ||
# enclose hoist in a damped box | # enclose hoist in a damped box | ||
| Line 142: | Line 146: | ||
[[image:Hoist box construction 4269-3.jpg|thumb|Box construction]] | [[image:Hoist box construction 4269-3.jpg|thumb|Box construction]] | ||
| − | Since 1/2" [[sheet Materials]] are so common, a suitable box may be made from 1/2" sheet, | + | Since 1/2" [[sheet Materials]] are so common, a suitable box may be made from 1/2" sheet, with a second layer of 1/2" sheet [[Adhesive|glued]] on to give more rigidity. |
| − | The box is then lined inside and out with damping materials. [[Carpet]] offcuts are | + | The box is then lined inside and out with damping materials. [[Carpet]] offcuts are an often readily available lining, though they're not ideal. 2 carpet layers internally give more damping. Carpet is best [[Adhesive|glued]] in place. |
The box interior is sized to give 2" clearance from the hoist all round. A slot in the front is needed for the steel lifting [[cable]]. This slot lines up with the centre of the hoist's cable drum. The slot is 2mm wider than the cable, and long enough to accommodate the cable at each end of its run (top & bottom of rail). [[Carpet]] covers this slot inside and out to maintain [[:Category:Noise|noise reduction]]: the carpet is slit but not cut away. | The box interior is sized to give 2" clearance from the hoist all round. A slot in the front is needed for the steel lifting [[cable]]. This slot lines up with the centre of the hoist's cable drum. The slot is 2mm wider than the cable, and long enough to accommodate the cable at each end of its run (top & bottom of rail). [[Carpet]] covers this slot inside and out to maintain [[:Category:Noise|noise reduction]]: the carpet is slit but not cut away. | ||
| − | External finish is your call. An easy option is to line the box with [[carpet]], which gives | + | External finish is your call. An easy option is to line the box with [[carpet]], which gives a little extra sound filtering as well. This is easy to fit and completely hides the wood box, making it possible to use any [[Sheet Materials]] to hand without any attempt at neat cabinet making. When the box will be carpeted, the 2nd layer of sheet material attached to the box is made slightly smaller than the box all round. This gives rounded corners to the external carpet. |
| + | |||
| + | A continuous lip of thin wood is [[Adhesive|glued]] to the wall just inside where the wooden box sits, using high grab [[adhesive]] (such as no more nails or similar) and about 5mm wide x 1/2" split wood strips. This is part of the noise reduction system, and blocks the direct sound path from inside to outside the box. These are fitted with a quarter inch gap between the strips and the box. This makes it easy to fit the box, and creates a [[Fan noise reduction|noise reducing serpentine sound path]] from interior to exterior. To position the strips, the box is held in place and drawn round with pencil. The strips can then be attached the right distance in from the pencil line. | ||
| − | + | The box can be fixed to the wall with 4 small [[Brackets|corner braces]]. The [[carpet]]ed exterior hides these. Drill all fixing holes deeper than usual, the hoist puts a lot of force on the box and can pull fixings out otherwise. | |
| − | |||
==Boxless hoist== | ==Boxless hoist== | ||
| − | Where absence of a visible box is required, the hoist box can often be mounted in the attic, the [[cable]] passing through a small slot in the ceiling. The slot must be steel lined, as cable fraying would quickly saw through [[wood]] & [[Sheet Materials|plasterboard]]. The hoist should preferably still be boxed to quieten it. | + | Where absence of a visible box is required, the hoist box can often be mounted in the attic, the [[cable]] passing through a small slot in the [[ceiling]]. The slot must be [[Metal|steel]] lined, as cable fraying would quickly [[saw]] through [[wood]] & [[Sheet Materials|plasterboard]]. The hoist should preferably still be boxed to quieten it. |
| + | |||
==Repair== | ==Repair== | ||
| Line 162: | Line 168: | ||
[[image:Hoist cable damage, strands missing 5994-2.jpg|right|250px|Damaged lifting cable]] | [[image:Hoist cable damage, strands missing 5994-2.jpg|right|250px|Damaged lifting cable]] | ||
| − | With time and use, strands of the lifting cable break, creating sharp spikes and reducing maximum load carrying ability. Eventually the drum of cable | + | With time and use, strands of the lifting cable break, creating sharp spikes and reducing maximum load carrying ability. Eventually the drum of cable can become a tangled jammed mess, and the cable must be renewed. Trying to just remove broken strands is pointless, once some break more soon follow. |
Another option often practical is to cut off the damaged cable and use the remaining good cable on the hoist drum. This works when less than half the cable is unwound in use. | Another option often practical is to cut off the damaged cable and use the remaining good cable on the hoist drum. This works when less than half the cable is unwound in use. | ||
| Line 170: | Line 176: | ||
[[image:Hoist cable refixed to hook 5995-3.jpg|right|125px|New cable attached to hook]] | [[image:Hoist cable refixed to hook 5995-3.jpg|right|125px|New cable attached to hook]] | ||
| − | No [[tools]] able to make a solid crimp (at the hook end) were available, so 2mm [[iron wire]] was used to create a wound crimp. The wire was wound round the cables using locking pliers and waterpump pliers - | + | No [[tools]] able to make a solid crimp (at the hook end) were available, so 2mm [[iron wire]] was used to create a wound crimp. The 2mm wire was wound round the cables using locking pliers and waterpump pliers - it's awkward getting it to sit tight against the steel cable, and getting each turn to sit neatly against the one before, but the time must be taken to do this for it to work. Make sure the cut ends are flattened down, not left sticking out. Once the wire wrap is complete, a club [[hammer]] is used to flatten the iron wire onto the steel cable, crimping the cables together. It needs to be hit hard, and the joint must rest on something much more solid than [[wood]] or [[plaster]], such as a lump of iron. When a bit of visible flattening was seen, the hook was load tested to ensure the cable joint was secure. |
[[image:Hoist cable fixing covered 5996-3.jpg|right|220px|Job done]] | [[image:Hoist cable fixing covered 5996-3.jpg|right|220px|Job done]] | ||
The red stop buffer slides over the cable joint to cover it, as shown on the right. If you want to hide the joint totally, [[silicone]] can be used to glue the buffer in place. If doing this, slide a washer onto the cable earlier to make [[Adhesive|gluing]] easy and neat. | The red stop buffer slides over the cable joint to cover it, as shown on the right. If you want to hide the joint totally, [[silicone]] can be used to glue the buffer in place. If doing this, slide a washer onto the cable earlier to make [[Adhesive|gluing]] easy and neat. | ||
| + | |||
| + | |||
| + | ===Switch repair=== | ||
| + | The rocker switches usually used on these hoists can fail in time. They're easy enough to replace, if you find a supply of the right type of replacement switch (typically 2 pole 2 way momentary rocker switch with centre off). These switches are held in by 2 tabs on the rear, press them together to release it. Just be sure to note which connectors go on where! | ||
| + | |||
| + | It's also possible to open a switch up and rub or file the contacts [[clean]]. Remove the switch first. The switch's rocker has 2 tabs either side of the centre that it pivots on, these also hold it in place. The outer casing is simply bent out on one side to release the rocker. Then blackened electrical contacts are cleaned up with some very fine sandpaper and the switch reassembled and refitted. | ||
| Line 180: | Line 192: | ||
One hoist had a habit of letting go of the rope put through the hook. The hook's sprung latch was pressed hard into the hook tip to dent the latch's flat surface, and the latch edges straightened up with pliers. No more dropped loads. | One hoist had a habit of letting go of the rope put through the hook. The hook's sprung latch was pressed hard into the hook tip to dent the latch's flat surface, and the latch edges straightened up with pliers. No more dropped loads. | ||
| − | |||
| − | |||
| − | |||
| − | |||
==Supplies== | ==Supplies== | ||
| Line 199: | Line 207: | ||
* [[Special:Allpages|Wiki Contents]] | * [[Special:Allpages|Wiki Contents]] | ||
* [[Special:Categories|Wiki Subject Categories]] | * [[Special:Categories|Wiki Subject Categories]] | ||
| − | + | * [http://www.toolstation.com/shop/p50350 wire rope] supplier | |
[[Category:Appliances]] | [[Category:Appliances]] | ||
[[Category:Projects]] | [[Category:Projects]] | ||
Latest revision as of 14:33, 17 October 2017
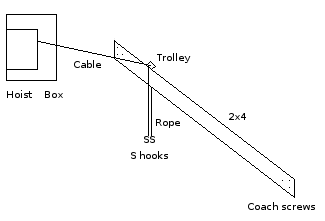
This is a design for a Goods Lift that occupies no floor space, is quick to construct, and costs very little. It uses an overhead rail and no goods cage, with goods being carried on a rope. The rope is fitted with hooks, and on these may be hung the goods to be lifted, or a sling or heavy duty bag. The lift mechanism fits overhead in a standard domestic stairwell.
Materials cost of these starts at about £100 for a basic 100kg lift, and they may be made and fitted in an afternoon once everything is to hand.
Hoist
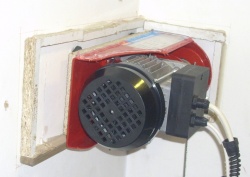
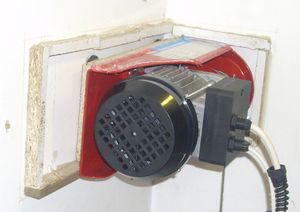
The hoist is a standard 125kg electric hoist, and is fixed to the wall.
Hoist Fixing
Many hoists have M8 threaded sockets and can be fixed to the wall with M8 rod threaded throuh holes drilled in the wall. For exterior walls the rods could be resin fixed into the wall.
However such a basic setup makes for a noisy installation, and noise reduction is needed if its to be used more than just occasionally.
To decouple hoist from wall the following are mounted on the threaded rod in order: hoist, 3/4" tap washer, wall, 3/4" tap washer, penny washer, locknut. The hole in the wall is drilled oversize and lined with soft flexible plastic tubing to decouple the threaded rod from the wall.
The 3/4" tap washers are drilled to produce a larger centre hole, enabling them to fit onto M8 rod. To do this the washer is held still by sandwiching it between a piece of wood underneath and a predrilled piece of wood on top (with a larger hole). It's quicker to just stand on the wood pieces than to clamp it all up.
Endstop
Hoists may have automatic endstop devices that can interfere with their use in this position. Electric hoists are mostly designed for vertical lifting rather than lifting at an angle to the horizontal. There are 3 ways to resolve this:
- Modify the mounting of the autostop sensor ring so that the lifting wire passes through it without fouling.
- Mount the hoist at an angle to the wall, using a wood spacer behind the upper fixings, and wall holes drilled at the necessary angle for the threaded rods.
- Remove the autostop device and make a manual power switch available. For this to be safe there must be a physical stop device that prevents the lifting hook from being pulled round the lifting drum, plus a suitable fuse used which will rupture if the motor is persistently stalled.
Rail
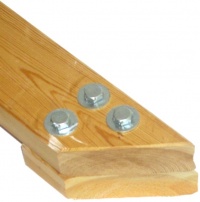
The rail is mounted above head height parallel to the stairs. 2x4 PAR is good for 100kg loads, and is fixed at each end using coach screws. The rail must be free of cracks. Much longer than usual lengths would require larger timber.
Smaller timber is unsuitable, as not enough wood remains above the coach screws.
3 screws are used at each end of the rail to give redundancy, as a safeguard against fixing failure. Large load spreading washers are used.
The rail should extend upward a foot beyond the edge of the upper floor, as the trolley can't reach the end of the rail, and the load may trail a little behind the trolley. The rail also extends a little beyond the bottom of the stairs as the rope can't travel to the rail end.
The rail is spaced away from the wall using a small piece of wood behind the rail at each fixing point. Matching spacers can be cut off the rail end, or smaller timber used.
The 4 long corners of the rail are routed round or planed to 45 degrees like so:
  _______
 /       \
|         |
|         |
|         |
|         |
|         |
|         |
|         |
 \_______/
In low strength walls, sufficient pullout strength may need to be tested. Resin fixing is the strongest option, if needed.
It's also possible to use a heavy duty sliding door mechanism as an alternative to the rail & trolley, but they don't look as nice and cost more. Light rail mechanisms for cupboard doors are unsuitable.
The rail is fitted to the wall parallel to the stairs.
For rails fitted at steeper than 45 degrees, load rating is reduced non-proportionally. See Load Rating section for details.
The rail and the trolley are polished with silicone furniture polish to minimise friction.
Trolley
The trolley is a small sliding piece that rides on top of the rail. When the hoist is above the line of the rail, the hoist cable is attached to the top or the front edge of the trolley. When the hoist is below the line of the rail, the goods rope is looped under the trolley and the lifting cable attached to it. The latter case requires a bottom to the trolley to prevent its sides being squeezed against the rail. The rope loop must be long enough to not jam when pulled by the cable.
The trolley is a U or O shaped wood or metal collar. If metal it has its edges bent outward slightly to avoid catching on the wood. It may be possible to make one from a joist hanger.
The goods lifting rope loops over the trolley and is attached to it. The rope is attached at the bottom of the trolley's sides so that the weight being lifted prevents the trolley from tipping over. Rope may be attached to a wooden trolley by screwing through the rope with a couple of 3mm x 1" screws with washers. Rope is attached to a metal trolley using heavy duty cable ties, 2mm iron Wire, or crimp fittings.
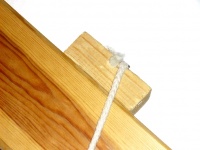
For testing, a temporary wooden trolley can be used, as shown. This is simply a small block of wood riding on the top of the rail with the lifting rope attached to its top. This is not a permanent trolley as it has no sides, and:
- it can fall off
- the rope would rub on the rail & eventually break.
Rope
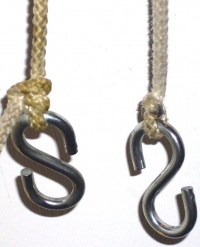
Like everything else, the rope should be rated to well above 100kg. Since it can experience jerkiness under full load it should be rated to several times 100kg. Unrated rope can be tested. Sash cord has the advantage of a rounder profile than typical twisted rope, and looks better in a domestic setting. The few brands used have all proven upto the job.
S hooks are tied to the bottom ends of the rope, and the load is hung on these. Butcher's hooks are not suitable, they're too sharp & thin.
Rope ends can be kept neat & prevented from fraying:
- Synthetic plastic fibre rope: hold the rope end in pliers with half an inch poking out, and apply a lighter to melt the end into a blob. The flame should not touch the rope, or burning occurs. Release in 20 seconds or so once the plastic sets,
- Natural fibre rope: apply pva to the cut end, and leave the end to dry while in locking pliers.
Rope assemblies can go in a washing machine when needed. It's best to include them in a full load to minimise the S hooks hitting the glass.
Maintenance
Any type of lift should be inspected periodically. There are no failsafe mechanisms, so a broken rope would result in dropped goods.
Check for visible damage, including worn rope, loose rope knots, damaged lift wire, or loose hoist fixings. The parts most liable to damage are the rope and lifting wire. Hoist cover boxes are also prone to coming loose due to the vibration, and are best checked annually.
Safety
The fact that these are only used for goods avoids many safety issues, but the lack of any backup support system means that dropping of the load is possible if a fault occurs. Consequently the user should not walk under or below the load when in use, nor permit others to do so.
Although physically able to lift people, the design does not meet the safety and legal requirements for doing so. In situations where kids are liable to play with it, it should be fitted with some way to prevent use. Options include a key operated switch, or a removable control switch lead or power lead, preferably using an obscure connector, such as shown above.
Rope knot failure due to poor knot technique is possible, and knots should be checked and load tested before the machine is put into service.
The hoist's lifting cable should be attached to the goods rope as well as the trolley. This way, a trolley failure won't cause dropped goods.
The risks involved with light goods lifts are tiny compared to passenger lifts, but in any DIY activity there is always scope to go wrong and end up causing injury. Falling or uncontrolled loads can cause injury, and only you are responsible for the results of your actions.
Readers should not rely on wiki articles for safety critical information. This is intended as an informational article describing a system in use, and no more. It does not constitute a recommendation of construction or use. You alone will live with the benefits and possible risks if you choose to implement or misimplement anything on a website.
Like any informational article, covering every possible issue and explaining it fully and clearly to every possible reader is a tall order, and can not be assumed. See Wiki Safety.
Weight Rating
A 125kg hoist with the above design gives a 100kg load rating.
For any given load rating, all load carrying elements must meet the rating, including hooks, rope, rail, hoist, and rail & hoist fixings. Some of these parts see higher forces than the load weight due to friction or forces acting in more than one direction, and these will need to handle above the system load rating. All items also need a large load safety margin. Note this refers to survival rather than ability to lift, so the hoist need only be rated to 125kg lifting capacity in order to carry 100kg. (A 125kg hoist can survive load forces of several times its lifting ability.)
Hoists require a higher load lifting rating than the load to be lifted, since they have to overcome trolley friction as well as lift the goods. A 125kg hoist can lift 100kg with rail angles of 45° or less.
For rails fitted at steeper angles than 45° from the horizontal, load multiplication and increased friction occur, and the system load rating becomes significantly less than the load rating of each individual component. If used with very steep stairs, such as alternating tread space savers, the hoist cable should not be too far from parallel with the rail, the cable pulling horizontally would not work.
Don't overlook the carrying capacity of the wall itself. Strawboard walls are inadequate for these systems. Timber stud walls must be reasonably well constructed to be strong enough, occasionally they're not. If in doubt the goods lift can be briefly tested with double the desired load rating, while keeping a safe distance - but be prepared to fix a large hole.
Noise
Many electric hoists are very noisy in use. This is greatly improved for domestic use with a little noiseproofing.
Ways to address this include:
- pick a quiet hoist (when practical)
- Decouple hoist from wall with rubber washers & tubing
- enclose hoist in a damped box
Damped box
Since 1/2" sheet Materials are so common, a suitable box may be made from 1/2" sheet, with a second layer of 1/2" sheet glued on to give more rigidity.
The box is then lined inside and out with damping materials. Carpet offcuts are an often readily available lining, though they're not ideal. 2 carpet layers internally give more damping. Carpet is best glued in place.
The box interior is sized to give 2" clearance from the hoist all round. A slot in the front is needed for the steel lifting cable. This slot lines up with the centre of the hoist's cable drum. The slot is 2mm wider than the cable, and long enough to accommodate the cable at each end of its run (top & bottom of rail). Carpet covers this slot inside and out to maintain noise reduction: the carpet is slit but not cut away.
External finish is your call. An easy option is to line the box with carpet, which gives a little extra sound filtering as well. This is easy to fit and completely hides the wood box, making it possible to use any Sheet Materials to hand without any attempt at neat cabinet making. When the box will be carpeted, the 2nd layer of sheet material attached to the box is made slightly smaller than the box all round. This gives rounded corners to the external carpet.
A continuous lip of thin wood is glued to the wall just inside where the wooden box sits, using high grab adhesive (such as no more nails or similar) and about 5mm wide x 1/2" split wood strips. This is part of the noise reduction system, and blocks the direct sound path from inside to outside the box. These are fitted with a quarter inch gap between the strips and the box. This makes it easy to fit the box, and creates a noise reducing serpentine sound path from interior to exterior. To position the strips, the box is held in place and drawn round with pencil. The strips can then be attached the right distance in from the pencil line.
The box can be fixed to the wall with 4 small corner braces. The carpeted exterior hides these. Drill all fixing holes deeper than usual, the hoist puts a lot of force on the box and can pull fixings out otherwise.
Boxless hoist
Where absence of a visible box is required, the hoist box can often be mounted in the attic, the cable passing through a small slot in the ceiling. The slot must be steel lined, as cable fraying would quickly saw through wood & plasterboard. The hoist should preferably still be boxed to quieten it.
Repair
Cable repair
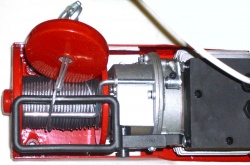
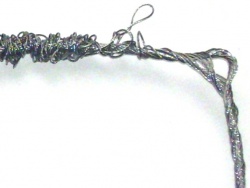
With time and use, strands of the lifting cable break, creating sharp spikes and reducing maximum load carrying ability. Eventually the drum of cable can become a tangled jammed mess, and the cable must be renewed. Trying to just remove broken strands is pointless, once some break more soon follow.
Another option often practical is to cut off the damaged cable and use the remaining good cable on the hoist drum. This works when less than half the cable is unwound in use.
The cable on the drum was unwound and the damaged length cut off with an angle grinder. The cable was held in locking pliers, it got too hot to hold. A plastic cable tie was put on the good cable near the cut to stop it unravelling once cut. The cable was also cut at the hook end using the angle grinder, and the original crimp discarded.
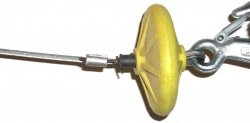
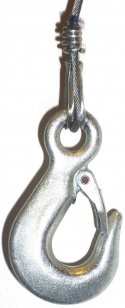
No tools able to make a solid crimp (at the hook end) were available, so 2mm iron wire was used to create a wound crimp. The 2mm wire was wound round the cables using locking pliers and waterpump pliers - it's awkward getting it to sit tight against the steel cable, and getting each turn to sit neatly against the one before, but the time must be taken to do this for it to work. Make sure the cut ends are flattened down, not left sticking out. Once the wire wrap is complete, a club hammer is used to flatten the iron wire onto the steel cable, crimping the cables together. It needs to be hit hard, and the joint must rest on something much more solid than wood or plaster, such as a lump of iron. When a bit of visible flattening was seen, the hook was load tested to ensure the cable joint was secure.
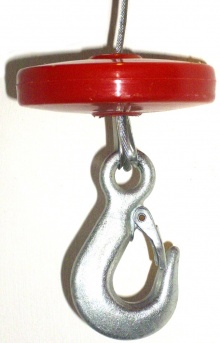
The red stop buffer slides over the cable joint to cover it, as shown on the right. If you want to hide the joint totally, silicone can be used to glue the buffer in place. If doing this, slide a washer onto the cable earlier to make gluing easy and neat.
Switch repair
The rocker switches usually used on these hoists can fail in time. They're easy enough to replace, if you find a supply of the right type of replacement switch (typically 2 pole 2 way momentary rocker switch with centre off). These switches are held in by 2 tabs on the rear, press them together to release it. Just be sure to note which connectors go on where!
It's also possible to open a switch up and rub or file the contacts clean. Remove the switch first. The switch's rocker has 2 tabs either side of the centre that it pivots on, these also hold it in place. The outer casing is simply bent out on one side to release the rocker. Then blackened electrical contacts are cleaned up with some very fine sandpaper and the switch reassembled and refitted.
Hook repair
One hoist had a habit of letting go of the rope put through the hook. The hook's sprung latch was pressed hard into the hook tip to dent the latch's flat surface, and the latch edges straightened up with pliers. No more dropped loads.
Supplies
- Toolstation hoist
- Screwfix hoist
- Goods hooks
- Rail: 2x4 redwood PSE, from any timber merchant.
- 16cm Coach screws
