Split-type Room Air Conditioner
This is a write-up of how I installed a split-type room air conditioner for my office. This is my first installation of anything like this, so I will write about what I did, and try to highlight the things I found particularly easy or difficult. Most jobs like this are easier the second time round, so my intention is to write something useful for someone who hasn’t tried before.
Foreword
The split-type room air conditioner has two parts, an indoor unit and an outdoor unit, linked by refrigerant flowing through a pair of pipes. The design puts the bulk of the equipment out of doors, leaving a reasonably stylish unit to hang on the wall in the room. Systems are available from various suppliers. It is impossible to provide meaningful illustrations without identifying my own particular system, but nothing I write here is intended to be an endorsement or indeed a criticism of this particular product.
I completed this project on 29 July 2017, and to the best of my knowledge and belief the work complies with the applicable parts of National planning regulations, local building control, and the wiring regulations and practices in use at the time. I also discussed and agreed the project with my neighbours, which seems to me (in England at least) the decent and proper thing to do.
Precautions and Planning
General
The essential precautions before starting (and indeed, before buying the system) are to make sure you can secure the indoor and outdoor units onto something sufficiently solid to hold their weight, and you can make a 65 to 75 mm diameter hole through the wall to take three pipes and a electric cable. These services can run along the surface of the wall (perhaps in trunking) but a hole behind the indoor unit makes for a neater job. This implies, the indoor unit must go on an outside wall. When you bend the pipes, the smallest radius you can hope to achieve is about 100 mm, with 120 mm or so being a lot easier.
Planning Regulations
(.. fresh section currently in composition ..)
Power Supply
The small systems like mine come with a fitted 13 amp plug and run happily from a socket on the ring - the maximum load on the electrical supply is given as 800 watts. Larger systems will need a dedicated radial circuit from the consumer unit.
The use of a 13 amp plug is similar to the approach taken for other small electrical loads such as my gas-fired central heating boiler, and it gives a straightforward way to isolate the system for maintenance. This approach is not ideal because the air conditioner is designed to be shut down in an orderly way, initiated by pressing a button on the remote control. Also I can imagine that pulling out the plug when the motors are running might present a voltage from the back emf across the live and neutral pins on the plug, and I do not know whether the system includes safeguards to reduce such a voltage to a safe level. I would follow this up if I had a toddler in the home, but the obvious alternative method of connection is by a switched fused connection unit, and this avoids such a scenario.
At the moment, the system does not have a permanent earth connection. The enclosure of the indoor unit is wholly plastic (and its steel mounting bracket is inaccessible), but the outdoor unit has a steel enclosure. Clearly, the use of a 13A plug gives an earth connection detachable without the use of a tool, and the scenario here is not comparable to my illustration of a central heating boiler attached to pipes which are themselves bonded to earth. Removing the plug takes the supply of electricity away from the system, but any electricity stored inside (for example in motor capacitors) might remain for some time.
The electric motors in the system present an inductive load which may (as an inductance) prove reluctant to turn 'on' and 'off' in an electromagnetically clean sort of way. My nearby computer equipment is powered from the same ring but through an uninterruptable power supply which gives some filtering. I do not envisage problems here, but a person with a sensitive hi-fi system (and perhaps an equally sensitive disposition) might look to run in a dedicated radial circuit from the consumer unit.
Specifying the System
My system is one of the smallest of its kind currently on the market (Summer 2017) – it is rated to move 9,600 BTU of heat per hour (this is about 2.8 kW), enough for a room twice the size of mine. This is not necessarily a good thing – an over-specified system can cool the room too quickly, before it has had time to take the moisture out of the air, and this makes for an environment less comfortable than it really should be. Conversely, a slightly under-specified system will merely struggle to keep up on a really hot day, and in the East of England this will rarely be a great problem. In my case, the room is an outbuilding where the door opens directly into my garden, and the additional capacity will help the system to cope with the door being left open from time to time.
The DIY Air Conditioner Kit
Overview
The DIY system is slightly special because it comes with the pipe connections ready-made for DIY assembly and the outdoor unit pre-charged with the refrigerant. This lets a DIY person complete the whole installation and commissioning themselves, without specialised tools to make flared pipe connections or calling in an air conditioning engineer with the gas. On the downside, you are stuck with the lengths of pipe provided, and to use these neatly you will need to either plan the installation very carefully indeed or be prepared to lose some excess pipe somewhere inconspicuous.
The system is “reversible” in that it can heat the room in winter as well as provide cooling in summer. I have used the room for the last year with an oil-filled electric radiator, and I am hopeful the larger capacity of the system (2.8 kW of heat pump opposed to 1 kW of radiant heater) will bring the room up to working temperature more quickly at the start of the working day. And, of course, I am hoping to hide myself away from the clammy stickiness which seems to pervade the summer here.
Delivery and Unpacking
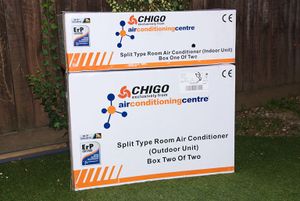
The system arrives in two cardboard boxes – a large, heavy box and a larger, heavier box. Both have been designed for handling by one person, and in particular the arrangement of the larger box is good for a lone worker needing to unpack the outdoor unit (which weighs 27 kg) on their own.
Opening both boxes indoors reveals something of a “new car smell” which seems to emanate from the indoor unit. This unit arrives pressurised with air as a factory precaution to show it is gas-tight when it arrives. Perhaps a tiny bit of Chinese air has made its way out during the trip across to England. The outdoor unit is also pressurised, but with the refrigerant which will flow around the completed system.
Looking at the parts supplied, everything is minimal and easy to comprehend. The indoor unit comes with two short copper pipes for the refrigerant (vapour and liquid), the condensate drain pipe, and two long electric cables already attached. The flap underneath the unit is motor-driven and if you try to open it by hand it may never quite close again neatly after operation. There is also a metal wall bracket, a plastic cylinder to line the hole through the wall, some insulating foam and a remote control unit. There are three instruction books – one for installation and maintenance, one for operation, and one for the App. This last one being a sign of the times I guess.
The outdoor unit is in the second box, along with the two lengths of copper pipe to join the two units together.
Schematic
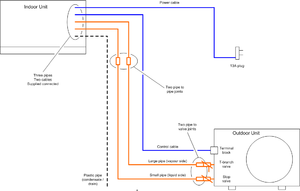
When I try to talk about air conditioning with otherwise educated people who don’t have experience of a system, I encounter a common misconception that the system is cooling air and then moving this air from outdoors to inside the room, and the building needs to be sealed to let the system work. So before I begin, here is a simple schematic for people who have not seen one of these systems before. The sketch draws together various details from the installation manual and puts them together into one place.
Fundamentally, this system is a heat pump which uses two small-bore copper pipes to move heat from one place to another. The pipes carry a refrigerant (R410A) – a larger pipe for vapour and a smaller pipe for liquid.
I show the indoor unit higher than the outdoor unit because this is how they are arranged in my installation, but the outdoor unit can go higher than the indoor unit instead. Apart from the indoor and outdoor units, there are the two copper pipes (orange), a plastic pipe (dotted) and two electric cables (blue) to be installed.
Outdoor Unit
I engaged in correspondence with the supplier before I ordered the unit, to discuss a simple way to install the outdoor unit. Their reply was straightforward – while the larger units do need to bolted down onto something immovable like a brick wall or a concrete pad, the smaller units will be happy enough to stand on some firm ground.
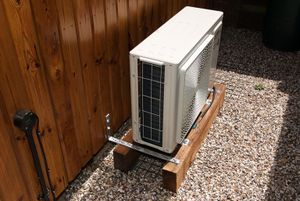
My building is demountable and timber-framed, so I am choosing a ground-based installation for the outdoor unit. This will save me from any vibration brought into the structure through wall brackets. Also, I’m not convinced the wall will cope with 27 kg of equipment hanging on it. The installation location is a patch of firm, well drained ground – about three inches of 10 mm shingle restrained by plastic grids.
Bearing in mind this is England, it seems sensible to raise the outdoor unit high enough to avoid the worst of the annual leaf fall and indeed the occasional flurry of snow. It would be pretty galling to return home from a trip away to find the unit shut down by a blockage. So I am putting the outdoor unit on a pair of timber beams, a bit like skis.
The beams are from a 150 x 75 mm softwood fence post, 1.8 metres long and cut in half with a hand saw. This sort of task is easier to do than spend time thinking about – the cutting took less than ten minutes. The beams spread the weight as well as providing the lift above ground level, and avoid a heavy construction in bricks or concrete.
The four mounting feet of the outdoor unit rather scrunched down when I tightened the coach screws. A perfectionist, which means me, would try to insert some thick washers under the feet if doing this again. The paint pretty much falls off the metal when it sees a spanner, so a little care tightening the screws will help to preserve the original finish.
The beams ended up parallel with each other but with one end about 6 mm higher than the other, just enough to annoy me, and I used some pieces of slate to pack one end of them up to be level.
I have added a couple of metal straps to stop the unit taking a walk under its own vibration, or indeed if I trip over it when I walk past in the dark. This location is supposed to be the “service area” of my garden, and it is not a frequent walking route, but I do keep the water butt here. I “made” the straps by buying the longest metal strap I could find in the local DIY shop and cutting and bending it to suit. Incidentally I bought the coach screws at the local agricultural wholesaler. They charge pennies per item, and you can buy the exact quantity you need.
Indoor Unit
Installation Location
The location for the installation of the indoor unit was easy to find. The unit should be 2 metres above the floor, to provide for the most efficient operation, and must be 150 mm below the ceiling, to allow for sufficient air flow. With a floor-to-ceiling height of 2.07 metres at this location (the lowest point under a sloping ceiling), I ended up with the unit a little closer to the floor than the ideal. This technically reduces the effective capacity of the system, but not by enough to have a tangible effect. The efficiency of the system reduces with poor room insulation and a lower location for the indoor unit, and the whole system will be de-rated by most of 50% if the unit is placed in a conservatory on a dwarf wall.
Pressurisation Check
Before starting work it is sensible to slacken off the plug on one of the two copper pipes and listen for escaping air. This confirms the gas-tight integrity of the unit. I re-tightened the plug immediately so I could repeat the check later on during the job.
Manipulating the Pipes
You can have the pipes (and the cables) exiting from the left, the rear or the right-hand sides of the unit, with the pipes as delivered aligned to the left. The installation manual has good advice on how to bend the pipes around for access to the rear (or the right-hand end), and this is straightforward if a little unnerving for a beginner to do. The larger pipe (which is rather more difficult to bend) has a spring to support it during adjustments.
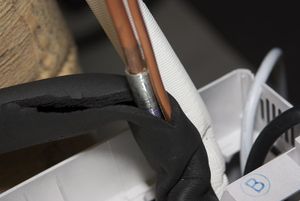
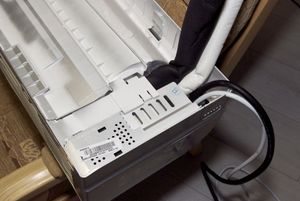
After several minutes of gentle manipulation the arrangement of the pipes looks like this. The black insulation is a split sleeve around the two gas pipes, and the white pipe is the drain pipe. The black cable is the control cable, and the white cable is the mains supply. You can see where I have removed the knock-out slot for the mains supply cable, and also the much larger moulded knock-out available for use if the pipes are leaving the unit at the end.
The natural movement is to rotate each pipe around its existing bend, and this activity left me with my pipes exiting about 15 mm lower down the unit than I really wanted them. Fairly clearly, although you can put a tight bend where you want it on a virgin length of straight pipe, it is all but impossible to move such an existing bend 15 mm along a pipe.
Hole through Wall
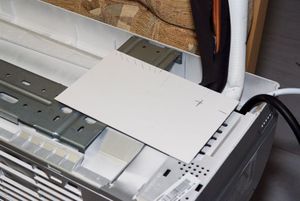
Undeterred I made a cardboard template to help me put the hole through the wall in the right place to suit my pipes. First I placed the wall bracket in its proper place in the back of the wall unit, and made my template.
I clamped the template between the bracket and the wall to let me find the centre of the hole to go through the wall.
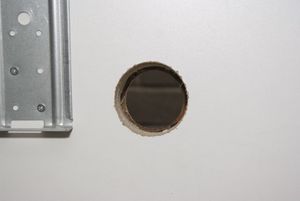
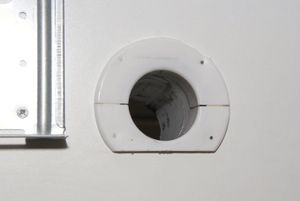
Unfortunately I then decided to be too clever. The hole is lined with a plastic cylinder (supplied) which is quite a snug fit on the three pipes and control cable which pass though it. Wanting to provide a little freedom in the alignment of the pipe and not strain the copper pipes, I cut the hole 70 mm diameter from the inside of the wall and 65 mm from the outside. The pipe being a snug fit on the outside (and easy to seal against the weather) and with a bit of latitude on the inside.
The stupid thing here is the pipe needs to slope downhill to let the condensate drain pipe work properly, and even with the centres of the holes clearly going downhill the sloppy inner hole let the pipe find its rest in a nearly horizontal alignment. To cut a long story short, and omitting a bit of a trial involving some silicon sealant and a wooden wedge, I ended up pinning the inner flange of the pipe to the wall, to make sure the pipe stayed pointing downhill.
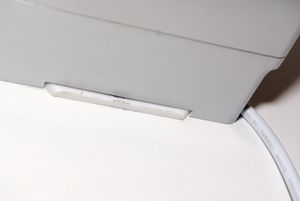
I trimmed the bottom of the flange to make it less of an eyesore, and cut a rebate out of the bottom of the enclosure of indoor unit too. This view is looking up from underneath.
Indoor Wall Bracket
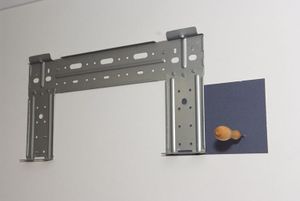
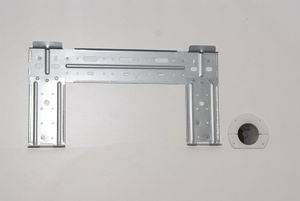
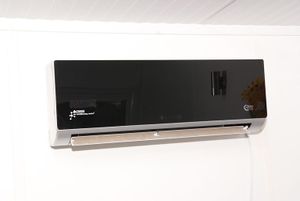
Here is my completed work on the wall in my room – it looks simple enough.
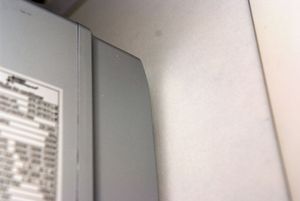
Unfortunately, the wall bracket is made from a pressing of relatively thin sheet steel. The bracket is strong enough to hold the 10 kg of indoor unit, but the two lugs for hanging the unit moved outwards while I manoeuvred the unit into place. So my indoor unit is hanging about two millimetres away from the wall at the top.
If I had a second pair of hands I would look at putting some shims into the lugs on the wall bracket, but the indoor unit is quite an unwieldy thing above your head (especially with no headroom!) and with it sitting on its bracket I decided it was best to leave it there. Bearing in mind the unit is for installation close to a ceiling, I do wonder if a pair of simple screw lugs with keyhole slots (like glass plates) would make for an easier design. Anyway, with this done the difficult part of the job was over.
Copper Pipes
Then next task is to form the copper pipes poking out through the wall into shapes to meet the long pipes linking to the outdoor unit. The pipes are easy enough to bend as long as you take your time. The technique is to apply even pressure with all fingers and both thumbs, then move along a half inch of so and repeat, and so on. The larger pipe is more difficult to bend, so it is sensible to form this one first to the best shape you can, and then bend the smaller pipe to match.
The plastic pipe covers are still in place here to keep the pipe connections as scrupulously clean as I can manage. The machined conical connections are behind them, with the pipe flares on the long pipes to connect to them. The black foam insulation is pulled away to let me manipulate the pipes into place and is tied into place later. The white pipe is the drain pipe, located at the bottom of the bundle to make sure it drains correctly, and the black cable is the control cable.
The kit omits all the hardware to attach the pipes to the outside of the building. I guess, every installation is different, and every DIY person has their own idea of what is “proper”, and so I made my start by looking at some professional air conditioner installations outside factories and shops and so on. My intention being to make something reasonably business-like without crushing the insulation on the pipes or spending a fortune on a tiny quantity of cable tray or “Unistrut” or custom pipe brackets.
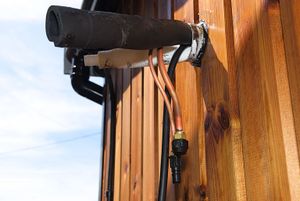
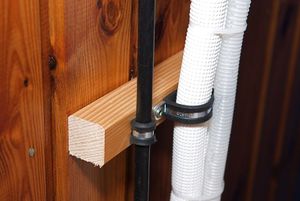
I settled on some lengths of hardwood screwed to the building, with the pipes and cable secured in metal P clips with rubber inserts. This gives a stand-off between the pipes and the wall – and this in turn makes for a more gentle swan neck at exit of the pipes from the wall an easier task to manipulate the pipes into place. Also I can get a paintbrush under and around the assembly when the time comes to top-up the finish on the building cladding. This is how the brackets looked to begin with, before I routed the drain pipe into my water butt (described later).
The two long pipes arrive coiled up. I want a fairly sharp bend at the outdoor unit, so I left the curves at this end as supplied in the kit while I loosely uncoiled the rest of the lengths.
A fresh correspondence with the supplier confirmed that it is fine to run the pipes both downwards and upwards between the indoor and outdoor units. This lets me take the easiest route for them – down the wall behind the building, through the void under the floor, and then up again and finally down to reach the valves on the outdoor unit. I began with the thicker pipe again, first creating the straight run to drop down the wall, and then forming a curve to take the pipe around and into the floor void. With the first half of this pipe in place I made off its connection to the short pipe from the indoor unit, and then formed new bends and made off its connection to the outdoor unit.
When you remove the first plastic cap from a pipe on the indoor unit, you lose the last of its factory pressurisation, and it seems sensible to assemble the joint promptly to avoid the ingress of any dust or dirt. I do not possess many large spanners but by chance I found both 17 and 22 mm open-ended ones, and these let me tighten the pipe fittings with the confidence you get with a conventional spanner. The fittings are lightly oiled before assembly, and then assembled to make a gas-tight seal. Effectively you are crushing and deforming a copper flange (the flare) against a conical surface to make each joint, so clearly the joints really do need to be very tight indeed. The installation manual suggests, “as tight as a car wheel nut”, and I suggest, possibly a little tighter. The last thing you want during this activity is for a spanner to slip and you to take the skin off your knuckles, so I suggest a couple of decent spanners are better than adjustable ones. They are also likely to be longer, which helps you to feel the tightness as you go along.
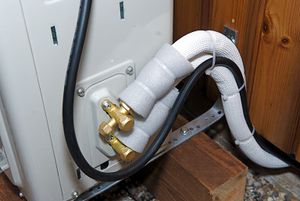
The smaller pipe is easier to run in, and just as hard to connect, but the result looks nice to me. Looking at the ends at the outdoor unit, the grey insulating sleeving here is supplied as one piece in the kit, but it makes for a neater job to cut it and apply two short lengths.
Electrics
The remaining nerve-wracking part of the job is making off the earth connection at the outdoor unit. Let it suffice to say, the earth wire in the control cable has a fitted ring lug, and so you have to remove the screw from its terminal; the screw is close above a hole in the enclosure, and if that screw goes down inside it will be there forever. I kept hold of mine. The other three wires in the control cable have simple fork lugs.
Setting Up
With the pipes and the wiring all assembled, the time comes to set up the system. Essentially, you use a small shot of the refrigerant from the outdoor unit to pressurise the system. Check for leaks at every joint using soapy water. Then expel the air from the system, and check for leaks again. And finally fill the system with all of the remaining refrigerant, and do a third check for leaks. I had one leak, which I found on the first round, and nipping up the joint with the spanner sorted it out. This was the smaller pipe at the outdoor unit. When the joint tightened, I watched the end of the unit bow out and then relax itself.
And so, with the control cable and the pipes connected up, it is time to try everything out. The indoor unit plugs into a 13A socket and, when you press the power button on the remote control, the display obligingly lights up and the machine opens its air flap. Seeing everything start up and run for a couple of minutes, I shut it down and tidied up the installation with foam insulation around the ends of the copper pipes and putting the access cover back onto the outdoor unit.
Then I restarted the system and ran it flat out as instructed in the installation manual - maximum chill for 35 minutes, and then maximum heat for as long again. The “new car smell” returned to the room for an hour or so, then faded away.
The initial impression of performance exceeds my expectations. With the ambient temperature outdoors sitting around 23-24C, this activity took the temperature at the far side of the room (opposite the indoor unit) down to 18C and then up to 24C. That is to say, a 6 degree increase in 35 minutes, which seems promising for next winter. During this time, the relative humidity in the room went up to 90% and down to 48%.
Finishing Off
The kit comes with a roll of nylon tape about 50mm wide, with instructions to wind this along the length of the two copper pipes. I cannot work out what great good this does, and with the tape being of a non-adhesive kind I decided early on that it and me were not going to get on.
I wrapped the pipes in duct tape for the first 300 mm or so after they emerge through the wall, cutting off the cable ties shown in my earlier photographs as I went along. I used white tape to blend in better with the pipe insulation and because it might (tentatively) be more efficient than black. The argument here being the opposite of the one which tells you to paint your central heating radiators matt black. It is worth remembering to wind the tape on from the bottom going upwards, so water cannot run down inside it.
The gap around the end of the plastic cylinder is sealed with glazier’s putty, this is hugely easier to work with than silicon and it the sealant recommended by the supplier of the system.
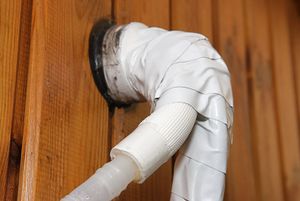
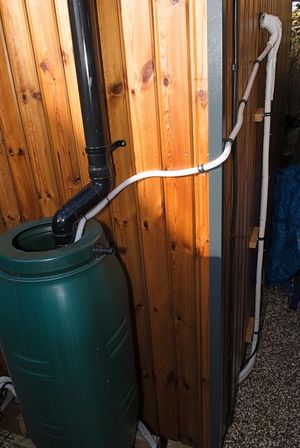
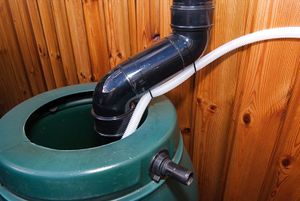
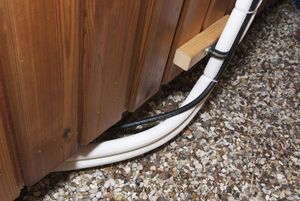
If I am to believe what I read, the drain pipe can run off a litre of water in an hour. The water is not really good enough to make your tea, but it is fine for the car screen washer or the garden, so I routed the pipe across to my water butt.
My idea is, when the weather is warmest and the rainfall is the least, the run-off from the system will replenish the butt. Looking again at this photograph, a real perfectionist might use some black pipe to blend in better with the rainwater drain and (just round the corner) the building power supply cable.
I ended up with the gas pipes a near-perfect length and the control cable about 150 mm shorter than I really wanted. I used up some of the cable to make a drip loop below its terminals on the outdoor unit, and the shortage is something I shall have to live with.
App
The system boasts “Wi-Fi” and the manufacturer provides an app for you to download onto a Smartphone. The software is not approved by Google and the list of permissions is too extensive for my taste. There are two further pages of permissions, which seem to include most every permission available to any Android app.
I did install the software for a few minutes, but it does not seem to be a functioning product. Certainly, it does not correlate with the instruction manual shipped with the kit, and I was quite relieved to decide to uninstall it.
Operation
The system has now been running for a week. The outdoor unit rattled a bit during the initial soak test I describe above. I didn’t notice when this noise stopped but I guess it is to do with the refrigerant spreading itself out through the system.
I installed the system in July 2017, when the ambient temperature ranged from about 28C in full shade down to 16C at night, so I could try out the heating mode as well as the cooling mode in meaningful outside temperatures.
You get a few extra modes of operation – the obvious cooling and heating, and also a “drying” mode, a plain “fan” and an “auto” mode. This “auto” mode instructs the system to maintain a pre-set temperature (around 25C) with a wider than usual tolerance, so running proceeds without the system fighting itself with alternate heating and cooling cycles. For illustration, with the ambient temperature at 16C in the middle of the night, the auto mode is keeping the room at 23C.
Final Thoughts
My system came with two 4-metre lengths of pipe to run between the indoor and outdoor units. You can buy a pair of extension pipes, and the system has enough refrigerant to let you have 6 metres of pipe instead of 4 metres. Beyond this you will need professional help to purge and charge the system, and you would probably save money by buying a system without refrigerant.
You need to have good clear access to the pipe fittings so you can tighten them up correctly and inspect them while you are setting up the system for operation. The space behind my building is fairly confined – I have 450 mm of access space and I suggest this is a practical minimum if you are going to preserve the skin on your knuckles and elbows while you get the pipes into place.
If the pipes are to go out through the left-hand end of the indoor unit, you will have two pipe joints hidden inside the back of the unit and impossible to inspect during setting up. If you really need to choose this pipe route then installation is probably best left to a professional who can test the pipe work for its gas tightness in stages, without wasting refrigerant and before hanging the unit onto the wall.
When I peeled the protective film off the front of the indoor unit I found a scratch I had made during manhandling. It doesn’t show badly, but it is there to remind me to get help with installing this sort of unit if I tackle a second system.
The Android app seems to be unworkable and although this is of no consequence to me it could be a major disappointment to someone who chose a particular system on the strength of this feature. Perhaps the iPhone version is better.
Switching off the system needs to be done from the remote control, this lets everything shut down in an orderly way. Because of this, the use of a 13A plug in a wall socket is a little vulnerable to accidental disconnection and is not really ideal. Much depends on the people who use the room, but I can see the addition of a dedicated fused spur as a future project for myself. Other possible trimmings for my own system are some mesh around the void under the building to keep out rats (I live near a train station …) and a roof over the outdoor unit to shield it away from direct sunlight. I save seen such roofs in the Mediterranean and the Middle East, but not in England, and I’m inclined to think this is unnecessary for me.
The result, with the system running as a heat pump in mid-July, is not quite what I intended for the season but is a good result all the same. The most compelling attribute of the system to me is its quietness of operation. This is my first personal air conditioner since I lived in a Portacabin in the Middle East some 30 years ago. The machine there rattled day and night – life and especially sleeping was a choice between noise and sweat. The door to the room had to be kept shut (and the window was sealed shut) to keep the mosquitoes out.
Technology has moved on a great deal, and by far the greatest noise now is from the outdoor unit when using the system for heating. There is even a “quiet” mode to reduce airflow from the indoor unit, and this kind of system seems good for a bedroom as well as a room for studying.
