Stripping Wallpaper
Credits
This document has been compiled from musings on the uk.d-i-y USENET group and is the result of various personal experience and the helpful suggestions and experiences of a great many people who are generous and free with their advice :) Thanks belongs to them, you know who you are! One relevant thread may be found here: [1]
Warnings
A checklist of a few things to remember
- Obviously, as all the methods of removing wallpaper (unless very loose already) will involve water, please exercise extreme caution when working near electrical accessories including consumer units. Even telephone wiring can give you a jolt if your hands are wet, even more so if you have an ISDN service which operates at a higher voltage.
- Beware of using sharp blades and stripping knives near cables.
- Steam and to some extent spray mist may upset some smoke and fire detectors, depending on type. Before simply turning them off or capping off the detector, please check that you have the required authorisation to do so. This is particularly true in a commercial environment (even ordinary offices) where you generally should seek permission from the local fire officer or site manager, but even residential tenants should check in case doing so has insurance implications. Obviously a house owner may give himself permission to do so(!) but it's worth noting that it would be advisable to uncap and re-enable all detectors after each and every day's work as DIY is the time when there is more risk of a fire. For commercial work, purpose made red caps can be obtained to cap off detectors as these remain obvious, but some have suggested the use of a latex (surgeon's style) rubber glove stretched over the detector for DIY/householder work as these are also visually obvious if left on by accident.
- Obviously beware of some stripping knives, especially those with razor sharp blades. Always work away from the body and face.
- Over steaming can blow plaster. Try to keep the steamer on the move, or rest it face up somewhere out of the way.
Removing ordinary plain (non vinyl) paper
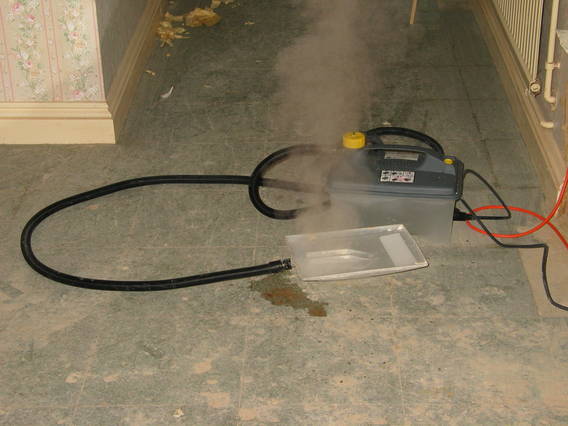
Steamer
- Can make a wet mess (see warnings regarding electricity above)
- Beware of very hot water condensate collecting in the hand held head if using upside down - this can be a moderate amount, enough to burn you. Keep pets and small children away and always hold the steamer so that it is not directly over you.
- Can be very useful on stubborn cheap vinyls that don't peel dry and painted paper (especially ceiling paper and textured papers).
- Fills the locality with a lot of water vapour - best to open some windows or you can get a fair bit of steam build up and condensation, especially in colder months. (Although this author notes that it can be very therapeutic if you have a horrible stinky cold!)
Wallwik sheets
- Use your own sprayer with them
- Possible (untested) replacement for wallwik sheets: lining paper
Sprayer
- Can be less messy than sloshing water on with a sponge.
- A good sprayer for large areas of work, if you don't mind a bit of mist on the floor, is a pump up garden sprayer. It's very quick and easy, especially on papered ceilings and paper on bare plaster, both of which can require a lot of water due to the absorbancy of the plaster.
- Please check if the sprayer has been used with evil or hazardous chemicals previously - you will be breathing the mist.
- For the same reason, use fresh water in the sprayer each day. Stagnant water may harbour bugs that would do you no favours if inhaled in quantity.
- Be aware of not exceeding the maximum temperature of the sprayer, which may be as low as 40C (or lower) in some cases. Ignoring this may weaken the sprayer bottle, and if it is a pressurised type (eg pump up sprayer) may result in a large bang, sharp edged flying plastic shrapnel and you falling off your ladder in shock, not to mention a gallon of hot water going everywhere. The author of this comment has been a victim of an exploding sprayer and it is not pleasant!
- Other sprayers designed to produce a fairly fine mist would also be suitable, eg a compressor attachment or a hand held plant mister for smaller areas.
- A fine mist spray makes less mess than a coarse spray, but whatever you do may make the floor wet. It would be best to lay some protective sheets if this is likely to damage your floor finish.
- Spray a section
- Wait 5-15 minutes (if paper is looking dryer rather than wetter then it's time to respray)
- Respray the section
- Wait 15 minutes. The paper should come off easily. If not, spray again and leave for a bit longer.
Long soak method
(Mostly verbatim from the original author)
- Wet the paper and leave to soak through. I do this with the steamer, without making any attempt to pull the paper off.
- Leave for at least an hour. (When I first discovered this, I had actually left it for over 12 hours, but subsequent practice shows that length of time isn't necessary unless the paper has been heavily painted.)
- Then go over with the steam stripper again, starting with the corners of each sheet. The steam will cause the moisture in the paper to boil, and blow the paper off the wall. Normally each sheet comes off effortlessly as one whole clean sheet, which even look reusable, although I never have!
- If you have a second person, they should follow along behind you cleaning the residual glue off, which is very easy just after the paper has been removed, but becomes more difficult if it gets a chance to dry again. I use warm sugar soap.
- You could try using a water spray, wet sponge or other method for initially wetting the paper. I don't know if it would do so as well as the steam does.
- Another tip -- don't score the paper unless/until you've found that you really can't get water to penetrate it without doing so, and that includes leaving it a day to do so. If you do end up scoring it, that makes it much less likely to come away in full sheets, so removal becomes more fiddly, and you can find afterwards that you've damage the plaster behind.
Vinyl paper
The vinyl surface is waterproof and the adhesive only comes away when wet. There are 2 ways to enable this to happen:
- Peel off the top vinyl layer. Many, but not all papers are designed for this to be done. Likely to be a feature of the better quality papers. Start in a corner and pull gently, at at least 90 degrees and if possible, try to pull off parallel to the wall. If you're lucky, it will come off in one sheet.
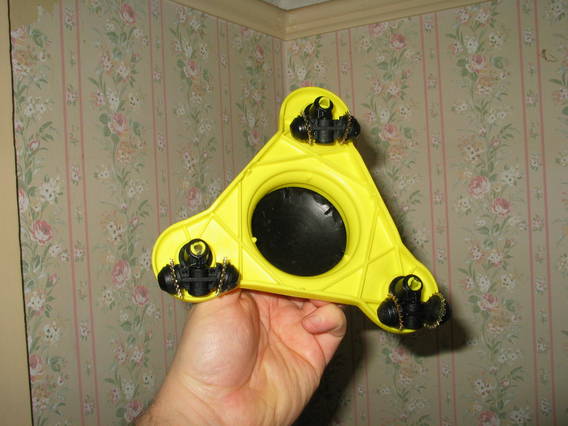
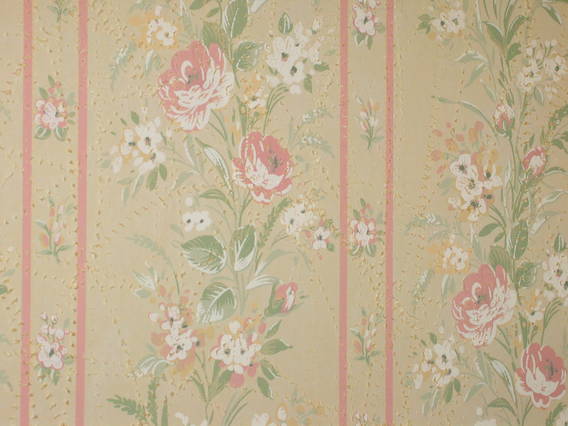
- If the previous attempt to peel fails, then you will need to scarify the vinyl layer to allow the penetration of water and/or steam. A bladed roller tool is available to do this in several formats. The type with 3 spikey rollers that you just push and drag around is a fast and efficient device, but various other devices that scratch or score the surface are available.
- Scarified paper may be fairly easily removed with steam. Steam the first corner (top or bottom) for a good minute or so, then carefully (it's hot!) try to pick up the corner of the vinyl. If you are very lucky, it and the backing paper will start to lift as one. If not, hopefully, at least the (thin) vinyl will start to peel. Move the steam onto the next section and apply gentle pulling force onto the bit you lifted. With care, you should be able to keep peeling very slowly with the steamer staying in advance of the section you're peeling. If the paper is very low quality, or old, or you were over enthusiastic in scarifying, it may tend to tear or break. If this happens, try a stripping knife instead of a peeling action.
- Here's the roller scarifier mentioned above:
- Example of scarified paper - this shows roughly how much you should aim to scarify the paper for sucessful stripping:
- If you don't have a steamer, try spraying or sponging on warm or hot water, though this will take longer as the water needs to wick its way under the vinyl surface. More than one application of water may be required.
- Any remaining backing paper is fairly easily dealt with. It can be steamed off in a second pass using a stripping knife, but this takes longer due to the paper absorbing the steam - it needs a moderate amount of water to actually become wet and soften the glue. A quicker, though messier approach is to follow the sprayer instructions above, or to sponge on hot water from a bucket. If the paper is sufficiently wetted in typically 2-3 passes, for at least 10-15 minutes, it may peel off in one piece, or it will yield fairly easily to a stripping knife. Wetter the better is the key to success.
Painted non vinyl paper
Typically this would be painted lining or textured paper (wall or ceiling).
- Steam can work very well on this type of paper, depending on how many coats of emulsion there are. For one or two coats of emulsion, scarifying is not always necessary. If it's been painted many times or with gloss paint, scarifying may help, prior to the application of steam or copious hot water.
Painted Woodchip
Don't kill yourself yet - read on...
Method 1
(Adapted from the original author)
- Steam with or without scarifying first (see what works for you).
- Scrape off what you can
- Finish with a light sanding when dry to remove any stubborn particles.
Method 2
(Adapted from the original author)
- First obtain a razor sharp scraper with 3-4" blade on a solid handle, eg: [2]
- Either scrape off in one hit, or more likely, scrape once which scars the surface (the wood chips make it easy for the scraper to slice lumps off).
- Then wet and wait, finally the rest comes off much like ordinary paper.
Method 3
- Angle grinder
(Yes, it's a standing joke)
Cleaning the walls afterwards
Just when you thought stripping was the most boring messy tedious job in the world... Now you may have to remove the glue residue. This would be recommended if you are going to paint or plaster the wall, but is probably less important if you are simply going to re-paper, though removing lumps of paste and fragments of old paper would be advisable or these could show through the final paper.
- Best done in sections whilst stripping as the walls will still be damp and warm which makes it easier.
- Hot water - as hot as you can stand, and lots of it. A drop of Flash or similar floor cleaner does no harm. Good large rough and robust floorcloths too - lot's of them.
- A tea trolley helps, to keep the bucket at a convenient height for the upper parts of the walls and ceilings.
- Paper over painted plaster: the glue should wash off fairly easily. Apply broad strokes with a very wet cloth to wet the glue. Do this over a good couple of yards of wall to give the water time to work. A second pass should see most of the glue coming off.
- Paper over bare plaster: This can be harder as the plaster tends to hold the glue well and defeats the water by sucking it up. Based on various suggestions from uk.d-i-y USENET group, a sharp bladed long handled scraper was found to be effective (3" razor sharp blade, handle about 12" long, though dimensions are not critical).
- Wet about 1/2 square meter/yard with either the cloth or a sprayer. Have a quick coffee (10 minutes), then wet again, until it's almost dripping.
- Now push (or pull) the blade at a fairly shallow angle in a single pass. If you're lucky, 90% of the paste gunk will come off and pile up on the blade.
- Rinse the blade in the bucket of hot water and do the next 3" strip. This works best on good hard flat plaster. If the plaster is less even, and you find you are missing hollows, try 1/2 blade width passes with on overlap.
- After you've scraped a section about a yard wide and a foot or two deep, put the blade down and use the floorcloth to wash the remainder of the glue off. With any luck, if scraping was effective, this will need perhaps 3-4 passes, with a fair bit of rubbing on one or two.
- If you run your finger over the wet surface you will feel if it's slimy or not. Not slimy is perfect - no glue left. Very slimy and you need to wash more. Slightly slimy - you need to decide if it's good enough.
Variations in technique and other tips from uk.d-i-y readers
- (Mostly verbatim from the original author) When stripping walls (as opposed to ceilings) I start at the top with a sprayer going around the whole room or a single long wall. I then strip as much as possible at the top of the wall leaving ragged edges to the remaining paper. Next, I go around again spraying just above the ragged edges and the effect of this is that the water running down tends to run behind the still attached paper causing less run-off onto the floor and softening the paper as it runs down between paper and plaster.


