Difference between revisions of "Stud wall"
m |
|||
| (45 intermediate revisions by 7 users not shown) | |||
| Line 1: | Line 1: | ||
| − | There are many ways to make '''partition walls''', but the most popular is timber frame & [[Sheet Materials#Plasterboard|plasterboard]]. | + | There are many ways to make '''partition walls''', but the most popular is with a timber frame & a [[Sheet Materials#Plasterboard|plasterboard]] (aka "sheet rock") covering. These walls are known as stud walls. Stud walls are more usually used for interior work, and are more commonly non load bearing - although contrary to popular belief, a stud wall can be load bearing in some cases - so it always pays to check first! Especially in UK listed buildings, structural studding was common in the 1800 era. Sometimes the timbers were in-filled with brick and lime mortar, but the timber took the weight. |
=Timber framed Walls= | =Timber framed Walls= | ||
| + | |||
Timber framing consists of: | Timber framing consists of: | ||
| − | |||
| − | |||
| − | |||
| − | |||
| − | |||
| − | |||
| + | [[image:StudWallTerms.png]] | ||
| + | |||
| + | * horizontal wood top and bottom, known as the base / sole / footer plate / rail and then top / header plate, and vertical wood attached to the wall at each end of the new wall. | ||
| + | * Wooden uprights anything from 1.5"x2.5" to 2"x4" spaced typically 16" or 24" apart | ||
| + | * Short horizontal noggings joining neighbouring uprights for increased strength and stiffness. | ||
| + | * [[Sheet Materials#Plasterboard|plasterboard]] attached to each side | ||
| + | * Mesh tape over the joints, though this can be omitted. | ||
| + | * Usually plaster skim both sides, though this is sometimes omitted and the joints and screwheads filled. | ||
| + | |||
| + | The 4 strips of wood making the outer frame are needed to secure the partition wall in place. Uprights are needed to provide the wall's strength. | ||
| + | |||
| + | Noggings prevent uprights twisting after fitting. Twisting would make small tears in the finish. Twisting may occur if no noggings are used. Noggings also increase the rigidity of the wall, and give the plasterboard some extra support. | ||
| + | * One line of noggings (also often called "noggins") is usual, and prevents significant twist. | ||
| + | * Two lines of noggings makes the [[Sheet Materials#Plasterboard|plasterboard]] more rigid, and makes the uprights practically twist proof. | ||
| + | * Three lines of noggings gives very short thin walls more rigidity and strength. This is only effective where wall width is not a great deal longer than height. | ||
| + | |||
| + | Mesh (or "Scrim") tape over the joints before plastering or filling prevents any loose pieces of joint [[filler]] falling out. It is sometimes omitted. | ||
| + | |||
| + | Plaster skim gives the cut & screwed PB a nice smooth surface. | ||
| + | |||
| + | ==Building a wall== | ||
| + | First fix the sole plate into position. Then fix the header plate (use a stud tapped into place mid span when fixing to hold it) | ||
| + | |||
| + | '''Don't drive the nails that fix the sole and header plates to the floor / ceiling fully home at this stage - wait until all the framework is complete (that makes it easy to tweak the position of the finished wall if needs be - just pull the nail free, and tap the wall over with a [[hammer]])''' | ||
| + | |||
| + | Studs need to be fixed into the top and bottom rails with skew or "tosh" nailing / screwing (i.e. the nail driven at an angle). Typically when framing with 4x2" timber the nail of choice is a 4" wire nail (or if using a [http://www.diyfaq.org.uk/powertools/nailer.htm framing nailer] a 90mm ring shank nail. Screws are also acceptable). Studs are spaced evenly along the wall usually 16/24" or 400/600mm. It is important to keep this spacing to a clean fraction of the plasterboard width, so that the edges of the board always fall on a stud without each board needing to be cut to fit. An additional closer stud is often needed at the wall end since the wall is unlikely to be an exact multiple of stud spacings. | ||
| + | |||
| + | [[image:FixingRailandStuds.png]] | ||
| + | |||
| + | |||
| + | Noggings are either be fixed in a straight line: | ||
| + | |||
| + | [[image:CompleteStudWallStructure.png]] | ||
| + | |||
| + | In which case, if working from left to right, the right hand end can be nailed square through the stud, and the left hand end skew nailed. (You can use an offcut of timber to wedge the nogging in place when skew nailing to stop it moving as you nail). | ||
| − | + | [[image:FixingNoggings.png]] | |
| − | + | or slightly staggered to make nailing easier - this way all the noggings can be fixed with nails / screws straight through the adjacent studs into the end grain of the nogging, rather than one end needing to be skew fixed: | |
| − | + | [[image:StudWallOffsetNoggings.png]] | |
| − | + | In which case each nogging can be nailed square from each end through the stud. At this stage, additional noggings can be included to support fixing of any heavy loads that you know the wall will need to carry (radiators, basins etc). | |
| − | |||
| − | |||
| − | + | Walls can be left empty, or the space inside can be filled with [[insulation]] material. This makes it more noise and fire resistant rather than improving the thermal performance of the wall. (Fitting quilted insulation is easier once one side of the wall has been boarded). ''(Note there is a trend with some modern high profile penny pinching house builders, to fill stud walls with any waste material that happens to be floating about like plasterboard offcuts etc. Apparently this helps reduce the volume and hence cost of disposing of waste materials!)'' | |
| − | + | ===Straightness & Alignment=== | |
| + | |||
| + | When the structure is in place, check everything for square and plumb. If necessary, free the top and bottom plate nails/screws, and tap the wall into final position with a lump hammer. When you are satisfied with the position, drive home the fixings. | ||
| + | |||
| + | Usually warped uprights are left as is, alignment is far from critical in the bowing out direction. If getting them straight matters, saw across them halfway deep on the inner side of the bow and hammer in wooden wedges with glue while pushing on them from the other side. | ||
| + | |||
| + | ===Boarding=== | ||
| + | |||
| + | Next fix the [[plasterboard]]. Ensure that every edge falls on a stud or nogging. Drywall screws are the ideal fixing method, and these should be driven every 6" to 12" apart. Boards can be fixed vertically: | ||
| + | |||
| + | [[image:StudWallVerticalPB.png]] | ||
| + | |||
| + | or horizontally: | ||
| + | |||
| + | [[image:StudWallHorizontalPB.png]] | ||
| + | |||
| + | If fixing horizontally, then the top and bottom sections can be staggered to add some extra rigidity to the [[wall]]. The choice of direction will depended a little on the size of plasterboard and the room. | ||
| + | |||
| + | If using taper edge boards, these are usually best fixed vertically. | ||
| + | |||
| + | Once the board is fixed, scrim [[tape]] should be applied over all the joins, and the wall either [[filler|filled]] and sanded, or skim plastered. | ||
| + | |||
| + | ====Nails or Screws==== | ||
| + | Many millions of plasterboard walls have been fixed with [[Nails|nails]], but [[Screws|plasterboard screws]] are now more popular. PB nails can give lousy performance. Even after many nails PB can very easily come loose, and is prone to popping plaster over nailheads and cracking up at joints. Plasterboard nails are an economy not recommended. | ||
| + | |||
| + | Always use bugle head PB screws and not ordinary countersunk screws. Standard screws cause the [[plaster]] to ruck up, ruining the finish. They also rust when plastered. If for some reason you need to use a standard screw or two, pre[[drill]] the plaster with clearance holes for them to minimise board breakup, and prime the screw head after fitting to avoid rust. | ||
| + | |||
| + | PB screws are sharp and also go into 0.5mm steel framing. | ||
| + | |||
| + | ===Doors / Windows=== | ||
| + | It is easy to include doors and windows into a stud wall. For example: | ||
| + | |||
| + | [[image:StudWallWithDoorWay.png]] | ||
| + | |||
| + | Keep your studs in the "right" places (i.e. normal spacing), and then add extra ones to frame the opening. Set this a few mm larger all round than the required door or window size. Also remember to allow for the thickness of the door lining in the case of doors, and for the sill in the case of windows. | ||
| + | |||
| + | '''Note it is handy to add extra noggings / studs where necessary to make plasterboard fixing easier - in the diagram above the extra set above the door allow a infill panel to be added above the door without needing to cut the plasterboard to go round the top of the frame.''' | ||
| + | |||
| + | Once the plasterboard is on, we are ready to fit the lining: | ||
| + | |||
| + | [[image:StudWallDoorReadyForFrame.png]] | ||
| + | |||
| + | The lining wants to be just slightly wider than the total wall thickness. If the wall is being skimmed, then allow a further 6mm so that the skim cab be brought up flush to the lining on each side. | ||
| + | |||
| + | Set the lining into the frame so that it is correctly spaced for the door to be hung. Add scraps of wood as packers behind the lining so that it can be fixed in the right place, and and allow it to be plumbed and squared up. | ||
| + | |||
| + | [[image:StudWallDoorFrameInPlace.png]] | ||
| + | See the [[Hanging_a_door#Fixing_the_lining|hanging a door]] article for more detail on the best way to fix the door lining. | ||
==Wood choice:== | ==Wood choice:== | ||
===Wood size=== | ===Wood size=== | ||
| + | * 1.5"x2.5" gives minimal sound absorption and is not recommended. However it does work and can be used where space is critical. The closer such uprights are spaced the better for sound insulation, but even 2' spacing is functional. Should only be used for rooms where sound insulation is unimportant. Such thinly framed walls are not suitable for plaster skimming. If you can spare another half inch, choose staggered isolated frames to gain some sound insulation, or larger timber for better rigidity. | ||
| − | * | + | * 2"x2" Many have been tempted to cut corners with 2x2 framing. Once skimmed, the wood moves enough to pop little pieces of plaster off over the screws. 2x2 is not recommended for general use, and is in fact slightly less rigid than 1.5x2.5. |
| − | * 2" | + | * 2"x3" sawn makes a wall suitable for skimming. Do not confuse this with 2x3 CLS or PSE, which tend to be closer to 1.5" x 2.5" in real life. |
| − | * | + | * 2x4 is the usual choice. It makes a wall with good rigidity about 5" thick |
| + | * 2x6 may be used for very large partition walls, such as in halls. | ||
| + | |||
| + | The 2 smaller sizes are ok for cupboards, where sound insulation is a non-issue. | ||
| + | |||
| + | ===Wood type=== | ||
| + | Rough sawn untreated wood is fine. If the wall is liable to get wet, eg close to a bath or shower, its worth using treated wood. | ||
===Quality of timber=== | ===Quality of timber=== | ||
| Line 45: | Line 127: | ||
Badly twisted wood may be used if trimmed. To ensure a nice flat wall, the high edges of warped wood can be sawn or planed down. Generally this is a waste of time, but if its that or drive out for more wood, planing is probably quicker. | Badly twisted wood may be used if trimmed. To ensure a nice flat wall, the high edges of warped wood can be sawn or planed down. Generally this is a waste of time, but if its that or drive out for more wood, planing is probably quicker. | ||
| − | Warped wood is fine, just fit it so the warp is sideways rather than outwards when possible. | + | Warped wood is fine (upto a point!), just fit it so the warp is sideways rather than outwards when possible. |
Small splits are unimportant, as is the appearance of the wood. | Small splits are unimportant, as is the appearance of the wood. | ||
| Line 57: | Line 139: | ||
Broken wood can be screwed or glued together and used if necessary. | Broken wood can be screwed or glued together and used if necessary. | ||
| − | In a pinch one can even use thinner bits of wood | + | In a pinch one can even use thinner bits of wood [[glue]]d & [[screw]]ed, glued & [[Tapes|taped]], or screwed together as an upright. (Tape is quicker than [[clamps]].) |
| − | Thinner scrap wood may be used for noggings if there is not enough full size wood in stock. Full size noggings | + | Thinner scrap wood may be used for noggings if there is not enough full size wood in stock. Full size noggings perform better, but aren't critical. |
Wood slightly too short can be padded at the top or bottom with an offcut. | Wood slightly too short can be padded at the top or bottom with an offcut. | ||
| − | 2 pieces of wood much too short may be | + | 2 pieces of wood much too short may be [[screw]]ed together to make one upright. Just put 2 screws through the overlapping section to create the length desired. |
| − | |||
| − | |||
| − | + | The 4 pieces of wood around the edges of the wall may be thinner than the rest. It won't flex as its screwed to walls, ceiling, etc. | |
| + | [[Wood Rot|Wood with rot]] or woodworm is not suitable. | ||
==Improving the Stud Wall== | ==Improving the Stud Wall== | ||
| Line 74: | Line 155: | ||
===Stronger Plasterboard=== | ===Stronger Plasterboard=== | ||
| − | [[Sheet Materials#Plasterboard|plasterboard]] walls are prone to being holed, and resonate when tapped, making them sound thin and hollow, which they are. Use 12mm PB not 9.5mm for better strength. The extra cost is tiny, and 12mm PB can be recommended in almost all cases. The only real plus of 9.5mm PB is its easier to hold up for ceiling use. | + | [[Sheet Materials#Plasterboard|plasterboard]] walls are prone to being holed, and resonate when tapped, making them sound thin and hollow, which they are. Use 12mm PB not 9.5mm for better strength. The extra cost is tiny, and 12mm PB can be recommended in almost all cases. The only real plus of 9.5mm PB is its easier to hold up for ceiling use. 15mm is also available for better robustness & sound blocking. |
| + | |||
| + | ===Two Layers of PB=== | ||
| + | Two layers of [[Sheet Materials#Plasterboard|plasterboard]] on each side give a much more robust & solid feeling wall with less resonance, less [[:Category:Noise|sound transmission]] and longer fire resistance. Stagger the PB joints in each layer for best result. | ||
===Isolated Framing=== | ===Isolated Framing=== | ||
By supporting each PB side on its own isolated framework, a main sound transmission path is broken. This can be achieved by providing twice as many framework studs and staggering them by at least half an inch. | By supporting each PB side on its own isolated framework, a main sound transmission path is broken. This can be achieved by providing twice as many framework studs and staggering them by at least half an inch. | ||
| − | Use of noggings is no longer possible. Uprights can be held true by using short pieces of wood at 45 degrees at the top and bottom of each upright | + | Use of noggings is no longer possible with this method, they would bridge the sound isolating gap. Uprights can be held true by using short pieces of wood at 45 degrees at the top and bottom of each upright, like so: |
| + | |||
| + | _________________ | ||
| + | _________________ | ||
| + | || \\|| \\|| \\|| | ||
| + | || \|| \|| \|| | ||
| + | || || || || | ||
| + | || || || || | ||
| + | || || || || | ||
| + | || /|| /|| /|| | ||
| + | ||_//||_//||_//|| | ||
| + | _________________ | ||
| + | |||
===Sound Absorbing Fill=== | ===Sound Absorbing Fill=== | ||
| − | Filling the cavity with rockwool deadens sound and gives longer fire resistance. | + | Noise nuisance is a big issue with plasterboard walls. |
| + | |||
| + | Filling the cavity with rockwool or fibreglass insulation deadens sound and gives longer fire resistance. The filling should be as dense as possible to be effective, choose batts rather than roll. | ||
| + | |||
| + | It doesn't normally give any heat saving advantage on an internal wall, since both sides are at the same temperature, and heat travel through the wall is not heat loss. Internal wall insulation reduces the wall's ability to equalise temperature differences between rooms. | ||
| + | |||
| + | There are several other filling options, discussed on [[Stud wall noise reduction]] | ||
===Fireproof Plasterboard=== | ===Fireproof Plasterboard=== | ||
| − | Pink fireproof [[Sheet Materials#Plasterboard|plasterboard]] contains glass fibre and gives longer fire resistance. | + | Pink fireproof [[Sheet Materials#Plasterboard|plasterboard]] contains glass fibre and gives longer fire resistance. 2 layers of ordinary plasterboard is another way to improve fire resistance times. |
| − | |||
| − | |||
| − | 2 layers of | ||
===Ply skin=== | ===Ply skin=== | ||
| − | Half inch [[Sheet Materials#Plywood|plywood]] skins (instead of [[Sheet Materials#Plasterboard|plasterboard]]) make these walls fairly much nutter proof. [[Sheet Materials#Plywood|Ply]] may be lined with lining paper to give a smooth paintable surface, after filling joints and screw heads. | + | Half inch [[Sheet Materials#Plywood|plywood]] skins (instead of [[Sheet Materials#Plasterboard|plasterboard]]) make these walls fairly much nutter proof. [[Sheet Materials#Plywood|Ply]] may be lined with lining paper to give a smooth paintable surface, after filling joints and screw heads, but its best to line it with plasterboard to provide fire resistance. |
===Camden Walls=== | ===Camden Walls=== | ||
When good soundproofing is required, google for Camden walls as developed by the BBC for studio work. | When good soundproofing is required, google for Camden walls as developed by the BBC for studio work. | ||
| − | |||
| − | |||
| − | |||
| − | |||
| − | |||
| − | |||
| − | |||
| − | |||
| − | |||
=Painting= | =Painting= | ||
| Line 124: | Line 214: | ||
==Metal framing== | ==Metal framing== | ||
| − | As timber frame but thin steel frame is used. The framing is bought in kit form. | + | As timber frame but thin steel frame is used. The framing is bought in kit form. Special "hard-wall" [[Screws|plasterboard screws]] will go straight into the metal. It's made of thin galvanised steel and doesn't rust, shrink or warp, Fixing is more difficult that wood because it will bend away from pressure from the screw. |
| − | ==Hollow [[concrete blocks]]== | + | Most builder suppliers stock metal framing, called C-stud and U-channel. Currently (2021) price is equal or cheaper than wood, the latter having soared in price recently. The U-channel is screwed to the floor and ceiling then the C-stud is slotted vertically between. Wear ear defenders when hack-sawing the stud! Usual stock widths are 50mm and 70mm but larger can be ordered. Lengths 2.4m, 2.7m, 3m are usual stock everywhere. |
| + | |||
| + | C-stud is meant to be clad on BOTH sides by plasterboard using dry-wall screws which have a bell-head and a hardened point. An electric screwdriver is needed, and a strong hand to stop the screw wobbling around and destroying the plasterboard before the point digs in. Fixing is a bit of an art. Otherwise you have to pre-drill with a light pressure and a fast speed using a 2.5mm drill. You will need to buy a pack of these as you will break some. | ||
| + | |||
| + | For dry-lining a wall, so.plasterboard only on one side, it is better to use I-stud instead of C-stud. You will need to order that, it's not usual stock. It is also stronger than C-stud so you will certainly need to pre-drill at 2.5mm. unless you have a drilling jig or a very strong arm. | ||
| + | |||
| + | Both C-stud and I-stud have 70mm holes punched through for services, spaced 600 apart. The convenience this offers means that metal stud goes up easier than wood if you have a lot of pipes and cables running along the wall. | ||
| + | |||
| + | ==Hollow [[Making Concrete Blocks|concrete blocks]]== | ||
Once a popular form of medium weight internal wall construction. | Once a popular form of medium weight internal wall construction. | ||
| Line 132: | Line 230: | ||
A popular medium weight alternative to framed walls. Better performance all round, but more work and cost to build. | A popular medium weight alternative to framed walls. Better performance all round, but more work and cost to build. | ||
| − | Block walls can be finished with a [[Plastering Beginner's Guide|wet plaster skim]], dot & dabbed [[Sheet Materials#Plasterboard|plasterboard]], or battens & [[Sheet Materials#Plasterboard|plasterboard]]. [[Sheet Materials#Plasterboard| | + | Block walls can be finished with a [[Plastering Beginner's Guide|wet plaster skim]], dot & dabbed [[Sheet Materials#Plasterboard|plasterboard]], or battens & [[Sheet Materials#Plasterboard|plasterboard]]. [[Sheet Materials#Plasterboard|Plasterboard]] is normally [[Plastering Beginner's Guide|skimmed]], but it can be just filled to save money. |
| − | |||
==Strawboard== | ==Strawboard== | ||
| − | A low cost thin wall with good sound insulation but poor strength. Quite possible to fall through such walls. Consists of thin uprights, straw infill and PB. | + | A low cost thin wall with good sound insulation but very poor strength. Quite possible to fall through such walls. Consists of thin uprights, straw infill and PB. |
==Poured concrete & Dense Concrete Block== | ==Poured concrete & Dense Concrete Block== | ||
| Line 144: | Line 241: | ||
=Thinnest Possible Wall= | =Thinnest Possible Wall= | ||
The question sometimes comes up, "what is the thinnest wall I can build?" There is no fixed answer in the sense that it is a continuum, the thinner the wall the weaker it is, the more sound it transmits, and the less durable it is. | The question sometimes comes up, "what is the thinnest wall I can build?" There is no fixed answer in the sense that it is a continuum, the thinner the wall the weaker it is, the more sound it transmits, and the less durable it is. | ||
| + | |||
| + | The thinnest workable wall of standard timber frame construction is 1.5x2.5 framing, fitted the thin way, with 12mm plasterboard. Noise reduction meaures are generally necessary, as such walls conduct sound well otherwise. | ||
If very poor performance were acceptable, a single layer of [[Sheet Materials#Plywood|half inch ply]] would make a wall, screwed at top and bottom with many [[Screws|screws]] from each side at a 45 degree angle into floor and ceiling. Or a sheet of 6mm [[Sheet Materials|fibre cement sheet]] could be supported on brackets top and bottom. | If very poor performance were acceptable, a single layer of [[Sheet Materials#Plywood|half inch ply]] would make a wall, screwed at top and bottom with many [[Screws|screws]] from each side at a 45 degree angle into floor and ceiling. Or a sheet of 6mm [[Sheet Materials|fibre cement sheet]] could be supported on brackets top and bottom. | ||
| − | The question then is one of trying to achieve passable performance with minimum thickness. There are a few main approaches to this, | + | The question then is one of trying to achieve passable performance with minimum thickness. There are a few main approaches to this, all of which can be used to enable a thinner frame. Doubtless there are others too: |
| − | |||
# replace PB with [[Sheet Materials#Plywood|plywood]] or [[Sheet Materials|fibre cement sheet]]. Screwing this every 6" to the wood frame helps stiffen the structure up. | # replace PB with [[Sheet Materials#Plywood|plywood]] or [[Sheet Materials|fibre cement sheet]]. Screwing this every 6" to the wood frame helps stiffen the structure up. | ||
# Use many noggings, so that the horizontal woodwork substantially stiffens the structure as well as the vertical. Note this method only adds significant strength with very short runs of wall. | # Use many noggings, so that the horizontal woodwork substantially stiffens the structure as well as the vertical. Note this method only adds significant strength with very short runs of wall. | ||
| − | # Make a wall from sapele veneered doors. Cut to required height, put in place and screw into the sides through the corners and into floor and ceiling. Fix the blind sides with glue. These don't make great walls, but are a quick easy method, and are very thin. | + | # Make a wall from sapele veneered doors, where their height is sufficient. Cut to required height, put in place and screw into the sides through the corners and into floor and ceiling. Fix the blind sides with glue. These don't make great walls, but are a quick easy method, and are very thin. |
# Use wide uprights. 2"x4" the wrong way round will give twice the stiffness of 2x2. Care needs to be taken to prevent misalignment and future twisting of the uprights, so noggings are important. | # Use wide uprights. 2"x4" the wrong way round will give twice the stiffness of 2x2. Care needs to be taken to prevent misalignment and future twisting of the uprights, so noggings are important. | ||
# Use hardwood uprights | # Use hardwood uprights | ||
| Line 157: | Line 255: | ||
# Build a 2" or 2.5" solid block wall, or poured [[Mortar Mixes|concrete]] wall. | # Build a 2" or 2.5" solid block wall, or poured [[Mortar Mixes|concrete]] wall. | ||
# Build a steel reinforced [[Mortar Mixes|fibre concrete]] wall less than 2" thick, anchoring it by fitting many corrosion proof [[Screws|screw]] heads round all 4 sides first. | # Build a steel reinforced [[Mortar Mixes|fibre concrete]] wall less than 2" thick, anchoring it by fitting many corrosion proof [[Screws|screw]] heads round all 4 sides first. | ||
| + | |||
| + | Discussion of [http://groups.google.com/group/uk.d-i-y/browse_frm/thread/7e91f1054a7e5fc2?hl=en+f3eea16dfb82940# other types of thin wall] | ||
=See Also= | =See Also= | ||
| + | * [http://groups.google.com/group/uk.d-i-y/browse_frm/thread/93d066ea52d5c9ff?hl=en# Repairing plasterboard walls] | ||
| + | * [http://groups.google.com/group/uk.d-i-y/browse_frm/thread/93d066ea52d5c9ff?hl=en# Fixing coathooks to PB walls] | ||
* [http://groups.google.co.uk/group/uk.d-i-y/browse_thread/thread/3e25231bb6eb1eba/c701fcecadcdff22#c701fcecadcdff22 discussion of acoustic insulation for PB walls] | * [http://groups.google.co.uk/group/uk.d-i-y/browse_thread/thread/3e25231bb6eb1eba/c701fcecadcdff22#c701fcecadcdff22 discussion of acoustic insulation for PB walls] | ||
| − | * [[Special:Allpages|Wiki | + | * [[Special:Allpages|Wiki Article Index]] |
* [[Special:Categories|Wiki Subject Categories]] | * [[Special:Categories|Wiki Subject Categories]] | ||
| Line 171: | Line 273: | ||
[[Category:Building]] | [[Category:Building]] | ||
[[Category:Construction]] | [[Category:Construction]] | ||
| + | [[Category:Walls]] | ||
Latest revision as of 20:52, 1 November 2021
There are many ways to make partition walls, but the most popular is with a timber frame & a plasterboard (aka "sheet rock") covering. These walls are known as stud walls. Stud walls are more usually used for interior work, and are more commonly non load bearing - although contrary to popular belief, a stud wall can be load bearing in some cases - so it always pays to check first! Especially in UK listed buildings, structural studding was common in the 1800 era. Sometimes the timbers were in-filled with brick and lime mortar, but the timber took the weight.
Timber framed Walls
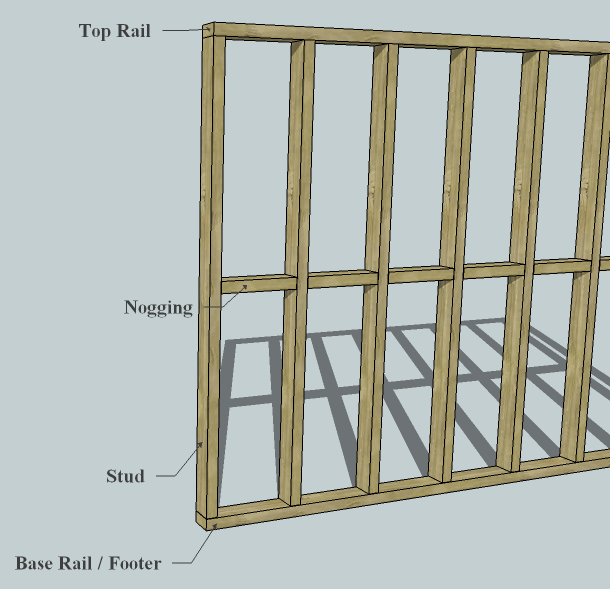
Timber framing consists of:
- horizontal wood top and bottom, known as the base / sole / footer plate / rail and then top / header plate, and vertical wood attached to the wall at each end of the new wall.
- Wooden uprights anything from 1.5"x2.5" to 2"x4" spaced typically 16" or 24" apart
- Short horizontal noggings joining neighbouring uprights for increased strength and stiffness.
- plasterboard attached to each side
- Mesh tape over the joints, though this can be omitted.
- Usually plaster skim both sides, though this is sometimes omitted and the joints and screwheads filled.
The 4 strips of wood making the outer frame are needed to secure the partition wall in place. Uprights are needed to provide the wall's strength.
Noggings prevent uprights twisting after fitting. Twisting would make small tears in the finish. Twisting may occur if no noggings are used. Noggings also increase the rigidity of the wall, and give the plasterboard some extra support.
- One line of noggings (also often called "noggins") is usual, and prevents significant twist.
- Two lines of noggings makes the plasterboard more rigid, and makes the uprights practically twist proof.
- Three lines of noggings gives very short thin walls more rigidity and strength. This is only effective where wall width is not a great deal longer than height.
Mesh (or "Scrim") tape over the joints before plastering or filling prevents any loose pieces of joint filler falling out. It is sometimes omitted.
Plaster skim gives the cut & screwed PB a nice smooth surface.
Building a wall
First fix the sole plate into position. Then fix the header plate (use a stud tapped into place mid span when fixing to hold it)
Don't drive the nails that fix the sole and header plates to the floor / ceiling fully home at this stage - wait until all the framework is complete (that makes it easy to tweak the position of the finished wall if needs be - just pull the nail free, and tap the wall over with a hammer)
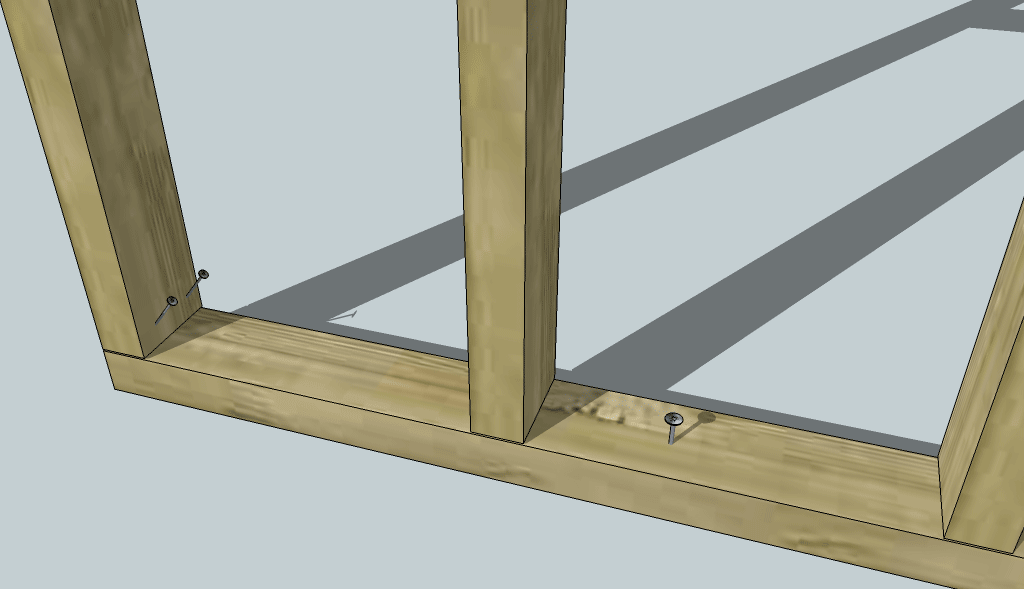
Studs need to be fixed into the top and bottom rails with skew or "tosh" nailing / screwing (i.e. the nail driven at an angle). Typically when framing with 4x2" timber the nail of choice is a 4" wire nail (or if using a framing nailer a 90mm ring shank nail. Screws are also acceptable). Studs are spaced evenly along the wall usually 16/24" or 400/600mm. It is important to keep this spacing to a clean fraction of the plasterboard width, so that the edges of the board always fall on a stud without each board needing to be cut to fit. An additional closer stud is often needed at the wall end since the wall is unlikely to be an exact multiple of stud spacings.
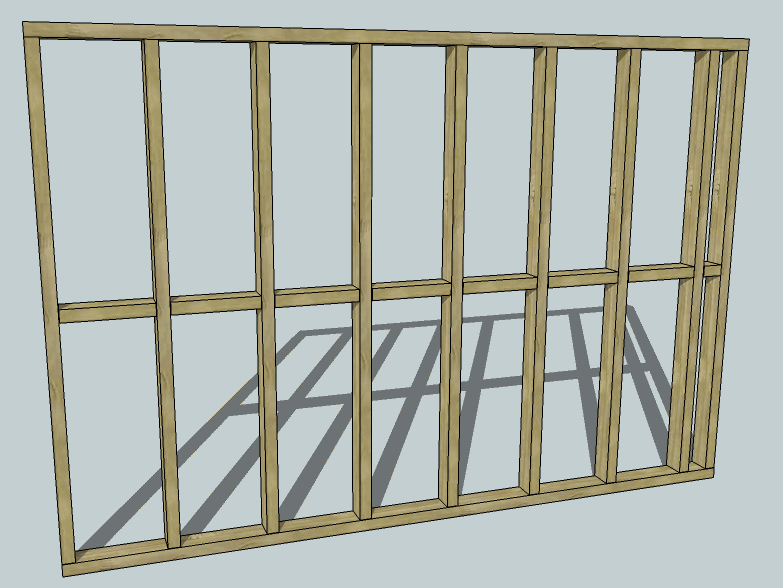
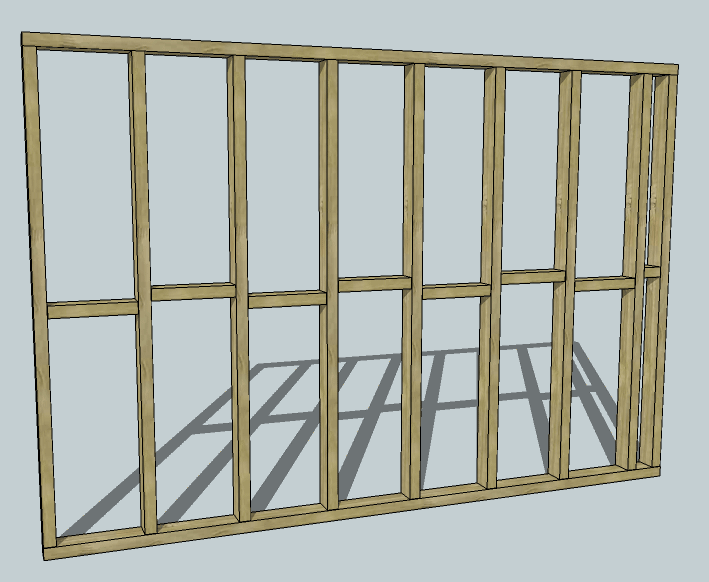
Noggings are either be fixed in a straight line:
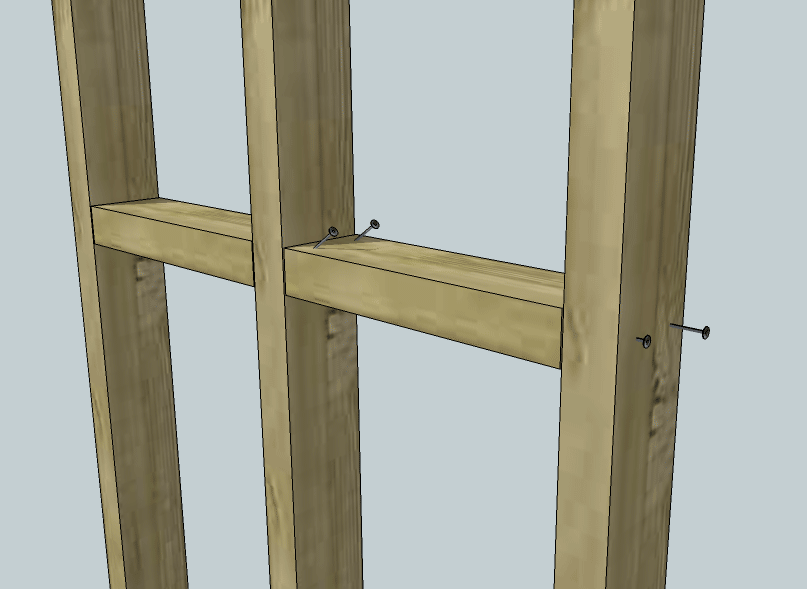
In which case, if working from left to right, the right hand end can be nailed square through the stud, and the left hand end skew nailed. (You can use an offcut of timber to wedge the nogging in place when skew nailing to stop it moving as you nail).
or slightly staggered to make nailing easier - this way all the noggings can be fixed with nails / screws straight through the adjacent studs into the end grain of the nogging, rather than one end needing to be skew fixed:
In which case each nogging can be nailed square from each end through the stud. At this stage, additional noggings can be included to support fixing of any heavy loads that you know the wall will need to carry (radiators, basins etc).
Walls can be left empty, or the space inside can be filled with insulation material. This makes it more noise and fire resistant rather than improving the thermal performance of the wall. (Fitting quilted insulation is easier once one side of the wall has been boarded). (Note there is a trend with some modern high profile penny pinching house builders, to fill stud walls with any waste material that happens to be floating about like plasterboard offcuts etc. Apparently this helps reduce the volume and hence cost of disposing of waste materials!)
Straightness & Alignment
When the structure is in place, check everything for square and plumb. If necessary, free the top and bottom plate nails/screws, and tap the wall into final position with a lump hammer. When you are satisfied with the position, drive home the fixings.
Usually warped uprights are left as is, alignment is far from critical in the bowing out direction. If getting them straight matters, saw across them halfway deep on the inner side of the bow and hammer in wooden wedges with glue while pushing on them from the other side.
Boarding
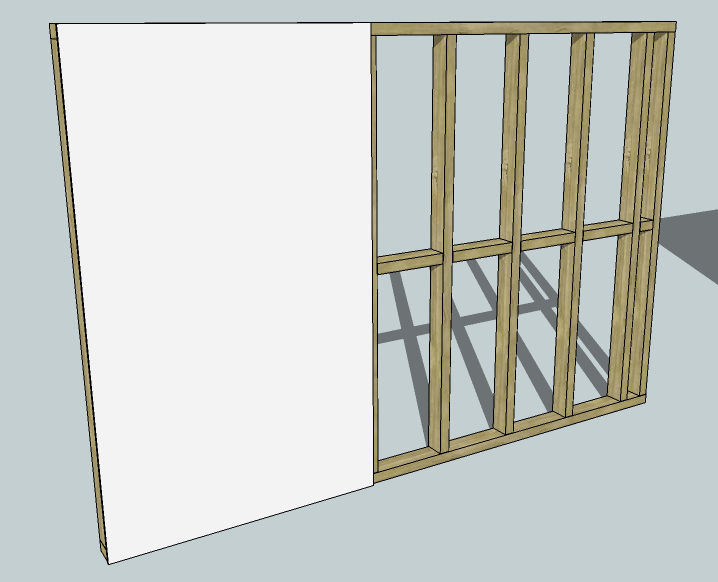
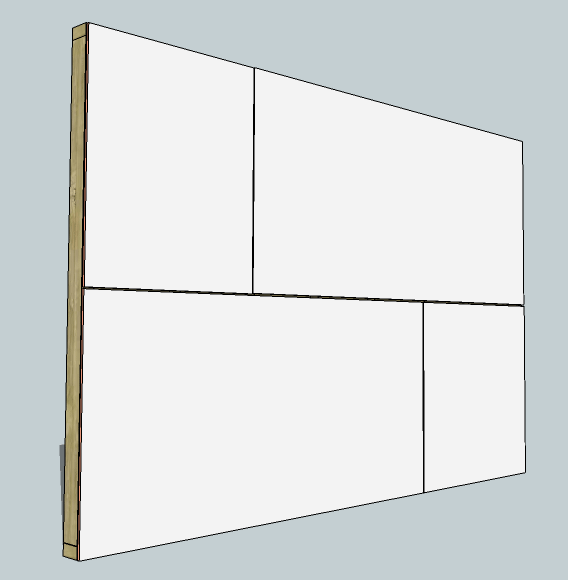
Next fix the plasterboard. Ensure that every edge falls on a stud or nogging. Drywall screws are the ideal fixing method, and these should be driven every 6" to 12" apart. Boards can be fixed vertically:
or horizontally:
If fixing horizontally, then the top and bottom sections can be staggered to add some extra rigidity to the wall. The choice of direction will depended a little on the size of plasterboard and the room.
If using taper edge boards, these are usually best fixed vertically.
Once the board is fixed, scrim tape should be applied over all the joins, and the wall either filled and sanded, or skim plastered.
Nails or Screws
Many millions of plasterboard walls have been fixed with nails, but plasterboard screws are now more popular. PB nails can give lousy performance. Even after many nails PB can very easily come loose, and is prone to popping plaster over nailheads and cracking up at joints. Plasterboard nails are an economy not recommended.
Always use bugle head PB screws and not ordinary countersunk screws. Standard screws cause the plaster to ruck up, ruining the finish. They also rust when plastered. If for some reason you need to use a standard screw or two, predrill the plaster with clearance holes for them to minimise board breakup, and prime the screw head after fitting to avoid rust.
PB screws are sharp and also go into 0.5mm steel framing.
Doors / Windows
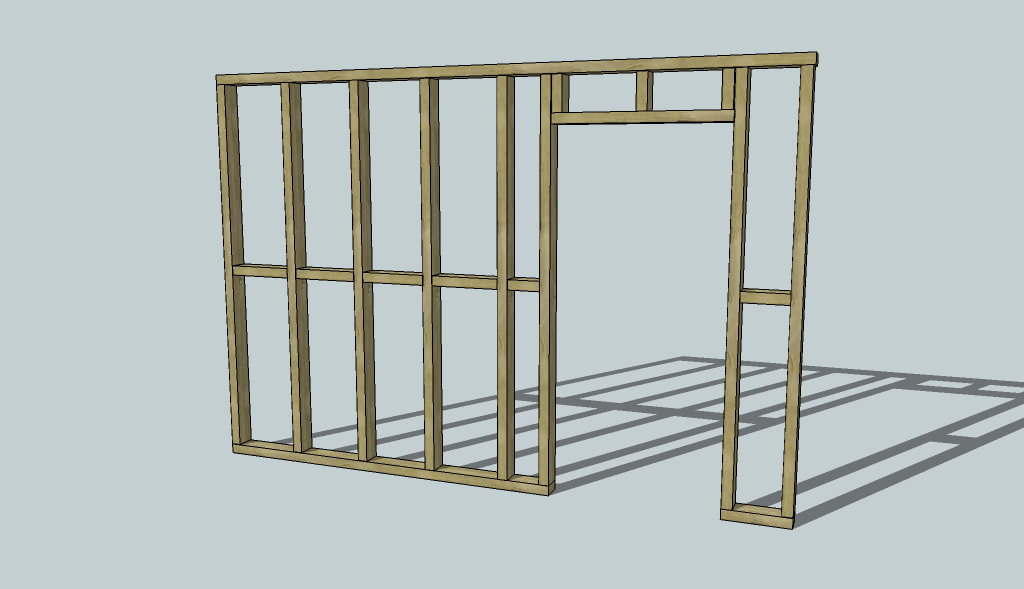
It is easy to include doors and windows into a stud wall. For example:
Keep your studs in the "right" places (i.e. normal spacing), and then add extra ones to frame the opening. Set this a few mm larger all round than the required door or window size. Also remember to allow for the thickness of the door lining in the case of doors, and for the sill in the case of windows.
Note it is handy to add extra noggings / studs where necessary to make plasterboard fixing easier - in the diagram above the extra set above the door allow a infill panel to be added above the door without needing to cut the plasterboard to go round the top of the frame.
Once the plasterboard is on, we are ready to fit the lining:
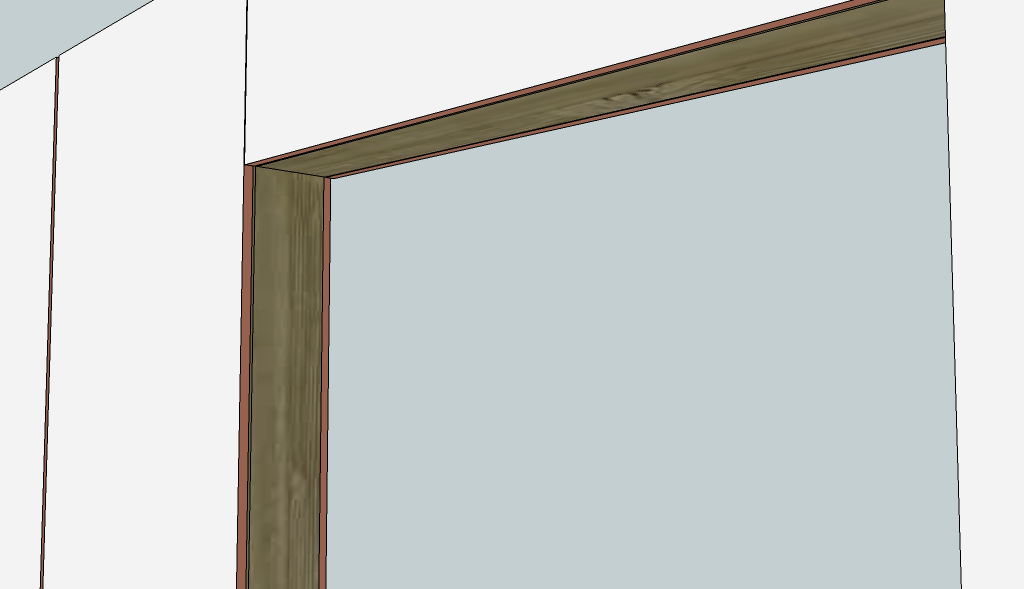
The lining wants to be just slightly wider than the total wall thickness. If the wall is being skimmed, then allow a further 6mm so that the skim cab be brought up flush to the lining on each side.
Set the lining into the frame so that it is correctly spaced for the door to be hung. Add scraps of wood as packers behind the lining so that it can be fixed in the right place, and and allow it to be plumbed and squared up.
See the hanging a door article for more detail on the best way to fix the door lining.
Wood choice:
Wood size
- 1.5"x2.5" gives minimal sound absorption and is not recommended. However it does work and can be used where space is critical. The closer such uprights are spaced the better for sound insulation, but even 2' spacing is functional. Should only be used for rooms where sound insulation is unimportant. Such thinly framed walls are not suitable for plaster skimming. If you can spare another half inch, choose staggered isolated frames to gain some sound insulation, or larger timber for better rigidity.
- 2"x2" Many have been tempted to cut corners with 2x2 framing. Once skimmed, the wood moves enough to pop little pieces of plaster off over the screws. 2x2 is not recommended for general use, and is in fact slightly less rigid than 1.5x2.5.
- 2"x3" sawn makes a wall suitable for skimming. Do not confuse this with 2x3 CLS or PSE, which tend to be closer to 1.5" x 2.5" in real life.
- 2x4 is the usual choice. It makes a wall with good rigidity about 5" thick
- 2x6 may be used for very large partition walls, such as in halls.
The 2 smaller sizes are ok for cupboards, where sound insulation is a non-issue.
Wood type
Rough sawn untreated wood is fine. If the wall is liable to get wet, eg close to a bath or shower, its worth using treated wood.
Quality of timber
The quality of timber used for framing may be low. Timber frame walls are an opportunity to use up some of the junk.
Wood may be twisted to some degree. Once the PB is on a few mm undulation is not normally noticeable.
Badly twisted wood may be used if trimmed. To ensure a nice flat wall, the high edges of warped wood can be sawn or planed down. Generally this is a waste of time, but if its that or drive out for more wood, planing is probably quicker.
Warped wood is fine (upto a point!), just fit it so the warp is sideways rather than outwards when possible.
Small splits are unimportant, as is the appearance of the wood.
Wood may be rough sawn, planed, or scrap wood with paint on. None of it will be seen once the wall is done.
Wood may be damaged or have holes. Just avoid holes of such size as to significantly weaken the timber.
Badly twisted, split or damaged wood may be cut to short lengths for nogging use.
Broken wood can be screwed or glued together and used if necessary.
In a pinch one can even use thinner bits of wood glued & screwed, glued & taped, or screwed together as an upright. (Tape is quicker than clamps.)
Thinner scrap wood may be used for noggings if there is not enough full size wood in stock. Full size noggings perform better, but aren't critical.
Wood slightly too short can be padded at the top or bottom with an offcut.
2 pieces of wood much too short may be screwed together to make one upright. Just put 2 screws through the overlapping section to create the length desired.
The 4 pieces of wood around the edges of the wall may be thinner than the rest. It won't flex as its screwed to walls, ceiling, etc.
Wood with rot or woodworm is not suitable.
Improving the Stud Wall
There are some ways to improve the performance of these walls.
Stronger Plasterboard
plasterboard walls are prone to being holed, and resonate when tapped, making them sound thin and hollow, which they are. Use 12mm PB not 9.5mm for better strength. The extra cost is tiny, and 12mm PB can be recommended in almost all cases. The only real plus of 9.5mm PB is its easier to hold up for ceiling use. 15mm is also available for better robustness & sound blocking.
Two Layers of PB
Two layers of plasterboard on each side give a much more robust & solid feeling wall with less resonance, less sound transmission and longer fire resistance. Stagger the PB joints in each layer for best result.
Isolated Framing
By supporting each PB side on its own isolated framework, a main sound transmission path is broken. This can be achieved by providing twice as many framework studs and staggering them by at least half an inch.
Use of noggings is no longer possible with this method, they would bridge the sound isolating gap. Uprights can be held true by using short pieces of wood at 45 degrees at the top and bottom of each upright, like so:
_________________
_________________
|| \\|| \\|| \\||
||  \||  \||  \||
||   ||   ||   ||
||   ||   ||   ||
||   ||   ||   ||
||  /||  /||  /||
||_//||_//||_//||
_________________
Sound Absorbing Fill
Noise nuisance is a big issue with plasterboard walls.
Filling the cavity with rockwool or fibreglass insulation deadens sound and gives longer fire resistance. The filling should be as dense as possible to be effective, choose batts rather than roll.
It doesn't normally give any heat saving advantage on an internal wall, since both sides are at the same temperature, and heat travel through the wall is not heat loss. Internal wall insulation reduces the wall's ability to equalise temperature differences between rooms.
There are several other filling options, discussed on Stud wall noise reduction
Fireproof Plasterboard
Pink fireproof plasterboard contains glass fibre and gives longer fire resistance. 2 layers of ordinary plasterboard is another way to improve fire resistance times.
Ply skin
Half inch plywood skins (instead of plasterboard) make these walls fairly much nutter proof. Ply may be lined with lining paper to give a smooth paintable surface, after filling joints and screw heads, but its best to line it with plasterboard to provide fire resistance.
Camden Walls
When good soundproofing is required, google for Camden walls as developed by the BBC for studio work.
Painting
New plaster is absorbent. If you paint on it with standard strength emulsion the paint layer will be sucked dry and lose much of its water based adhesive.
There are 2 ways to resolve this.
- Make the first paint coat diluted 50/50 with water.
- Brush on a coat of water, which can be done very rapidly due to no need for care. Give it a few minutes then apply normal strength paint.
The 2nd option has advantages:
- no mixing, no container to clean up
- quicker
- first coat is full strength not half
- Better adhesive retention in the paint layer
Other wall types
Metal framing
As timber frame but thin steel frame is used. The framing is bought in kit form. Special "hard-wall" plasterboard screws will go straight into the metal. It's made of thin galvanised steel and doesn't rust, shrink or warp, Fixing is more difficult that wood because it will bend away from pressure from the screw.
Most builder suppliers stock metal framing, called C-stud and U-channel. Currently (2021) price is equal or cheaper than wood, the latter having soared in price recently. The U-channel is screwed to the floor and ceiling then the C-stud is slotted vertically between. Wear ear defenders when hack-sawing the stud! Usual stock widths are 50mm and 70mm but larger can be ordered. Lengths 2.4m, 2.7m, 3m are usual stock everywhere.
C-stud is meant to be clad on BOTH sides by plasterboard using dry-wall screws which have a bell-head and a hardened point. An electric screwdriver is needed, and a strong hand to stop the screw wobbling around and destroying the plasterboard before the point digs in. Fixing is a bit of an art. Otherwise you have to pre-drill with a light pressure and a fast speed using a 2.5mm drill. You will need to buy a pack of these as you will break some.
For dry-lining a wall, so.plasterboard only on one side, it is better to use I-stud instead of C-stud. You will need to order that, it's not usual stock. It is also stronger than C-stud so you will certainly need to pre-drill at 2.5mm. unless you have a drilling jig or a very strong arm.
Both C-stud and I-stud have 70mm holes punched through for services, spaced 600 apart. The convenience this offers means that metal stud goes up easier than wood if you have a lot of pipes and cables running along the wall.
Hollow concrete blocks
Once a popular form of medium weight internal wall construction.
Aerated concrete blocks (aka Breeze blocks)
A popular medium weight alternative to framed walls. Better performance all round, but more work and cost to build.
Block walls can be finished with a wet plaster skim, dot & dabbed plasterboard, or battens & plasterboard. Plasterboard is normally skimmed, but it can be just filled to save money.
Strawboard
A low cost thin wall with good sound insulation but very poor strength. Quite possible to fall through such walls. Consists of thin uprights, straw infill and PB.
Poured concrete & Dense Concrete Block
Two heavyweight types of wall. Generally unsuitable for supporting on ceiling/floor woodwork due to high weight. Can be used on concrete ground floors, but aerated blocks are normally enough.
Thinnest Possible Wall
The question sometimes comes up, "what is the thinnest wall I can build?" There is no fixed answer in the sense that it is a continuum, the thinner the wall the weaker it is, the more sound it transmits, and the less durable it is.
The thinnest workable wall of standard timber frame construction is 1.5x2.5 framing, fitted the thin way, with 12mm plasterboard. Noise reduction meaures are generally necessary, as such walls conduct sound well otherwise.
If very poor performance were acceptable, a single layer of half inch ply would make a wall, screwed at top and bottom with many screws from each side at a 45 degree angle into floor and ceiling. Or a sheet of 6mm fibre cement sheet could be supported on brackets top and bottom.
The question then is one of trying to achieve passable performance with minimum thickness. There are a few main approaches to this, all of which can be used to enable a thinner frame. Doubtless there are others too:
- replace PB with plywood or fibre cement sheet. Screwing this every 6" to the wood frame helps stiffen the structure up.
- Use many noggings, so that the horizontal woodwork substantially stiffens the structure as well as the vertical. Note this method only adds significant strength with very short runs of wall.
- Make a wall from sapele veneered doors, where their height is sufficient. Cut to required height, put in place and screw into the sides through the corners and into floor and ceiling. Fix the blind sides with glue. These don't make great walls, but are a quick easy method, and are very thin.
- Use wide uprights. 2"x4" the wrong way round will give twice the stiffness of 2x2. Care needs to be taken to prevent misalignment and future twisting of the uprights, so noggings are important.
- Use hardwood uprights
- Use uprights more closely spaced, eg 1' or less apart.
- Build a 2" or 2.5" solid block wall, or poured concrete wall.
- Build a steel reinforced fibre concrete wall less than 2" thick, anchoring it by fitting many corrosion proof screw heads round all 4 sides first.
Discussion of other types of thin wall
