Waste pipe
Pipe Sizes & Types
The (nominal) sizes of waste pipe used for domestic houses are
- 21.5mm
- 32mm (aka 1.25")
- 40mm (aka 1.5")
- 50mm (aka 2")
- 110mm (aka "soil pipe")
Uses of the nominal sizes:
- 21.5mm - overflow pipe from cisterns, and condensate drains from boilers.
- 32mm - for basin or bidet (upto 3 can be connected to a 32mm pipe).
- 40mm - for kitchen sink, washing machine etc, can service several appliances.
- 50mm - for many appliances & food waste disposal units.
- 110mm - for toilets and main connection to underground sewage systems from the house to the street.
Larger sizes also exist, and are used in flats and large houses.
There are 2 types of pipe, solvent weldable and push fit. For a given nominal size,
- Solvent weld pipes are slightly larger in diameter than the nominal size (so 40mm pipe actually has an OD of around 42-43mm).
- Solvent weld pipes are generally all the same real size regardless of manufacturer.
- Solvent weld pipe is typically a slightly "harder" ABS style plastic. (you can shatter it if you hit it hard enough)
- Push fit pipes are fractionally smaller, and closer to the nominal size.
- Exact push fit pipe size varies a bit between manufacturers, but most of the different makes of fittings are interchangeable.
- Push fit pipes tend to be made from a slightly more flexible polypropylene material. (Pipe will tend to fold or crush rather than break)
- Just to be helpful, all these pipe variations are described using exactly the same nominal size description. Note that the different sizes are deliberately used to make sure you can't use the wrong type of fitting with a pipe.
- Solvent weld pipe can't be used with push fit fittings.
- Push fit pipe can't be used with solvent weld fittings.
- "Universal" Compression fittings are also available, and will fit both types of pipe.
Types of fitting
Solvent Weld
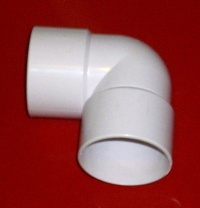
Solvent weld
- small & slim
- relatively cheap fittings
- use solvent weld pipe only, the other type won't fit or weld
- undoing a solvent weld is completely impossible, the plastic fuses together becoming one piece
Fitting
Ensure the pipe end is cut clean and square, and any burrs are removed. Brush on pipe weld solvent to both the pipe and the socket of the fitting, and assemble the joint immediately. A twisting action will help ensure all surfaces are bonded, and speed the curing time. Once the joint starts to set (10 seconds or so) rotate to the final position and leave it alone to set.
If the pipe isn't clean, use a scourer first.
- Remember to include sufficient access / rodding points in the pipework, since the joints can't be separated later.
Pushfit
- Quick & easy to use
- relatively slim and neat
- Joints can be pulled apart later
- Proper pipe support is needed to ensure joints can't separate unexpectedly.
Fitting
Ensure the pipe end is cut clean and square, and any burrs are removed. Sanding, cutting a slight bevel on the leading edge of the pipe can aid assembly. Push the pipe firmly into the socket of the fitting. A twisting action can help it insert.
Its common to use with water based gel lubricants, or silicone grease on push fit fittings to aid assembly. Note that if you use grease the fitting will remain permanently slightly more "mobile". This may or may not be desirable depending on the application.
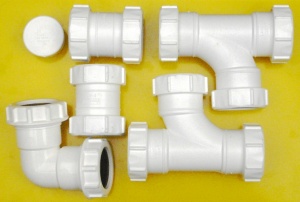
Compression / Universal
- bulkier
- more expensive
- generally these fit all variations of a given nominal size of pipe
- dismountable
- reusable if the rubber rings are ok (replacements are available)
- check its watertight after fitting, as its possible for the rubber sealing ring to sit wrong and allow leakage
Fitting
Ensure the pipe end is cut clean and square, and any burrs are removed.
Its normally best to disassemble the fitting. There will often be a back nut, a profiled rubber O ring seal, and often a plastic ring to act as a washer between the back nut at the seal. Slide the back nut onto the pipe first. Then the plastic ring, then the seal. Ensure that the bevelled edge of the seal is pointing in the direction of the socket of the fitting. Push the pipe into the fitting, and slide the seal and plastic ring up the pipe into the gap between pipe and socket. Now tighten the back nut hand tight.
Using a silicone grease lubricant on the seal can make for a more reliable seal, and also allows the jointed to be more easily tightened by hand.
Fall
New pipework should have a fall of 18-90 mm/metre to comply with building regs part H. Pipework outside these figures has increased tendency to deposit solids, increasing risk of blockage.
Occasionally waste pipework is seen that flows uphill. Water isn't so keen on going upwards, and such arrangements tend to either not work or collect solids and be prone to blocking.
Compliance
New pipework must be building regs compliant at time of fitting. Old pipework need not legally meet any building regulations, current or past, and upgrades of such pipework are at the discretion of the householder. A lot of non-compliant pipework works fine in practice.
Blockage prevention
- Correct fall
- Straight as possible runs, minimise the of use right angle joints
- Enough access points to enable rodding the full length of the pipe.
- Where space permits, a swept bend is better than a sharp right angle
- Avoid putting any cooking fat or solids down the sink. Molten fat causes lots of blockages.
Badly designed pipework with very poor flow is occasionally seen. With this, an occasional flush can help reduce solids build up, lessening the risk of blockage. This is easily done by eg filling the sink at the beginning of the pipe run to the brim, and letting it flush the pipe.
Impending blockages are easier to clear than a blocked pipe, and can be spotted in 3 ways:
- sink drains very slowly
- outflow of pipework very slow (visible on old open drain systems)
- Trickling sound of pipework continues awhile after the sink etc is empty
Unblocking
Cutting
The main ways to cut plastic waste pipe are:
- Plastic pipe cutters - these look like giant secateurs
- Saw - most types will do it, but a fine tooth hacksaw blade is ideal.
Sawn ends need the outer & inner burr trimming off with a knife or a pipe deburring tool.
Clips
Plastic pipes sag easily under the load of water, and should be clipped to the wall. Failure to do so results in sag, increased risk of blockage and tendency for the pipe to pull out of pushfit or compression fittings.
Different types and brands of pipe clips have differing pipe to wall spacing.
If you're missing a clip somewhere and the pipework will be out of sight, a protruding screw into the wall under a pipe can be used to support it.
Lubrication
Silicone grease on rubber rings in fittings isn't essential, you can assemble pushfit without, but it makes it much easier, especially on larger stuff like WC connectors.
Grease makes the assembly simpler, you're less likely to dislodge a sealing ring on a pushfit, it can also improve the seal in the case of minor scratches on the pipe, and universal fittings do up tighter and more easily with a little grease. Silicone sprays can be faster to apply on large fittings.
Its important to use silicone rather than other types of grease so as not to attack the rubber of the seal.
Some of the pushfit makers sell branded tubs of it right beside the fittings. Makers like Polypipe recommend its use in assembly. See (3) in opening section here
CPC sell small 50g tubes of silcone grease that last for ages. Much cheaper than the pipe makers branded ones. One of these in the plumbing kit will last for years. (Very good for stopping leaks on rubber seals on cars as well I find - a gentle wipe over will often stop water or wind ingress. Also for getting tight sleeves over wires and cables etc.)

