Difference between revisions of "Coffee table - Limbert style"
(work in progress) |
m (→Assembly: added note on assembly error outcome) |
||
| (17 intermediate revisions by 2 users not shown) | |||
| Line 4: | Line 4: | ||
The year end was near, and it was decreed that a coffee table shall be brought forth... What kind of table enquired the humble carpenter? It should be easy enough to nail one of those together, if we could agree on a design! | The year end was near, and it was decreed that a coffee table shall be brought forth... What kind of table enquired the humble carpenter? It should be easy enough to nail one of those together, if we could agree on a design! | ||
| − | Eventually after looking at lots, it was decided that one featured in the Dec 2010 cover of Fine Woodworking magazine should fit the bill nicely... This is the story of its creation. | + | Eventually after looking at lots, it was decided that one featured in the Dec 2010 cover of Fine Woodworking magazine should fit the bill nicely... Its basically a scaled down version of a similar design created by Charles Limbert, and features many of his typical design cues. |
| + | |||
| + | This is the story of its creation. | ||
==Design== | ==Design== | ||
| Line 10: | Line 12: | ||
==Materials== | ==Materials== | ||
| − | This project really cried out for some real Oak. Some enquiries of local merchants eventually found a decent source from [http://www.eoburton.com/ EO Burton] in Brentwood. There was even a choice of American White Oak and European Oak. Since the American version was significantly cheaper (£95 vs £160), and we don't really need the extra durability of English Oak, this is what I went for. | + | This project really cried out for some real Oak. Some enquiries of local merchants eventually found a decent source from [http://www.eoburton.com/ EO Burton] in Brentwood. There was even a choice of American White Oak and European Oak. Since the American version was significantly cheaper (£95 vs £160), and we don't really need the extra durability of English Oak, this is what I went for: |
| + | |||
| + | [[image:SawnAmericanWhiteOak.jpg]] | ||
| − | + | Partly to keep costs down, and partly to see how successfully I could build from sawn kiln dried timber without buying it already machined, I thought it would be interesting to buy the rough lumber and machine it myself prior to use. | |
| − | Partly to keep costs down, and partly to see how successfully I could build from sawn kiln dried timber without buying it already machined, I thought it would be | ||
===Preparation - Legs=== | ===Preparation - Legs=== | ||
| Line 20: | Line 23: | ||
[[image:BoardCuppedBeforePlaning.jpg]] | [[image:BoardCuppedBeforePlaning.jpg]] | ||
| − | To prep these, I ran the cupped side over the surface planer / jointer first, to get a flat reference face, and then used this against the fence of the planer to get a perpendicular edge. With this edge against the table saw fence it was then sawn to slightly over its final 4" width. Then using the planer to finish the other edge and bring it to final width. The second bowed face was then removed by the planer thicknesser when the | + | To prep these, I ran the cupped side over the surface planer / jointer first, to get a flat reference face, and then used this against the fence of the planer to get a perpendicular edge. With this edge against the table saw fence it was then sawn to slightly over its final 4" width. Then using the planer to finish the other edge and bring it to final width. The second bowed face was then removed by the planer thicknesser when the board was brought down to its final thickness of around 1 and 1/8th inch. |
[[image:LegSectionPlanedAndThicknessed.jpg]] | [[image:LegSectionPlanedAndThicknessed.jpg]] | ||
| + | |||
| + | (there are some nice videos showing the steps required for processing a rough sawn board like this down to a piece usable for furniture on Youtube. Here is [http://www.youtube.com/watch?v=G3YbasoBKpY one example]) | ||
===Preparation - Main table top=== | ===Preparation - Main table top=== | ||
| − | The table top was specced at 3/4" thickness, The boards I had for this were at least 8" wide, and typically around 1" thickness. Alas my jointer planer is only 6" wide, which meant either ripping each board in half to allow them to be accurately machined on the surface planer first, (and then going with a more complicated glue up), or taking a chance on "skip" planing. In the end I opted for the latter having selected a couple of nice untwisted boards to make the table top from. These were surfaced on '''both''' sides using the | + | The table top was specced at 3/4" thickness, The boards I had for this were at least 8" wide, and typically around 1" thickness. Alas my jointer planer is only 6" wide, which meant either ripping each board in half to allow them to be accurately machined on the surface planer first, (and then going with a more complicated glue up), or taking a chance on "skip" planing using just the thicknesser. In the end I opted for the latter having selected a couple of nice reasonably untwisted boards to make the table top from. These were surfaced on '''both''' sides using the thicknesser. (This only really works on boards that are not twisted, since the thicknesser does not have the capability to remove twist easily - basically it just makes sure one face is flat relative to another!) These were then edge planed on the surface planer, and glued up into a wide table top: |
[[image:MainTableTopBoardGlueUp.jpg]] | [[image:MainTableTopBoardGlueUp.jpg]] | ||
| − | Some solid softwood cauls were used to make sure the top surface was kept as near as possible flat. The contact surface of the cauls was covered with PVC packing tape to make sure they did not get glued to the table! Since there was a slight variation in panel twist, the glue up was | + | Some 4x2" solid softwood cauls were used to make sure the top surface was kept as near as possible flat. The contact surface of the cauls was covered with PVC packing tape to make sure they did not get glued to the table! Since there was a slight variation in panel twist, the glue up was done in three goes - with middle two boards first, and then the outer two added on after. |
| + | |||
| + | (normally I would have included a few biscuits in each joint to aid the alignment against the top face when gluing up, but I did not want to run the risk of having one become visible at the perimeter when the ellipse was cut!) | ||
===Preparation - thinner boards=== | ===Preparation - thinner boards=== | ||
| − | The majority of the rest of the timber required was only 5/8th of an inch thick. To plane this all down from 1" stock seemed rather wasteful given that the primary stages of machining had already generated 2 dustbin loads worth | + | The majority of the rest of the timber required was only 5/8th of an inch thick. To plane this all down from 1" stock seemed rather wasteful given that the primary stages of machining had already generated 2 dustbin loads worth of planer shavings! So with these boards I ripped them down to narrow widths, and then used the [[bandsaw]] to resaw them closer to final thickness, before starting planing. |
| + | |||
| + | [[image:ResawPlankThinner.jpg]] | ||
| + | |||
| + | ==Construction== | ||
| + | Once all the timber was prepared, it was time to start building... | ||
| + | |||
| + | ===Legs=== | ||
| + | The legs each require four machining operations. The first was to cut the notch for the lower table. This was done for all four legs in one go using a sledge on the table saw to notch out the sides accurately, and then using multiple passes to waste away the remaining timber. | ||
| + | |||
| + | Stage two was to cut the mortice slots for the stretchers. This was done with a 1/4" hollow chisel in a bench morticing machine. | ||
| + | |||
| + | [[image:LegMorticesAndRebatesDone.jpg]] | ||
| + | |||
| + | Stage three was to cut the bridle joints into the tops of the legs. This would be easy to do with a traditional table saw tenon jig, but alas I don't have one. Hence I made a taller extra fence to fix to the first one to help guide them safely on end over the blade: | ||
| + | |||
| + | [[image:TenonJigFence.jpg]] | ||
| + | |||
| + | The final stage was to cut the taper on the upper section of the leg. To mark the wood for the cut, I clamped a block of wood to the side of the leg, and then clamped a wooden rule to the block. This was then bent to the required curve and used to pencil in the line: | ||
| + | |||
| + | [[image:MarkingTheCurveOnTheLegs.jpg]] | ||
| + | |||
| + | The legs where then cut on the [[bandsaw]], and finished to the final shape using a belt sander. | ||
| + | |||
| + | [[image:TableLegsFinished.jpg]] | ||
| + | |||
| + | ===Templates=== | ||
| + | To get from the rectangle to final elliptical shape, needs a template. I made both templates for upper and lower table tops from the same section of 1/2" ply. The ellipses are marked out using a pair of panel pins - one tapped into each foci, and loop of string placed round them. The string then guides a pencil line. The foci are spaced at 17 and 5/16" for the smaller ellipse, and 24 1/4" for the large one. The ply was the cut just outside the line with the [[bandsaw]]. The smaller template was then cut free with a jigsaw. These were then very carefully sanded to the line to get a nice smooth shape. | ||
| + | |||
| + | [[image:EllipseJig.jpg]] | ||
| + | |||
| + | Can you spot where I worked out my sheet of ply was too narrow? | ||
| + | |||
| + | (In an ideal world a thin sheet of MDF would probably make a batter template, than this rather shonky bit of shuttering ply) | ||
| + | |||
| + | ===Lower Table=== | ||
| + | The lower table was glued up from 4 smaller planks, and trimmed to a rectangle as a first stage. | ||
| + | |||
| + | The boards where then rough sanded to remove all traces of glue squeeze out, and also to hide any errors in the board alignment using a hand held belt sander with a coarse 40 grit belt (dry oak really does take some effort to sand!) | ||
| + | |||
| + | The rebates on the mid span of each side where then cut with the table saw and the planks clamped on edge to the front of a table sledge. Again using multiple passes to notch out the waste. | ||
| + | |||
| + | [[image:LowerTableFIrstStage.jpg]] | ||
| + | |||
| + | Using the template, the shape was them marked and the top cut roughly to size on the [[bandsaw]]. The template was then clamped to the oak, and a bearing guided flush trim bit using in a router to machine the table top to the exact shape of the template. | ||
| + | |||
| + | ===Upper Table=== | ||
| + | This was a repeat of the smaller one, just on a bigger scale. Just to add a little drama, a slight snag when routing ripped out a small section of the edge: | ||
| + | |||
| + | [[image:RouterTableEdgeDamage.jpg]] | ||
| + | |||
| + | This could probably have been prevented by flipping the whole job over half way through and swapping from a top bearing guided bit to a bottom baring guided bit. Thus allowing all of the grain to be routed "down hill". | ||
| + | |||
| + | A couple of minutes work with the belt sander however allowed this error to be polished away (at the expense of the table no longer being a perfect ellipse!) | ||
| + | |||
| + | [[image:TopTableCutToShape.jpg]] | ||
| + | |||
| + | ===The Stretchers=== | ||
| + | The stretchers where made from a single 7" wide board (I had originally cut these for the lower table, but found there was a very slight cup in them after machining - so decided to use these boards for the stretchers where the cup would not be visible and would also be restrained by the tenons and rebates) | ||
| + | |||
| + | The next stage needed another jig, to make the Limbert style cutouts: | ||
| + | |||
| + | [[image:CutoutRouterJig.jpg]] | ||
| + | |||
| + | Made from some 1/2" ply, the original cutout was made using the side fence on the router, to index the cutter from the edges of the jig (which was cut square to start with). A small 1/4" solid carbide bit was used, and an additional 6mm of offset allowed for a standard 16mm template guide to be used for the final cut with the jig. | ||
| + | |||
| + | The jig was then used to cut the decorative 3x2" holes in the stretchers: | ||
| + | |||
| + | [[image:LongStretcherCutouts.jpg]] | ||
| + | |||
| + | This was also the first deviation from the original plans, that called for the ends of the stretchers to be morticed in the same way as the legs, and slip tenons used to join them. Instead I cut them longer and made traditional tenons on the end using the table saw, with a precise blade height adjustment to cut the shoulders with the wood flat on the table against the fence (removing the remainder with extra passes). | ||
| + | |||
| + | The shorter stretcher has a rebate 5/8" wide and 1/8" deep, cut the full height of the overlap on both sides to allow the edges of the join to be hidden: | ||
| + | |||
| + | [[image:StretcherRebate.jpg]] | ||
| + | |||
| + | The next stage of the stretchers was to use the table saw sled to notch out the haunches for the tenons: | ||
| + | |||
| + | [[image:CuttingTenonHaunches.jpg]] | ||
| + | |||
| + | And also to start the half lap joint that allowed one stretcher to cross the other (the full depth could not be cut on the table saw, so the remainder needed to be cut by hand and chiselled out). | ||
| + | |||
| + | [[image:StretchersAssembled.jpg]] | ||
| + | |||
| + | ===The Table Bearers=== | ||
| + | The last components to make are the table bearers. These are both 2 and 1/4" tall, and 5/8" thick. They have a half lap cut in the centre. The ends are trimmed at a 45 degree bevel. Screw holes were also drilled to allow the table top to be fixed. These were part drilled with a 10mm lip and spur bit, and then through drilled with a 6mm bit. The final assembly to use 4mm diameter 50mm length Reisser gold passivated screws to fix the table. The little bit of slop in the holes will accommodate any seasonal movement in the big table top. | ||
| + | |||
| + | ==Pre Finishing== | ||
| + | To make finishing easier, some of it was done at this stage. First all components were thoroughly sanded at 60, 120, and finally 240 grit, using a combination of belt, random orbit, and orbital sander. | ||
| + | |||
| + | A first coat of Liberon finishing oil was also applied at this stage to make cleanup of any assembly glue spills easier. | ||
| + | |||
| + | All the sharp corners were also broken with a 1/4" round over bit in a trim router. | ||
| + | |||
| + | ==Assembly== | ||
| + | Assembly needs to be done in a strict order, since the lower table is not fixed in position, but it is captive! | ||
| + | |||
| + | The stetchers were glued up first, and clamped to a square block to make the intersection properly square. Then one leg was mounted on its joint and glued in place.* The lower table can then be positioned. Its important to the keep the top of the stretchers exactly aligned with the lower rebate coutout in the leg so that the table can slip into placewith its notches overlapping with those in the legs. Now the additional legs can be added in sequence (the cutouts in the stretchers make an easy place to add clamps to pull the mortice and tenon joints up tight). | ||
| + | |||
| + | ''* The original intention was to only glue the top tenon to allow the stretcher room to move with humidity changes - however an error in assembly meant I glued the bottom ones as well by mistake - so we will have to hope the wood was already dry enough not to shrink much further and cause the stretcher to split!'' | ||
| + | |||
| + | ''' ''(Update, two years on - seem to have gotten away with it - a couple of seasons later, and no splits yet)'' ''' | ||
| + | |||
| + | [[image:LowerSectionAssembly.jpg]] | ||
| + | |||
| + | A rasp was used to fettle any rebate sides as required to get a nice fit where some of the original joints were a little tight for assembly (even if technically "correct" according to the design). | ||
| + | |||
| + | Next the bearers were glued in place: | ||
| + | |||
| + | [[image:TableBaseFullyAssembled.jpg]] | ||
| + | |||
| + | And finally the top mounted: | ||
| + | |||
| + | [[image:TableFullyAssembledWithTopOn.jpg]] | ||
| + | |||
| + | ==Finishing== | ||
| + | Prior to application of the final finish there was a quick chance to tweak any errors in fit... Slight gaps at the interface of the lower table and a couple of legs were filled with suitable shavings of wood and pared flat with a chisel. Any other minor gaps were filled with a filler simply made from some of the fine oak sawdust collected from the sanding, mixed with a little Tightbond glue. | ||
| + | |||
| + | I did cut some oak plugs to fill the screw access holes in the bearers, but since you have to lay on the floor and look up under the table to see them, and I wanted to keep the screws accessible should it ever be necessary to remove the top later for refinishing, I did not bother fitting them in the end. | ||
| + | |||
| + | To finish the table, two more coats of finishing oil were applied, and then left to dry for a day or so. Finally the finish was polished with some Liberon Black Bison Wax, and buffed to a slight sheen: | ||
| + | |||
| + | [[image:TableSurfaceLusterFromOil.jpg]] | ||
| + | |||
| + | And there you have it, construction was spread over about 10 days working a few hours a day. Most of the time was spent milling all the wood to shape and size. Building one from PAR pre-prepared planks would probably only take about three days. | ||
| + | |||
| + | ==See also== | ||
| + | * [[:Category: Projects]] | ||
| + | * [[:Category: Furniture]] | ||
| + | * [[:Category: Wood]] | ||
| + | * [[Special:Allpages|Wiki Contents]] | ||
| + | * [[Special:Categories|Wiki Subject Categories]] | ||
| + | |||
| + | |||
| + | [[Category: Projects]] | ||
| + | [[Category: Furniture]] | ||
| + | [[Category: Wood]] | ||
Revision as of 02:32, 6 June 2016
Introduction
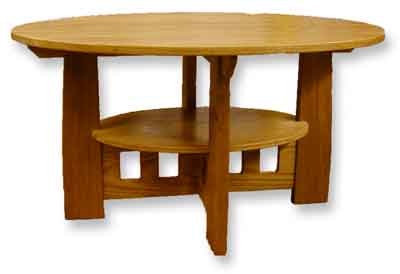
The year end was near, and it was decreed that a coffee table shall be brought forth... What kind of table enquired the humble carpenter? It should be easy enough to nail one of those together, if we could agree on a design!
Eventually after looking at lots, it was decided that one featured in the Dec 2010 cover of Fine Woodworking magazine should fit the bill nicely... Its basically a scaled down version of a similar design created by Charles Limbert, and features many of his typical design cues.
This is the story of its creation.
Design
Nice thing about this one is that its already been done for you. They will even sell you a complete set of plans either printed, or as a digital download. If you can find a copy of the magazine article about, then there is also just about enough information in that to do the build.
Materials
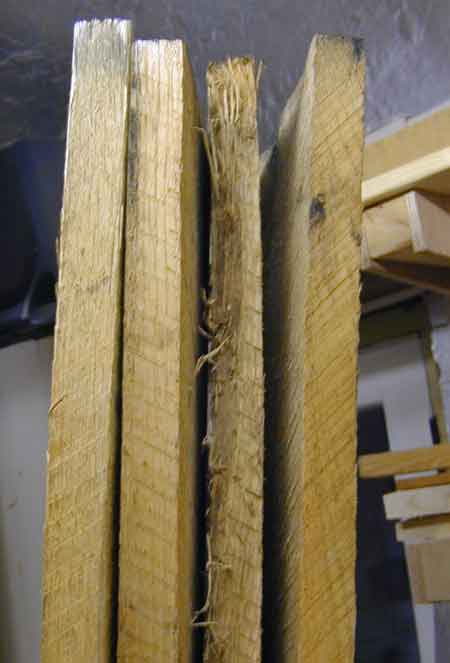
This project really cried out for some real Oak. Some enquiries of local merchants eventually found a decent source from EO Burton in Brentwood. There was even a choice of American White Oak and European Oak. Since the American version was significantly cheaper (£95 vs £160), and we don't really need the extra durability of English Oak, this is what I went for:
Partly to keep costs down, and partly to see how successfully I could build from sawn kiln dried timber without buying it already machined, I thought it would be interesting to buy the rough lumber and machine it myself prior to use.
Preparation - Legs
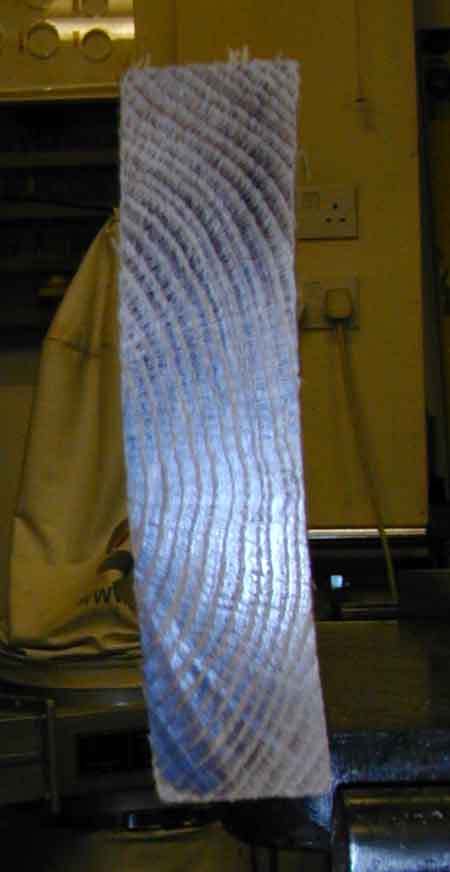
The legs were made from a single 2.1m board of around 6x2" cross section. This was a nice straight board, but it did exhibit some cupping as you can see from the photo below:
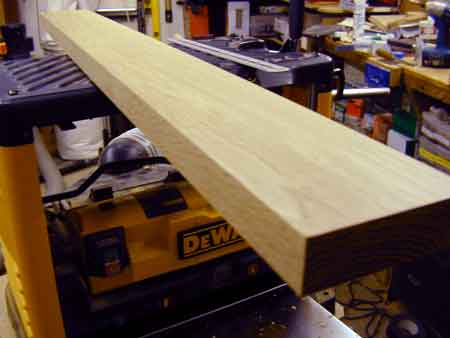
To prep these, I ran the cupped side over the surface planer / jointer first, to get a flat reference face, and then used this against the fence of the planer to get a perpendicular edge. With this edge against the table saw fence it was then sawn to slightly over its final 4" width. Then using the planer to finish the other edge and bring it to final width. The second bowed face was then removed by the planer thicknesser when the board was brought down to its final thickness of around 1 and 1/8th inch.
(there are some nice videos showing the steps required for processing a rough sawn board like this down to a piece usable for furniture on Youtube. Here is one example)
Preparation - Main table top
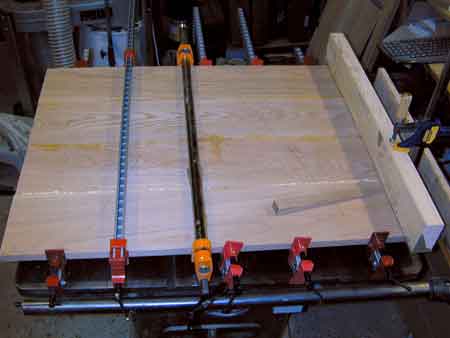
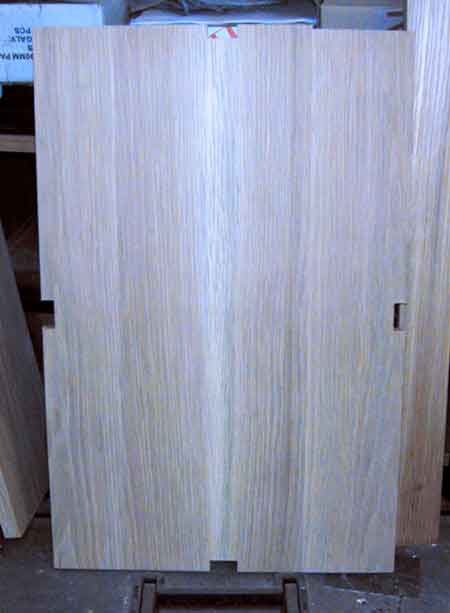
The table top was specced at 3/4" thickness, The boards I had for this were at least 8" wide, and typically around 1" thickness. Alas my jointer planer is only 6" wide, which meant either ripping each board in half to allow them to be accurately machined on the surface planer first, (and then going with a more complicated glue up), or taking a chance on "skip" planing using just the thicknesser. In the end I opted for the latter having selected a couple of nice reasonably untwisted boards to make the table top from. These were surfaced on both sides using the thicknesser. (This only really works on boards that are not twisted, since the thicknesser does not have the capability to remove twist easily - basically it just makes sure one face is flat relative to another!) These were then edge planed on the surface planer, and glued up into a wide table top:
Some 4x2" solid softwood cauls were used to make sure the top surface was kept as near as possible flat. The contact surface of the cauls was covered with PVC packing tape to make sure they did not get glued to the table! Since there was a slight variation in panel twist, the glue up was done in three goes - with middle two boards first, and then the outer two added on after.
(normally I would have included a few biscuits in each joint to aid the alignment against the top face when gluing up, but I did not want to run the risk of having one become visible at the perimeter when the ellipse was cut!)
Preparation - thinner boards
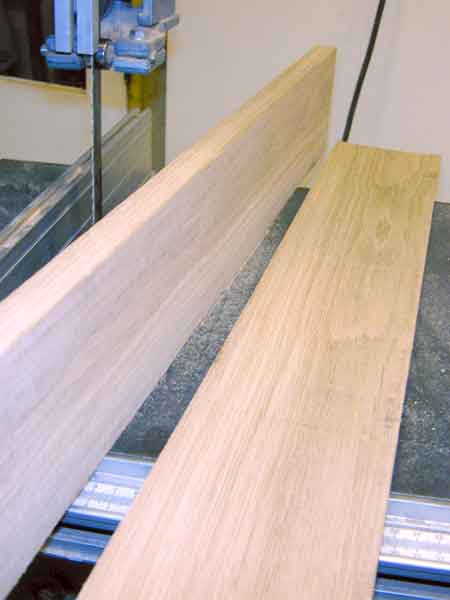
The majority of the rest of the timber required was only 5/8th of an inch thick. To plane this all down from 1" stock seemed rather wasteful given that the primary stages of machining had already generated 2 dustbin loads worth of planer shavings! So with these boards I ripped them down to narrow widths, and then used the bandsaw to resaw them closer to final thickness, before starting planing.
Construction
Once all the timber was prepared, it was time to start building...
Legs
The legs each require four machining operations. The first was to cut the notch for the lower table. This was done for all four legs in one go using a sledge on the table saw to notch out the sides accurately, and then using multiple passes to waste away the remaining timber.
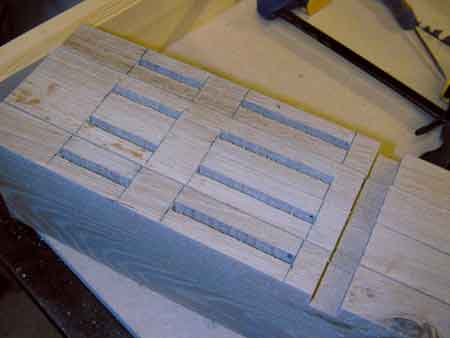
Stage two was to cut the mortice slots for the stretchers. This was done with a 1/4" hollow chisel in a bench morticing machine.
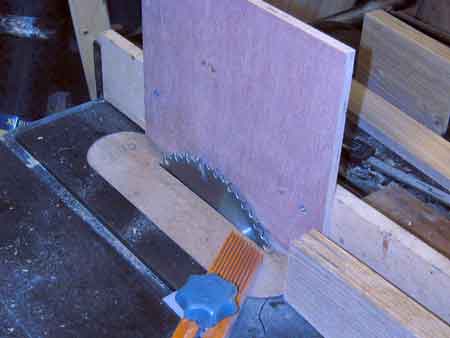
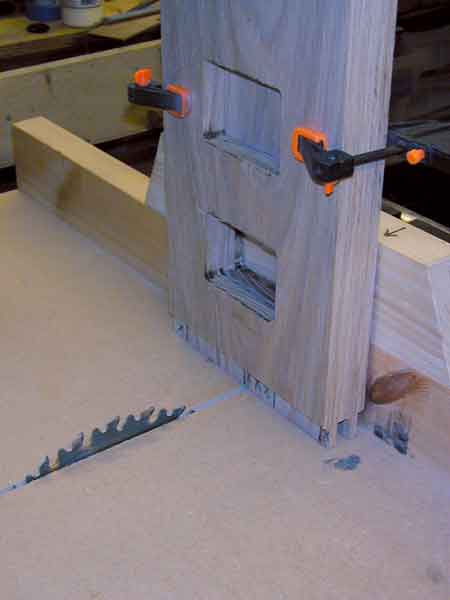
Stage three was to cut the bridle joints into the tops of the legs. This would be easy to do with a traditional table saw tenon jig, but alas I don't have one. Hence I made a taller extra fence to fix to the first one to help guide them safely on end over the blade:
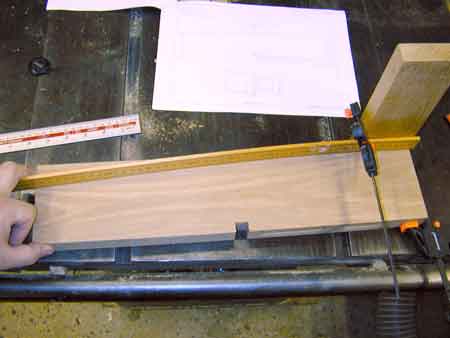
The final stage was to cut the taper on the upper section of the leg. To mark the wood for the cut, I clamped a block of wood to the side of the leg, and then clamped a wooden rule to the block. This was then bent to the required curve and used to pencil in the line:
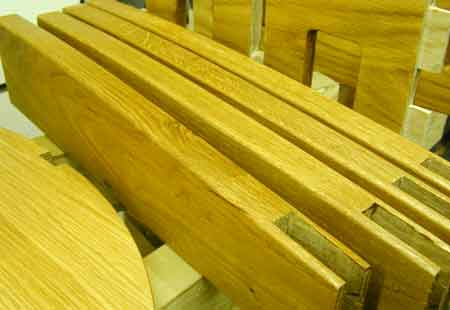
The legs where then cut on the bandsaw, and finished to the final shape using a belt sander.
Templates
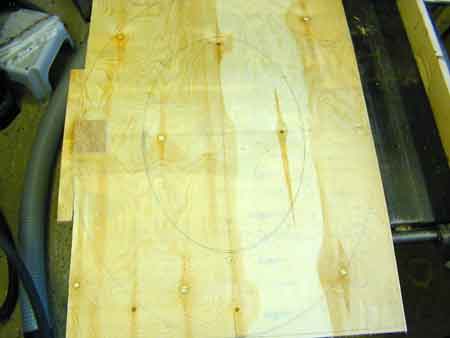
To get from the rectangle to final elliptical shape, needs a template. I made both templates for upper and lower table tops from the same section of 1/2" ply. The ellipses are marked out using a pair of panel pins - one tapped into each foci, and loop of string placed round them. The string then guides a pencil line. The foci are spaced at 17 and 5/16" for the smaller ellipse, and 24 1/4" for the large one. The ply was the cut just outside the line with the bandsaw. The smaller template was then cut free with a jigsaw. These were then very carefully sanded to the line to get a nice smooth shape.
Can you spot where I worked out my sheet of ply was too narrow?
(In an ideal world a thin sheet of MDF would probably make a batter template, than this rather shonky bit of shuttering ply)
Lower Table
The lower table was glued up from 4 smaller planks, and trimmed to a rectangle as a first stage.
The boards where then rough sanded to remove all traces of glue squeeze out, and also to hide any errors in the board alignment using a hand held belt sander with a coarse 40 grit belt (dry oak really does take some effort to sand!)
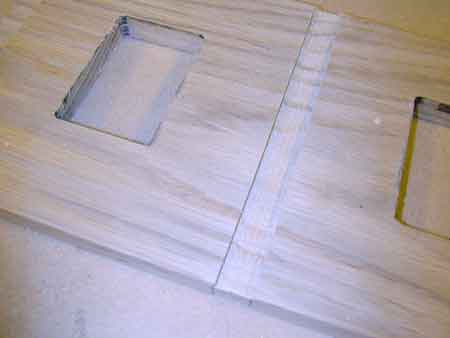
The rebates on the mid span of each side where then cut with the table saw and the planks clamped on edge to the front of a table sledge. Again using multiple passes to notch out the waste.
Using the template, the shape was them marked and the top cut roughly to size on the bandsaw. The template was then clamped to the oak, and a bearing guided flush trim bit using in a router to machine the table top to the exact shape of the template.
Upper Table
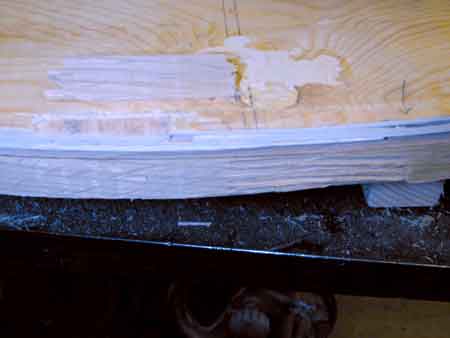
This was a repeat of the smaller one, just on a bigger scale. Just to add a little drama, a slight snag when routing ripped out a small section of the edge:
This could probably have been prevented by flipping the whole job over half way through and swapping from a top bearing guided bit to a bottom baring guided bit. Thus allowing all of the grain to be routed "down hill".
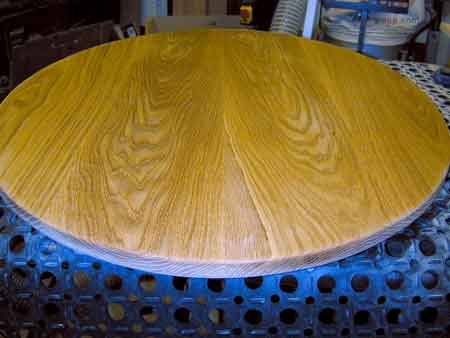
A couple of minutes work with the belt sander however allowed this error to be polished away (at the expense of the table no longer being a perfect ellipse!)
The Stretchers
The stretchers where made from a single 7" wide board (I had originally cut these for the lower table, but found there was a very slight cup in them after machining - so decided to use these boards for the stretchers where the cup would not be visible and would also be restrained by the tenons and rebates)
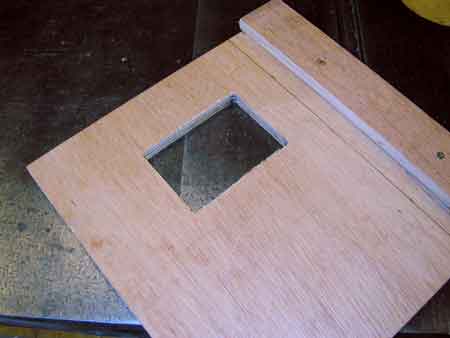
The next stage needed another jig, to make the Limbert style cutouts:
Made from some 1/2" ply, the original cutout was made using the side fence on the router, to index the cutter from the edges of the jig (which was cut square to start with). A small 1/4" solid carbide bit was used, and an additional 6mm of offset allowed for a standard 16mm template guide to be used for the final cut with the jig.
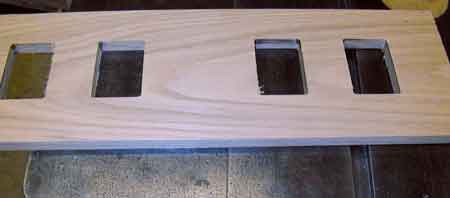
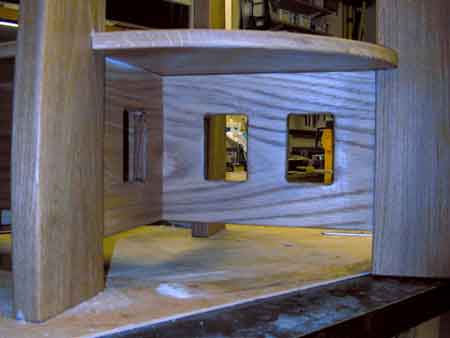
The jig was then used to cut the decorative 3x2" holes in the stretchers:
This was also the first deviation from the original plans, that called for the ends of the stretchers to be morticed in the same way as the legs, and slip tenons used to join them. Instead I cut them longer and made traditional tenons on the end using the table saw, with a precise blade height adjustment to cut the shoulders with the wood flat on the table against the fence (removing the remainder with extra passes).
The shorter stretcher has a rebate 5/8" wide and 1/8" deep, cut the full height of the overlap on both sides to allow the edges of the join to be hidden:
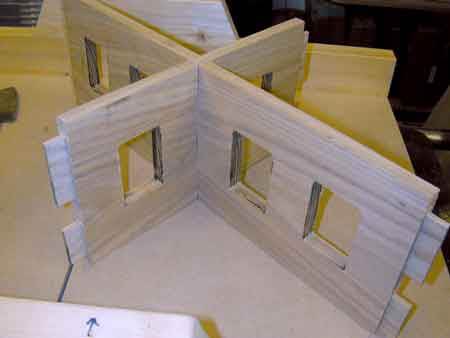
The next stage of the stretchers was to use the table saw sled to notch out the haunches for the tenons:
And also to start the half lap joint that allowed one stretcher to cross the other (the full depth could not be cut on the table saw, so the remainder needed to be cut by hand and chiselled out).
The Table Bearers
The last components to make are the table bearers. These are both 2 and 1/4" tall, and 5/8" thick. They have a half lap cut in the centre. The ends are trimmed at a 45 degree bevel. Screw holes were also drilled to allow the table top to be fixed. These were part drilled with a 10mm lip and spur bit, and then through drilled with a 6mm bit. The final assembly to use 4mm diameter 50mm length Reisser gold passivated screws to fix the table. The little bit of slop in the holes will accommodate any seasonal movement in the big table top.
Pre Finishing
To make finishing easier, some of it was done at this stage. First all components were thoroughly sanded at 60, 120, and finally 240 grit, using a combination of belt, random orbit, and orbital sander.
A first coat of Liberon finishing oil was also applied at this stage to make cleanup of any assembly glue spills easier.
All the sharp corners were also broken with a 1/4" round over bit in a trim router.
Assembly
Assembly needs to be done in a strict order, since the lower table is not fixed in position, but it is captive!
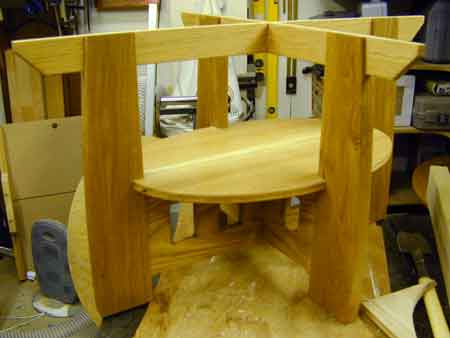
The stetchers were glued up first, and clamped to a square block to make the intersection properly square. Then one leg was mounted on its joint and glued in place.* The lower table can then be positioned. Its important to the keep the top of the stretchers exactly aligned with the lower rebate coutout in the leg so that the table can slip into placewith its notches overlapping with those in the legs. Now the additional legs can be added in sequence (the cutouts in the stretchers make an easy place to add clamps to pull the mortice and tenon joints up tight).
* The original intention was to only glue the top tenon to allow the stretcher room to move with humidity changes - however an error in assembly meant I glued the bottom ones as well by mistake - so we will have to hope the wood was already dry enough not to shrink much further and cause the stretcher to split!
(Update, two years on - seem to have gotten away with it - a couple of seasons later, and no splits yet)
A rasp was used to fettle any rebate sides as required to get a nice fit where some of the original joints were a little tight for assembly (even if technically "correct" according to the design).
Next the bearers were glued in place:
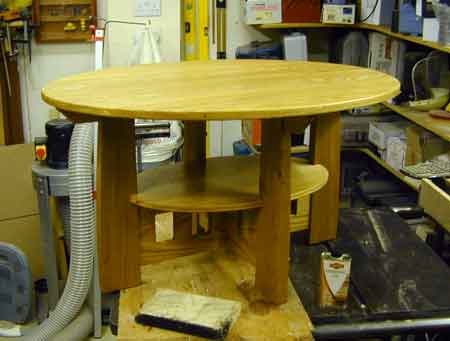
And finally the top mounted:
Finishing
Prior to application of the final finish there was a quick chance to tweak any errors in fit... Slight gaps at the interface of the lower table and a couple of legs were filled with suitable shavings of wood and pared flat with a chisel. Any other minor gaps were filled with a filler simply made from some of the fine oak sawdust collected from the sanding, mixed with a little Tightbond glue.
I did cut some oak plugs to fill the screw access holes in the bearers, but since you have to lay on the floor and look up under the table to see them, and I wanted to keep the screws accessible should it ever be necessary to remove the top later for refinishing, I did not bother fitting them in the end.
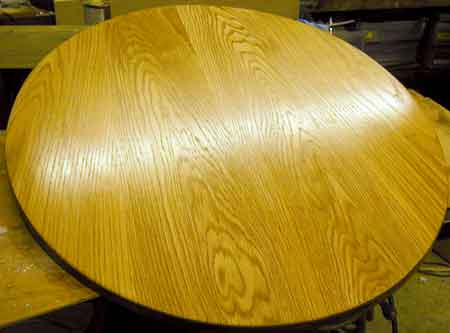
To finish the table, two more coats of finishing oil were applied, and then left to dry for a day or so. Finally the finish was polished with some Liberon Black Bison Wax, and buffed to a slight sheen:
And there you have it, construction was spread over about 10 days working a few hours a day. Most of the time was spent milling all the wood to shape and size. Building one from PAR pre-prepared planks would probably only take about three days.
