Difference between revisions of "Curtain rail"
(→Rail fixings: m) |
|||
| (20 intermediate revisions by the same user not shown) | |||
| Line 37: | Line 37: | ||
==Rail types== | ==Rail types== | ||
| − | + | [[image:Curtain rail sliders 4921-3.jpg|100px|right]] | |
| − | The 2nd type uses much larger runners that wrap around the whole rail. The middle 2 items in the yellow | + | There are 2 main types of [[plastic]] rail. One type has grooves moulded along it, and little runners that move along this groove, as shown on the right. The little runners tend to break over many years, so its a good idea to fit more of them than are needed. This rail type looks neat, so can be used left on view, with the curtains hung under it, should this be wanted. |
| + | |||
| + | The 2nd type uses much larger runners, pictured on the right, that wrap around the whole rail. The middle 2 items in the yellow picture above are these type of runners. The runners are unclipped by lifting them, and pulling the bottom out forwards. These runners are much more robust than the above type, and easier to replace if damaged. But they're not neat if left on view when the curtains are closed. | ||
Curtain rails are also supplied straight or coiled. Coiled rails must be kept straight in use by the wall fixings, and this puts a fair bit of force on these fixings. Since these fixings are prone to break in time, the situation is worsened with coiled rail. The advantages of coiled rail are that it goes readily round corners, and that it comes in longer lengths than is practical with straight rail. | Curtain rails are also supplied straight or coiled. Coiled rails must be kept straight in use by the wall fixings, and this puts a fair bit of force on these fixings. Since these fixings are prone to break in time, the situation is worsened with coiled rail. The advantages of coiled rail are that it goes readily round corners, and that it comes in longer lengths than is practical with straight rail. | ||
| − | |||
==Fitting== | ==Fitting== | ||
| Line 51: | Line 52: | ||
===Doors=== | ===Doors=== | ||
| − | Sometimes a fixed rail is fitted above the door - this works, but is inconvenient, as the curtain interferes with door opening. A rail fixed to the door doesn't work well either, it fails to cover the door top, and the curtain can get damaged at the bottom. The solution is a curtain rod that lifts up as the door opens. These are called portiere rods. | + | Sometimes a fixed rail is fitted above the [[door]] - this works, but is inconvenient, as the curtain interferes with door opening. A rail fixed to the door doesn't work well either, it fails to cover the door top, and the curtain can get damaged at the bottom. The solution is a curtain rod that lifts up as the door opens. These are called portiere rods. |
==Hanging Curtains== | ==Hanging Curtains== | ||
| − | This is often done badly, creating a poor appearance. The main thing is to space the hooks out evenly along the length of the curtain. To do this, count the number of hanging loops on the curtain and divide by the number of hooks you have minus 1. This makes the curtain hang evenly. | + | This is often done badly, creating a poor appearance. The main thing is to space the hooks out evenly along the length of the curtain. To do this, count the number of hanging loops on the curtain and divide by the number of hangers & hooks you have minus 1. This makes the curtain hang evenly. For a good result there should be a hook every 3-4 loops in the curtain tape. Much wider spacing doesn't hang well. |
| − | The opening ends of curtains are a weak point with both curtains and hooks. Avoid damage by fitting 2 hooks next to each other at | + | The opening ends of curtains are a weak point with both curtains and hooks. Avoid damage by fitting 2 hooks next to each other at each end of each curtain (in neighbouring loops in the curtain header tape). |
Curtains have 3 rows of hanging loops so you can set them at 3 different heights. Pick the one that gives the best appearance at both top and bottom. | Curtains have 3 rows of hanging loops so you can set them at 3 different heights. Pick the one that gives the best appearance at both top and bottom. | ||
* Thick curtains can hide the rail completely if hung on the highest setting | * Thick curtains can hide the rail completely if hung on the highest setting | ||
* Thin curtain flop over at the top if hung high | * Thin curtain flop over at the top if hung high | ||
| − | * Pick the setting that causes the curtains to just clear the windowsill or floor if possible | + | * Pick the setting that causes the curtains to just clear the windowsill or floor if possible. The closer the curtain bottom is to the cill or [[floor]], the better the curtain [[Insulation|insulates]]. |
When pullcords are used, fit the centre ends of the curtains so the curtains overlap enough when closed. Its common to see curtains hung on the wrong holes on the sliding closers so that the closers show when the curtain is closed, or worse so the curtain isn't fully closed. It often works better to hang the curtain from the 2nd fixing loop rather than the end one, to hide the closers. | When pullcords are used, fit the centre ends of the curtains so the curtains overlap enough when closed. Its common to see curtains hung on the wrong holes on the sliding closers so that the closers show when the curtain is closed, or worse so the curtain isn't fully closed. It often works better to hang the curtain from the 2nd fixing loop rather than the end one, to hide the closers. | ||
| + | Curtains are usually wider than the window, and string threaded along the curtain tape is pulled and tied to give bunching. Often the spacing of the loops along this tape becomes uneven in use. To tidy this up, lay the curtain flat, hold at one end, and pull parts of the header tape where needed away from the held end so as to even the loop spacing out. A few pulls here & there soon evens it all up. | ||
==Troubleshooting & Repair== | ==Troubleshooting & Repair== | ||
| Line 71: | Line 73: | ||
===Rail fixings=== | ===Rail fixings=== | ||
| − | [[image: | + | [[image:Curtain rail fixing 4919-4.jpg|left|110px]] |
| − | These can break or get lost in storage. Replacements can be got from another curtain rail kit of the same type, or ad hoc fixings can be used. | + | These can break or get lost in storage. Replacements can be got from curtain rail sellers, some haberdashers, another curtain rail kit of the same type, or ad hoc fixings can be used. |
| + | ====Ad hoc fixings==== | ||
| + | [[image:Adhoc curtain rail support 4794-2.jpg|right|70px]] | ||
Any ad hoc replacement fixing must not obstruct the sliding channel used by the hook hangers and closers. This is typically the lower of the 2 channels in plastic rail systems. | Any ad hoc replacement fixing must not obstruct the sliding channel used by the hook hangers and closers. This is typically the lower of the 2 channels in plastic rail systems. | ||
1" metal [[Brackets|corner braces]] work. Drill a pilot hole into the top of the rail, and screw in there using a cranked [[screwdriver]]. These can be used as temporary repairs, or permanent where no-one looks too closely. | 1" metal [[Brackets|corner braces]] work. Drill a pilot hole into the top of the rail, and screw in there using a cranked [[screwdriver]]. These can be used as temporary repairs, or permanent where no-one looks too closely. | ||
| − | |||
===Broken closers=== | ===Broken closers=== | ||
| Line 89: | Line 92: | ||
===Hooks break=== | ===Hooks break=== | ||
| + | [[image:Curtain hook 4919-4.jpg|70px|right]] | ||
| + | |||
Caused by any of: | Caused by any of: | ||
* not enough hooks being used | * not enough hooks being used | ||
* not using 2 hooks at the opening end of each curtain for greater strength | * not using 2 hooks at the opening end of each curtain for greater strength | ||
| − | * stiff rail mechanism needing excessive force - take it down & clean out the rail channels & hook hangers | + | * stiff rail mechanism needing excessive force - take it down & [[clean]] out the rail channels & hook hangers - water and [[detergent]] works |
* sometimes just weak deteriorating hooks. Replace any weak ones that see force, ie the end ones. | * sometimes just weak deteriorating hooks. Replace any weak ones that see force, ie the end ones. | ||
| − | Replacement hooks are widely available at £1 or 2 for 100. If you come across metal hooks off an old metal rail, keep them. Unlike plastic ones, they last for life. | + | Replacement hooks are widely available at £1 or 2 for 100. If you come across [[metal]] hooks off an old metal rail, keep them. Unlike plastic ones, they last for life. |
| − | |||
===Sticking=== | ===Sticking=== | ||
| Line 104: | Line 108: | ||
===Restringing=== | ===Restringing=== | ||
[[image:Curtain rail centre 4790-3.jpg|550px]] | [[image:Curtain rail centre 4790-3.jpg|550px]] | ||
| + | |||
Arrangement at the centre of the rail, with one sliding closer on each cord | Arrangement at the centre of the rail, with one sliding closer on each cord | ||
| Line 113: | Line 118: | ||
When restringing, check the following points: | When restringing, check the following points: | ||
* the cords don't cross over or wrap round each other | * the cords don't cross over or wrap round each other | ||
| − | * cords and other parts | + | * cords and other parts don't foul |
* the free cord ends are both a suitable length, both when open and when closed | * the free cord ends are both a suitable length, both when open and when closed | ||
| Line 119: | Line 124: | ||
[[image:Curtain pulls 4895-3.jpg|120px|right]] | [[image:Curtain pulls 4895-3.jpg|120px|right]] | ||
| − | Supplied pullhandles can be replaced with something much lighter and smaller. You can use pretty much anything, hollow thermoplastic is ideal because it hides the cord knot, is light and unbreakable, and doesn't mark the wall. | + | Supplied pullhandles can be replaced with something much lighter and smaller. You can use pretty much anything, hollow thermoplastic is ideal because it hides the cord knot, is light and unbreakable, and doesn't mark the wall. On the right the original pulls were replaced with bottletops. |
| + | |||
| + | ==Parts== | ||
| + | Parts are still available for most curtain rails decades old. The main challenge is finding the shop that stocks them :) | ||
| + | |||
| + | ===Swish=== | ||
| + | New Swish rail parts fit old rails, but a slight difference in the depth of the slot in the rail means new bits need a shave off one edge to fit in. New Swish wall fixing brackets are a different shape, and foul moving parts if in the wrong position. The rotating fixing in them fits the old fixing brackets. | ||
==Reusing rails== | ==Reusing rails== | ||
| − | Old removed rails typically need a clean and have some broken hook hangers. They can be cleaned, cut & reused as smaller rails, or the parts from 2 such rails used on one rail. Clean the rail completely rather than just the visible face, dirty channels run | + | Old removed rails typically need a clean and have some broken hook hangers. They can be cleaned, cut & reused as smaller rails, or the parts from 2 such rails used on one rail. Clean the rail completely rather than just the visible face, dirty channels run stiffly. |
| − | |||
==Alternatives== | ==Alternatives== | ||
| − | * Aluminium rail | + | * Aluminium rail, longer lived, same principles, and a bit more expensive |
* Curtain rod, wood or steel, & rings | * Curtain rod, wood or steel, & rings | ||
* Curtain wire & cafe rod to hang nets, but not curtains | * Curtain wire & cafe rod to hang nets, but not curtains | ||
Latest revision as of 01:22, 5 August 2014
Plastic curtain rails are cheap & easy to fit round curves, but tend to deteriorate over decades, with fixings breaking. This article describes their fitting and repair, and how to hang curtains neatly.
Parts
 _______________________________
|____________--__--_____________|  rail
 '  '  '  '         '  '  '  ' ||
    hook     closers           ||  pullcords
   hangers                     ||
                               ||
                               ||
                               ||
                               oo  handles

          Front view
   __           __          __
 _|__|_________|__|________|__|_  wall fixing blocks
|_______________________________| pulleys at each end for pullcords

        Bird's eye view
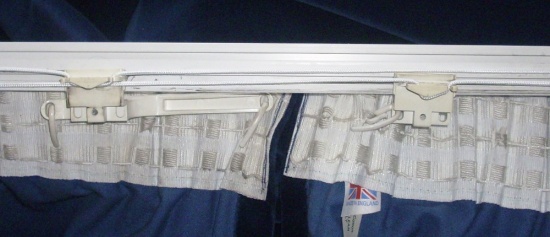
Rear rail view above shows
- the 2 closers, one hooked on each cord run
- curtain header tape has 3 rows of loops, giving 3 possible curtain positions
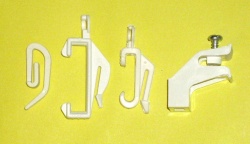
Curtain hook, 2 sizes of rail sliders, & a wall fixing
Rail types
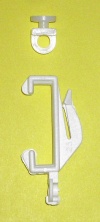
There are 2 main types of plastic rail. One type has grooves moulded along it, and little runners that move along this groove, as shown on the right. The little runners tend to break over many years, so its a good idea to fit more of them than are needed. This rail type looks neat, so can be used left on view, with the curtains hung under it, should this be wanted.
The 2nd type uses much larger runners, pictured on the right, that wrap around the whole rail. The middle 2 items in the yellow picture above are these type of runners. The runners are unclipped by lifting them, and pulling the bottom out forwards. These runners are much more robust than the above type, and easier to replace if damaged. But they're not neat if left on view when the curtains are closed.
Curtain rails are also supplied straight or coiled. Coiled rails must be kept straight in use by the wall fixings, and this puts a fair bit of force on these fixings. Since these fixings are prone to break in time, the situation is worsened with coiled rail. The advantages of coiled rail are that it goes readily round corners, and that it comes in longer lengths than is practical with straight rail.
Fitting
Make sure you use enough wall fixings to ensure the track lays flat and is well supported. Ensure you have a wall fixing right at the end if you're using a pullcord.
Take care to cut rail ends accurately straight, it really makes a difference to final appearance.
Doors
Sometimes a fixed rail is fitted above the door - this works, but is inconvenient, as the curtain interferes with door opening. A rail fixed to the door doesn't work well either, it fails to cover the door top, and the curtain can get damaged at the bottom. The solution is a curtain rod that lifts up as the door opens. These are called portiere rods.
Hanging Curtains
This is often done badly, creating a poor appearance. The main thing is to space the hooks out evenly along the length of the curtain. To do this, count the number of hanging loops on the curtain and divide by the number of hangers & hooks you have minus 1. This makes the curtain hang evenly. For a good result there should be a hook every 3-4 loops in the curtain tape. Much wider spacing doesn't hang well.
The opening ends of curtains are a weak point with both curtains and hooks. Avoid damage by fitting 2 hooks next to each other at each end of each curtain (in neighbouring loops in the curtain header tape).
Curtains have 3 rows of hanging loops so you can set them at 3 different heights. Pick the one that gives the best appearance at both top and bottom.
- Thick curtains can hide the rail completely if hung on the highest setting
- Thin curtain flop over at the top if hung high
- Pick the setting that causes the curtains to just clear the windowsill or floor if possible. The closer the curtain bottom is to the cill or floor, the better the curtain insulates.
When pullcords are used, fit the centre ends of the curtains so the curtains overlap enough when closed. Its common to see curtains hung on the wrong holes on the sliding closers so that the closers show when the curtain is closed, or worse so the curtain isn't fully closed. It often works better to hang the curtain from the 2nd fixing loop rather than the end one, to hide the closers.
Curtains are usually wider than the window, and string threaded along the curtain tape is pulled and tied to give bunching. Often the spacing of the loops along this tape becomes uneven in use. To tidy this up, lay the curtain flat, hold at one end, and pull parts of the header tape where needed away from the held end so as to even the loop spacing out. A few pulls here & there soon evens it all up.
Troubleshooting & Repair
Some repairs to these rail systems are simple, and quicker and easier than fitting a new rail.
Rail fixings
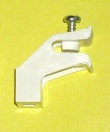
These can break or get lost in storage. Replacements can be got from curtain rail sellers, some haberdashers, another curtain rail kit of the same type, or ad hoc fixings can be used.
Ad hoc fixings
Any ad hoc replacement fixing must not obstruct the sliding channel used by the hook hangers and closers. This is typically the lower of the 2 channels in plastic rail systems.
1" metal corner braces work. Drill a pilot hole into the top of the rail, and screw in there using a cranked screwdriver. These can be used as temporary repairs, or permanent where no-one looks too closely.
Broken closers
Plastic closers sometimes break. Often these can be repaired using 2mm iron wire attached to whatever remains, to take up the function of the lost part. Make sure the position of the wire holds firm and doesn't flop, and that nothing fouls. Sometimes ensuring these can be fiddly.
Closer string tabs broken
The pullcord typically goes over 2 tabs on the closers, and these can snap off. Just tie the string to somewhere on the closer with a bit of 1.6mm iron wire. Wrapping the pullcord round the iron wire makes for a firmer hold. If there's really nothing to tie to, drill another hole in the closer and use that.
Hooks break
Caused by any of:
- not enough hooks being used
- not using 2 hooks at the opening end of each curtain for greater strength
- stiff rail mechanism needing excessive force - take it down & clean out the rail channels & hook hangers - water and detergent works
- sometimes just weak deteriorating hooks. Replace any weak ones that see force, ie the end ones.
Replacement hooks are widely available at £1 or 2 for 100. If you come across metal hooks off an old metal rail, keep them. Unlike plastic ones, they last for life.
Sticking
Clean out the sliding channel on the rear of the rail. Any surface dirt makes them behave badly, clean it thoroughly but don't use anything abrasive. an old toothbrush is helpful.
Restringing
Arrangement at the centre of the rail, with one sliding closer on each cord
Pullcord rails have a single cord that goes over a little pulley at the left end (in the above pic). The 2 cord ends then each go over a pulley at the right end. This means there are 2 cord runs traversing the rail; one sliding closer hooks onto one of these cord runs, and the other sliding closer hooks onto the other. Now pulling one cord at the right end closes the curtains, and pulling the other opens them. The cord is very cheap (around 20p a metre), and available from haberdashers (sewing shops).
Curtain rail pull assembled like so, the bottom cover snaps on.
When restringing, check the following points:
- the cords don't cross over or wrap round each other
- cords and other parts don't foul
- the free cord ends are both a suitable length, both when open and when closed
Pullhandles knock things over
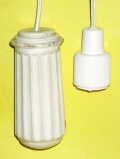
Supplied pullhandles can be replaced with something much lighter and smaller. You can use pretty much anything, hollow thermoplastic is ideal because it hides the cord knot, is light and unbreakable, and doesn't mark the wall. On the right the original pulls were replaced with bottletops.
Parts
Parts are still available for most curtain rails decades old. The main challenge is finding the shop that stocks them :)
Swish
New Swish rail parts fit old rails, but a slight difference in the depth of the slot in the rail means new bits need a shave off one edge to fit in. New Swish wall fixing brackets are a different shape, and foul moving parts if in the wrong position. The rotating fixing in them fits the old fixing brackets.
Reusing rails
Old removed rails typically need a clean and have some broken hook hangers. They can be cleaned, cut & reused as smaller rails, or the parts from 2 such rails used on one rail. Clean the rail completely rather than just the visible face, dirty channels run stiffly.
Alternatives
- Aluminium rail, longer lived, same principles, and a bit more expensive
- Curtain rod, wood or steel, & rings
- Curtain wire & cafe rod to hang nets, but not curtains
See Also
- Wiki Contents
- Wiki Subject Categories
- People occasionally make motorised controls for these rails. Google for detail.
