Difference between revisions of "Garden table - slatted top"
| Line 11: | Line 11: | ||
Using a chop saw set at 22.5° I cut the angles for the shape, as there were 8 sides this would be 22.5° for each angle. These were glued and screwed together. | Using a chop saw set at 22.5° I cut the angles for the shape, as there were 8 sides this would be 22.5° for each angle. These were glued and screwed together. | ||
| + | |||
| + | [URL=http://s64.photobucket.com/user/scudo/media/shoulder_zpsygkcnoiy.jpg.html][IMG]http://i64.photobucket.com/albums/h194/scudo/shoulder_zpsygkcnoiy.jpg[/IMG][/URL] | ||
===Building the plinth and base=== | ===Building the plinth and base=== | ||
Revision as of 19:08, 8 August 2016

Introduction
My main objective in doing this project was to use up some leftover pieces of wood. The wood at hand consisted of some 2 x 2 inch, a 4 x 4 fence post, 3 x 2 railing from a fence and some old bed slats. The design was therefore constructed from what I had available.
Construction
Building the table top
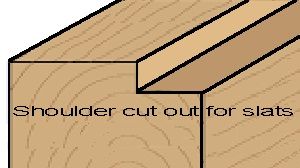
I decided on an octagonal shape using the 2x2 timber I decided on an approximate `diameter` and then used an online calculator to determine the length of each side. Before cutting to size I used a circular saw to cut out a shoulder which would allow the slats to sit flush with octagonal frame.
Using a chop saw set at 22.5° I cut the angles for the shape, as there were 8 sides this would be 22.5° for each angle. These were glued and screwed together.
[URL=http://s64.photobucket.com/user/scudo/media/shoulder_zpsygkcnoiy.jpg.html][IMG]http://i64.photobucket.com/albums/h194/scudo/shoulder_zpsygkcnoiy.jpg[/IMG][/URL]
Building the plinth and base


