Networking
Computer networking
Introduction
The aim of this is to guide you though the different options open to you when creating a computer network. This may be connecting two computers together, or connecting hundreds together.
Before You Buy Anything
Don't just go to PC World and pick up the first or cheapest thing you see, there are various decisions you need to make first in order to create the perfect network for you.
The Basics
The simplest form of a computer network is two computers connected together. With this, you can share files, printers and even an internet connection! You could have a computer in the study, and the kids could have one in their room, connecting the two together would mean the kids can print their homework out, without you having to invest in another printer, or maybe you have a black and white laser printer in the study, and a photo quality one in the kids room, networking the two machines together will mean you can print to either printer, from either computer.
Types of network
The two main types of networking are wired and wireless. Just because you start with one, does not mean you can't then have the other, they co-exist perfectly. in fact, they are totally transparent to one another, one computer on a wired connection can happily talk to another on a wireless connection in the same network (if it is all set up correctly, of course!)
Wired
Wired networking is more reliable and generally faster. On the other hand it takes work to install the wiring.
When fitting wired networking it may be worth installing extra cables in parallel; the Low Voltage Wiring article discusses its other uses, and the cost of extra cable is usually minimal. The Structured wiring system article describes a more elaborate wired system.
Home plug
A variation on the wired theme is the use of Homeplug devices. These use your existing mains electricity wiring to act as a network. Not usually as fast as a traditionally wired network (although the 200MB "AV" rated devices can be comparable in ideal situations), they are often faster and more reliable than wireless networks. They cost more if using lots of connection points, but are ideal for adding one or two additional network connections without the need to run new wires.
Wireless
Wireless or WiFi uses low power microwave radio to link computers. Depending on the building construction the wireless signal from a wireless router or wireless access point can reach up to a few hundred feet (or in some cases, can have difficulty getting into the next room!). Wireless works well for laptop computers (modern ones will include it as standard), and for sharing an internet connection between a few computers. Getting good coverage over wide areas however can be difficult. Consideration needs to be given to security as well - since wireless signals can spill into public areas or adjacent properties. Hence wireless LANs need to be protected with WPA2 encryption setting.
Network Adaptors
First, you will need to make sure all your computers have a network adaptor.
Modern computers will have an Ethernet network adaptor built into their mostherboards. Older ones can have them added. This can be in to form of an internal card, or an external adaptor, usually connected to the USB port. Some laptops may also use a PCMCIA network card.
Internal Cards
If you don't have a built in network adaptor, then an internal card is the best form of network adaptor to use, they are more reliable than external USB adaptors, but do require you to open the computer to install one.
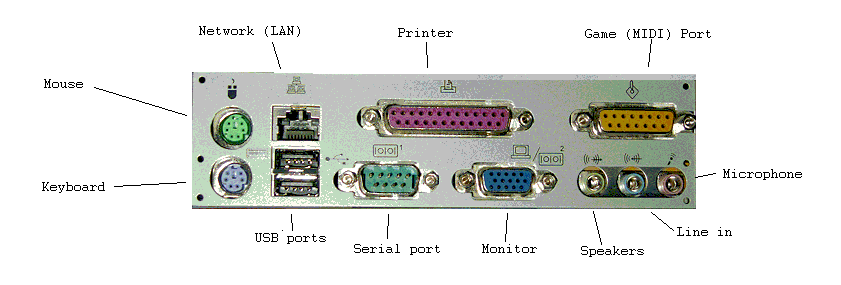
Before adding a card, check you don't already have a built in one. You need to look for a port on the back like the second connector on the top row here

There is a smaller connector that is very similar, this is a modem connection, for connecting the computer to the telephone line, this is NOT the same.
A Modem connection will have either 2 or 4 little gold contacts inside, a network connection will have 8.
Connecting a telephone line into a network connection may damage the network interface (as the telephone connector is narrower version or the one used for networks, it will fit in the larger network socket - don't do it!)
If you don't have this connection, you may have one installed as an expansion card, you are basically looking for the same 8 pinned connector shown on the picture above.
If you can't find one, all is not lost, adding one is fairly easy.
Network wiring
The basic configuration is to have a router, to which each PC connects via a cat5e cable. The router also connects to the internet cable/ADSL modem. So the layout is star shaped, with the router at the centre.
Cable types
- Cat 5 does upto 100Mbit. Lots is currently in use, but better to install 5e now.
- Cat 5e can provide gigabit connection speed, if all parts of the network are within the necssary specs. cat5e is the current general recommendation for home use in 2010.
- Cat 6 is specced to 250MHz, yet can provide higher data rates than 5e. It costs more and is fatter, and is a good choice for work places.
- Cat6a is specced to 500MHz
- Many problems happen with cat6
Stranded & solid core
Fixed wiring should use the cheaper solid core cable for best reliability. Wiring that can be moved should use stranded for best reliability.
It is possible to simply put a plug on the end of fixed cabling, rather than fit a faceplate and use a flying lead, but this approach results in reduced reliability.
Adding a network card
The best way to add a network socket is to install a new card inside your PC. This will require you to take the side/top off the machine. If you are happy to do this, then you need to make sure you have a spare (white) PCI slot (or an ISA slot for very old machines) in the computer.
First thing to do is shut down the PC. Once the PC is off, you need to take the side or top of the machine. As there are so many types of computer case, I won't go into this here.
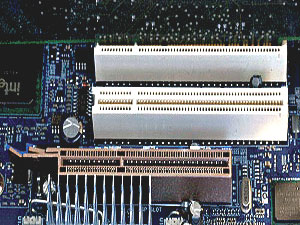
Once you get the side off, you should see the motherboard (the large board that everything connects to). On this motherboard, you will (hopefully!) see some (usually white) slots like this.
You can see, one of the white PCI slots already has a card in, the other one is empty. If you can see an empty one, then you can add a PCI network card!
ISA slots are usually black, and will be seen in old machines. ISA network cards are only available used.
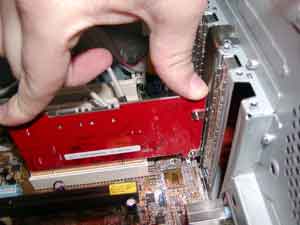
Now you need to check what type of card you need. Nearly all computers take a standard full height (the normal type) of NIC. The less common small form factor computers may require a half height card.
If you look at the picture below, this is a full height card.
The height of the metal plate to the right should be about 12cms, some of this plate will go below the main board, so the hole in the back of the PC will be about 10cms.
If you have a half height card, the plate will be about 8cms and the hole about 6cms.
Old kit
Pentium 2 and older machines have (black) ISA slots as well as PCI, and its often advantageous to use one of these for a network card, leaving more PCI slots free. The downside of ISA cards is slower speeds, since the ISA bus is slower.
486 computers often only have ISA slots. Although now relics of a historic era, there are still a few in use.
Laptops without built in networking can take a PCMCIA card or a USB NIC.
Many old ISA network cards will do 10 and 100 M, but some very old ISA ones will only run at 10M. The ISA bus can't maintain anywhere near a 100M data rate though, so these cards aren't as capable as they appear.
1 gigabit cards are also available new, but these are unlikely to be needed for home use for the life of existing computers.
Enabling networking
Windows
Windows 7, Vista, XP: Just plug it in, nothing needs doing.
2000:
ME:
98:
- Have the 98 CD available if you dont have the installation files backed up in C:/Windows/Options/Cabs
- Enable file & printer sharing
- Create a new folder that you won't use, right click it, properties, set it to be shared
- reboot a few times
- cross fingers
- Note 98 only networks when the connection is present at bootup time. It thus behaves poorly with an unreliable network.
95: In principle this is set up the same as 98, but one issue makes it much more problematic. There is more than one version of win95, and you must use the same version of Windows 95 CD to install files from, otherwise win will never boot again, and reinstalling windows will be needed.
Linux
Most modern versions of Linux connect automatically, no setup needed.
Router types
A "router" is a generic term for a box of tricks that joins one network to another and intelligently passes information between them based on a set of rules.
For home networks the devices of most interest are actually multifunction devices that can do more than just "route". Often they will include some form of high speed modem for connecting to a broadband network of some sort (usually one provided via a telephone line using one of the variants of ADSL, or to a cable network). They may also include a small network hub to enable several computers to be connected, and they will also probably include facilities such as a firewall.
Broadband Modem
These are usually supplied for connection to cable networks (although ADSL ones are available). They will allow a single computer to connect directly to a broadband network. Note that direct connections are not advisable since they tend not to offer the sophisticated security facilities of the routers described below.
ADSL Router
These connect to a telephone line and allow one or more computers to share a broadband connection. The simplest ones have a single network port for the connection of one PC or an external hub. More expensive ones will often include a 4 port hub.
Broadband or Cable Router
These are much the same as the ADSL router, but without the ADSL modem or telephone line interface. They are instead designed to connect to an external modem via an ethernet interface. Typically used to add sharing and other capabilities to a basic cable modem. (The fact that they have an ethernet interface on both the LAN and WAN (Wide Area Network) side can also make them useful for partitioning up a larger home networks into segments for better security).
Wireless Access Point
A Wireless Access Point (or WAP) adds wireless routing to an existing wired network. These can be used to provide for wireless clients, or for bridging wired network segments together with wireless "jumps". (with directional antenna, these jumps can even be between buildings at some distance).
Wireless Router
Versions of both the ADSL router and the Cable router are available with a built in WAP.
Homeplug Router
A router that also includes a homeplug interface on its LAN side. This enables the router to be connected to a network via other mains wiring and other homeplug devices rather than by a network cable or WiFi. Handy for situations where it would be difficult to provide a network connection close to the ideal place to install the router (e.g. close to the telephone or cable entry location).
More features
Routers will often have all or some of:
- Network Address Translation (sometimes known as IP masquerading) is a trick used by many modern routers to "hide" a number of computers behind a single network address. Many routers employ this to enable broadband connections to be shared with several computers even with the internet service provider only provides a single network address. NAT can also improve security on a network, since it makes it difficult for a computer on the internet to make an unsolicited connection to one of your computers without prior arrangement.
- Firewall: Controls what services and applications can connect through a router for added security.
- Management: Usually provided by a built in web based interface. Allows you to set up and alter various settings via the PC
- Blacklists / Whitelists: Allows access to some site to be explicitly allowed or denied.
- QOS or traffic shaping: Ensures that capacity for time critical applications (e.g. video or voice streaming and telephony, or multiplayer gaming) can be reserved so that other computers doing file transfers or web browsing will not hog the connection.
- Failover: Some routers allow multiple broadband connections, and can automatically switch from one to another should the primary connection fail for any reason.
- Load balancing: For routers supporting more than one broadband connection, load balancing allows the multiple links to be used together to provide more aggregate network bandwidth.
Network Addressing
Addresses
All of the computers, phones, tablets, and smart TVs and other devices on a network need a unique network address to be able to function properly. For normal home networks there is no need to give this any consideration due to the marvels of what it called the Dynamic Host Configuration Protocol (DHCP). Every time a device powers up and connects to the network, it will simply broadcast a message to every other device on the network with a DHCP request for an address, hoping there is a DHCP server listening that will be able to help. Normally this will be running on your internet router. It will look to see what addresses it has been told it is allowed to hand out, and will give out the next free address. It will keep a note of the addresses it has allocated so that it does not hand out the same one again (you must never have one network address used by more than one device at a time).
Addresses are typically handed out with a "lease" time on them, meaning that the device using it can only have it for a certain amount of time (this might be a number of hours, or a few days - but 1 day is typical), after that time the device will need to ask the router to renew the lease if it still needs it. That way when a device drops off the network, the router can reclaim the address once it's lease has expired and use it again.
This behaviour is all fine and dandy for network devices that are "consumers" of services - e.g. those that visiting web pages or stream music or video. It's not so well suited for devices that are servers. For servers (and anything that you might want to make an incoming connection to, rather than just an outgoing connection from can be thought of as a server), it is better to allocate a fixed network address to the device. That way all the client devices can be told where to find it, and know that it will always be at the same address regardless of what other devices are on the network, and which order they powered up in. This type of address is known as a "Static IP address".
Allocating a Static IP addresses to a server is usually fairly simple, but it does take a bit of planning. There two basic ways of doing this. The first is (possibly counter intuitively) using DHCP, and the second is to do it manually.
Setting a Static IP via DHCP
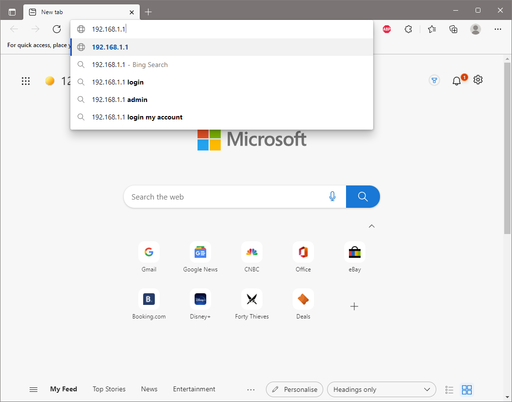
Many modern internet routers will implement DHCP address reservation. This is where you can tell the DHCP server in the router that you would like a particular IP address to be reserved for one particular network device and never used for any others. This is usually done from the routers management web page. This is a private web page that you can only access from "inside" your network (it is not visible to internet users outside of your network). There are a number of ways you can find out where this is. The first is to check the label on the back of the router - it will normally tell you want its default address is, and also the login details you need to access it. Typically it will be in the form of an IP address that starts 192.168.?.?. Quite often it will be 192.168.1.1, or 192.168.0.254 (BT routers), or 192.168.0.1 (Sky and Virgin routers). There is no harm in tapping that address into your web browser and trying it.
NOTE you must enter this address into the address bar of the router, don't use the search box since these addresses are not accessible from the internet: 
If you are unsure, you can find out what address to use from your computer since if it is on the network and can access the internet, it must know.
For Windows PCs, it is usually easy to open a command prompt and type the command:
ipconfig
That will display a list of results, for each of the network connections your computer has (it may have several - typically one for its Ethernet connection, and another for its WiFi, and possibly a number of others). Look for the one for the connection you are using (Ethernet it connected with a network cable, or WiFi).
Ethernet adapter Ethernet 1:
   Connection-specific DNS Suffix  . :
   Link-local IPv6 Address . . . . . : fe80::4811:e71c:d6ac:f92d%9
   IPv4 Address. . . . . . . . . . . : 192.168.1.35
   Subnet Mask . . . . . . . . . . . : 255.255.255.0
   Default Gateway . . . . . . . . . : 192.168.1.1
Look for the "Default Gateway" address. That is most likely to be the address of your internet router. Enter that into the address bar of the router.
Once you are into the management page you will need to find the section that allows you to reserve a DHCP address. This will be different for every different type of router, but you will normally be able to find a guide for your brand of router on the internet - quite often your Internet Service Provider will have a help page on this.
Setting a Static IP Manually
The other way to set a static IP address is to do it manually. There are two stages to this:
- Decide on a free address to use, and make sure the router knows not to use it elsewhere.
- Set the address on your device
The decide on an address to use bit is normally easy - most people will go for an easy to remember one like 192.168.1.10, however it is important to make sure that your router knows it must not allocate this address to anything else via DHCP.
To do this you need to go to the routers management page again (see above), and set the start address and size of the address pool that the router will allocate addresses from. (some routers specify a start and end address, others a start and a pool size. You can move the start or end address of the DHCP pool, such that you leave some addresses free that will not be allocated by the router.
So for example, if your router's address is 192.168.1.1, you might set the start of the DHCP pool to 192.168.1.100, and the end to 192.168.1.200 giving it a pool of 100 addresses it can give out automatically, but leaving all the addresses below .100 and above .200 free to be allocated as Static IPs to your network servers. (note you can't use the router's own IP address for anything else, or the address ending .255).
The final stage is to set the IP address on the device itself. You may need to use the devices web management page, or you might have software supplied with it that can do this for you.

