Difference between revisions of "Rekey a lock cylinder"
(m) |
(m) |
||
| Line 13: | Line 13: | ||
==Anatomy== | ==Anatomy== | ||
| − | [[image:Lock cylinder pins 5412-2.jpg| | + | [[image:Lock cylinder pins 5412-2.jpg|right|250px]] |
How a lock cylinder works: the right key raises all the pins to the height at which the break in each pin stack lines up with the key barrel/body shear line, and the key barrel can thus rotate. | How a lock cylinder works: the right key raises all the pins to the height at which the break in each pin stack lines up with the key barrel/body shear line, and the key barrel can thus rotate. | ||
| Line 31: | Line 31: | ||
When fitting a lock to existing keys, insert the key, and for each pin hole, test pins to see which works with the key. You'll usually need a 2nd lock for more donor pins to suit. You'll notice that any pin equal to or shorter than needed will let the thing turn if its dropped in on its own, but once the rest of the pin stack is fitted, only the right length pin will work. | When fitting a lock to existing keys, insert the key, and for each pin hole, test pins to see which works with the key. You'll usually need a 2nd lock for more donor pins to suit. You'll notice that any pin equal to or shorter than needed will let the thing turn if its dropped in on its own, but once the rest of the pin stack is fitted, only the right length pin will work. | ||
| − | [[image:Lock cylinder wired shut 5413-2.jpg| | + | [[image:Lock cylinder wired shut 5413-2.jpg|right|250px]] |
Refit the capping strip. How this was attached originally varies | Refit the capping strip. How this was attached originally varies | ||
Revision as of 12:33, 28 February 2012
When
New lock cylinders are only £1 or so for basic ones, so rekeying is mainly for:
- making master keyed locks
- making identically keyed locks
- rekeying higher cost cylinders
- rekeying cylinders when you have many identical keys with no usable cylinder(s) for them.
The process takes around 5 minutes for pin reversal rekeying, or upto 10 if making a lock fit an existing set of keys.
Anatomy
How a lock cylinder works: the right key raises all the pins to the height at which the break in each pin stack lines up with the key barrel/body shear line, and the key barrel can thus rotate.
How to
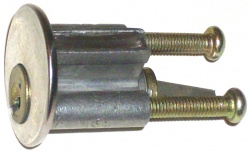
Remove the capping strip on top of the pins. Exactly how varies with the lock: most capping strips can just be levered off, sometimes the sides bent over them can be bent back.
Some cylinders have metal pressed into the pinholes instead. You're on your own with how to open these without damaging the pin springs, until one of us does so.
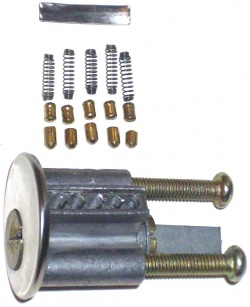
Keep the cylinder upright so the many pingfckits don't fall out. Cover them all with a finger, and turn the cylinder upside down while you've uncovered one pin stack at a time, so they come out in a known order. Put them on cardboard on a level plate, the cardboard ridges keep the pin stacks in order, and the raised plate edges stop them rolling away. Don't lose any of the pingfckits.
Put the pin stacks back in their new order. Its vital to know how the order has been changed, or you won't be able to cut a new key to match the lock. The rounded end of each pin is the end that lands on the key.
When cutting new keys, going from 12345 to 54321 is the easiest change when it comes to key cutting, as the keys can simply be clamped together in opposite directions.
When fitting a lock to existing keys, insert the key, and for each pin hole, test pins to see which works with the key. You'll usually need a 2nd lock for more donor pins to suit. You'll notice that any pin equal to or shorter than needed will let the thing turn if its dropped in on its own, but once the rest of the pin stack is fitted, only the right length pin will work.
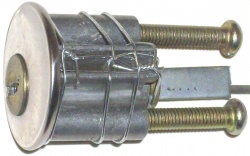
Refit the capping strip. How this was attached originally varies
- sometimes the edge of the cylinder body is bent over it
- the capping strip can be glued over
- 0.45mm iron wire was used in the photo
New keys
If you've reversed the pin order, cut new keys to fit, using the old key as a template. Clamp new and old keys like so for cutting:
 _
(_)======= _
   =======(_)
The new key's pin landings need to be the same distance from the shoulder as the original. So measure from the shoulder to the first pin landing, mark this same distance onto the new key blank in the same place, and line this up with the landing nearest the tip on the old key.
See Key cutting for full info.
Master rekeying
How a master keyed scheme works (on an example 6 pin cylinder):
- pins 1-5 are the same pattern for all the locks
- pin stack 6 has 2 break points, one that differs for each lock, plus one that's the same for all the locks.
- Keys that use the variable position breakpoint on pin 6 only open one lock
- Keys that use the identical position breakpoint on pin 6 open all the locks
Master keyed schemes are a good deal less secure for a given number of pins than conventional keying. 5 pin cylinders aren't recommended for master keying.
To make a master type pin, cut a pin with a thin die grinder disc, losing as little material as possible, and round off one end like the existing pins. Deburr the cut top end.
Childproof locks
These toddlerproof enable any adult that knows what to do to open the lock, but prevents nuisance access by toddlers. The locks can be opened easily with over 50% of random keys that fit the keyway, or a small screwdriver etc. If you use a 1A keyway cylinder, almost anyone can open it with their own keys.
Old cylinders with no matching key are converted to toddlerproof locks by removing all pins except the front-most one. If a random inserted key doesn't work, pull it out a click and try again. Each key gives you 5 or 6 goes.


