Replace a lock cylinder
Replace a lock cylinder
The technology of cylinder locks dates back thousands of years to the ancient Egyptians. Today's cylinder locks usually have a separate lock cylinder that can be replaced on its own.
There are also other incompatible cylinder lock systems, such as eurolock.
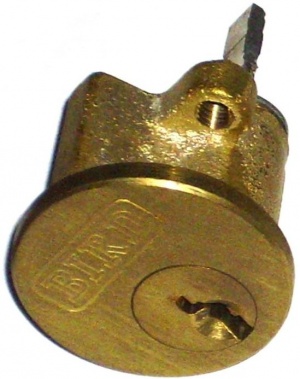
Its a mostly simple job to fit a new rim lock cylinder. The lock itself is not usually replaced, just the key cylinder, which is bought separately.
Why replace
Apart from the obvious...
A new rim lock cylinder is under £2 for a basic one, or £4-5 for one with hardened pins in 2011. So replacement is often cheaper than copying keys. New cylinders usually come with 3 keys, sometimes 2.
When moving into a house, you've no idea who has keys. Its prudent to replace external cylinders.
Some house insurance policies are invalid if a cylinder with unhardened pins is used on an external door.
The new cylinder
They're standardised, so the main choices are brass or chrome finish, and hardened or unhardened pins, 5 or 6 pin.
- minimum cost cylinders are unhardened 5 pin, and can be drilled open
- house insurance often requires hardened pins
- hardened pin cylinders can be drilled, but its more difficult, and can take a while, and several drill bits.
- unhardened may be preferable for internal rooms & cupboards, a fair bit easier to remove if keys are ever lost.
- You can also buy higher security cylinders from the likes of Abloy, Bramah, Ingersoll & Kaba, at a price. Not all are compatible with standard rim cylinder locks
New lock cylinders always come with 2 snapoff screws, a front ring and a rear fixing plate in the pack.
Its not best practice to have new locks, cylinders or keys posted to you, the seller usually has your address, either from the delivery address or credit card details, and there are people that copy keys and misuse them.
How to replace
Once the lock is unscrewed, its not hard to see how it all goes together.
Gain access
If you're locked out and can't get in any other way, drilling out the lock cylinder is usually the easiest way to gain entry. Expect to ruin a few drill bits in the process. 4mm twist drills are good for the job, though if not careful more drill bits will be needed.
Remove lock
There are 2 ways cylinder locks are commonly fixed to doors. Remove the visible screwheads, and either the whole lock will come off in one piece, or most of it will come off, leaving a backplate behind that needs to be unscrewed to remove it.
If the whole lock comes off in one, there is a separate smaller backplate that holds the cylinder in place. When the lock leaves a full size backplate in place, the baseplate holds both the cylinder and the lock.
Remove old cylinder
As you'll see, the lock cylinder is held with 2 snapoff screws. Remove these, and the cylinder, the ring on the front, and the plate on the rear all come away. Reuse these screws if they're not wrecked, its easier than cutting the new ones to length.
Fit new cylinder
How it fits in is fairly obvious, ring at the front, plate at the back. Get the new cylinder in the right position, not rotated round out of place. There's usually a slight ring indentation in the door, sit the front ring in that to avoid a minor decorating mishap. Often the old front ring looks better than the new one, and on occasion the old rear plate is the only one that will sit flat enough.
Reuse the old cylinder fixing snapoff screws when possible, it avoids needing to cut the new ones. If they can't be reused, the new ones can be chopped or sawn at the indentations. Don't try to snap them, a lot of these screws aren't hardened and will bend, ruining them instantly. If cutting screws, look at the cut end afterwards, and if any thread is distorted at the end, file the damaged bit of thread down.
The projecting tongue of the new cylinder needs to be cut to length. Mark on the tongue where it projects about halfway into the depth of the lock, and cut it off there. Length needn't be precise. A hacksaw works, but is slow and fiddly; bolt croppers or mini bolt croppers are very quick.
Refit lock
Just the reverse of removing it.
Issues
Issues sometimes encountered:
Screw won't tighten
The lock screws won't tighten because the thread in the wood is stripped. Probably the simplest solution is to lightly hammer a matchstick into the hole in the wood door, and snap it off level. Or sometimes slightly fatter screws will fit and grip. Or if the screws are short, fit much longer ones.
Lock won't sit flat
Lock won't quite sit flat against the door. This happens when the rear plate that holds the lock cylinder fouls the lock. Loosen this backplate, reposition slightly and tighten, or if necessary remove it and put the old one back on instead.
Lock needs to accept old key
In some situations you might need a new lock that takes the old key. Rekeying a lock cylinder is a locksmith job.
Stiffness
There are a few patterns of stiffness, with different causes. Oiling the cylinder is never the solution, and only causes staining of hands & clothing with dirty oil.
=Stiffens up when turned
The new lock is too stiff to turn as far as is needed. If it turns in one direction ok, and opens the lock, no problem. If not, the cause is usually poor alignment between cylinder and lock. This tends to give huge variation in stiffness as the key is turned. Slacken the lock cylinder fixing and slide it sideways a fraction so it lines up better with the slot in the lock where the tongue goes, and retighten.
Consistently stiff to turn
If the amount of stiffness doesn't vary with key position, the fault is with the lock, not the cylinder. Open, clean and grease the lock mechanism. Lock parts tend to pop out of place when opened, so probably some people aare better leaving it alone.
Key needs waggling
If the key needs waggling to be able to turn, this is caused by a poorly cut key copy. It also happens on old lock cylinders that have had a lot of use, and the mechanism is well worn.
Key doesn't insert smoothly
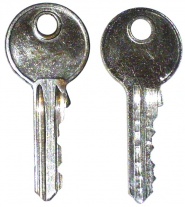
The key needs waggling to insert, or is stiff to insert. Some keys have a series of raised points between the pin landing areas as a result of the way they're cut. This can cause keys to not go in smoothly. The solution is to file the raised points on the key down - obviously the pin landing areas must not be filed down.
Key doesn't turn
If a key just doesn't turn at all, its not uncommon for a copied key to fail to work, due to a slight error in cutting.

