Difference between revisions of "The secret diary of a bathroom refurbishment"
| Line 163: | Line 163: | ||
[[image:StartFittingNewBasin.jpg|512px]] | [[image:StartFittingNewBasin.jpg|512px]] | ||
| − | So time to switch to some more woodwork | + | So time to switch to some more woodwork. I had ordered and collected five packs of "bead and butt" tongue and grove panelling boards. These come half a dozen boards to a pack in great long 4.5m lengths. So to make installation easier, I chopped them to length in the workshop first rather than trying to do it in the small bathroom. |
| − | + | Stick a laser level round the room, and screw cross battens to the studs ready for the boards. Go buy some 1” EPS (Expanded Polystyrene) insulation boards so that we can add a layer behind the panelling on the outside walls while we are at it (enough to add a little extra insulation and also reduce condensation formation on the lower wall surface). | |
| − | + | Design time: it was intended that the panelled sections would have a small ledge on the top – a couple of inches deep on most of it, but widening out to a 4” deep shelf on the wall adjacent to the bath (hence a place to park your shampoo etc). | |
| − | That done, rip out the basin in the ensuite, and get the first wall panelled. Prime that… and oh, | + | To try and create a theme or style for the room, I modelled (another sketchup model) various ideas for edge details on the woodwork, since it would be nice if these were consistent in the room. For the board capping / shelf, there was a rebate on the underside so that it would sit over and cover the top cut edge of the boards (nicely hiding any slight errors in board lengths etc). We decided a decorative “cove” would be the main design element. It will be on the under edge of all protruding woodwork. It could also be used for decorative trims we would need to end the runs of panelling. So I designed another profile for that which will marry up with the skirting. |
| + | |||
| + | So some hours were spent in the workshop at the router table. Made up the profiled top shelves with rebate. A section of windowsill with the same decoration. The end stop profiles and some cove sections to fill in the corner details where the boards will meet at the corners of the room. | ||
| + | |||
| + | That done, rip out the basin in the ensuite, and get the first wall panelled. Prime that… and oh yes, we need paint. | ||
| + | |||
| + | So we trek off to a paint mixing place, with one of the ensuite shower listello tiles in hand to try and find a match for the colour. That done (lovely match Jonstone's "Periwinkle" – but *how much* for 2.5L of paint?), we can get the first coat on that. | ||
[[image:EnsuiteButtAndBeadBoard.jpg|512px]] | [[image:EnsuiteButtAndBeadBoard.jpg|512px]] | ||
| − | Now, fit the basin. Hide an air admittance valve behind its pedestal | + | Now, fit the basin. Hide an air admittance valve behind its pedestal (I did not want any glugging noises from that), and get it plumbed in. Note that a slight plumbing error under the floor managed to get the pipes rising behind the basin back to front with hot on the right rather than the left like intended. Fortunately the final connection to the mixer tap is by flexi tails, so swapping those is easy. |
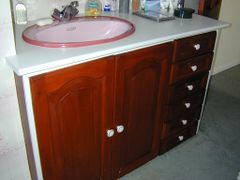
[[image:EnsuiteBasinAndCabinet.jpg|512px]] | [[image:EnsuiteBasinAndCabinet.jpg|512px]] | ||
| Line 180: | Line 186: | ||
Rip out the old loo, and get the walls round that panelled. Prime, paint, and fit the new loo. Work out we don’t have quite enough panelling so order another pack. | Rip out the old loo, and get the walls round that panelled. Prime, paint, and fit the new loo. Work out we don’t have quite enough panelling so order another pack. | ||
| − | Let’s have a close look at the shower. The odd thing is, I measured the space really carefully several times. However a brain fart seems to have occurred, in that the measurement for the width was made to the inside of the existing plasterboard. Alas that was on the outside of the studwork on one side – the inside wall being unboarded. This means that the width available is not actually 1200mm as drawn on the plans… or matching the shower tray and enclosure we have sat in the hall, but is only 1100mm wide. Hmm, so I could move the wall (which would cause disruption in both rooms), or I could swap the tray and shower screen. On the bright side it seems the depth available would actually take a 900mm tray rather than the 800mm as originally expected. Better go and have a chat with the bathroom shop again. Get them agree to swap out the door for the enclosure for a narrower one, and the tray for a narrower and deeper one. (needless to say there is a restocking fee from the manufacturer of the bits, and the slightly less standard tray is more expensive – so all in all that exercise costs some days and £127). Oh, and the waste position on the new tray is different. So some more waste pipe wrangling there. | + | ===Time to get the ensuite shower done=== |
| + | Let’s have a close look at the shower. The odd thing is, I measured the space really carefully several times, and used that in my computer models for the room. | ||
| + | |||
| + | However a brain fart seems to have occurred, in that the measurement for the width was made to the inside of the existing plasterboard. Alas that was only on the outside of the studwork on one side – the inside of that wall being unboarded. This means that the width available is not actually 1200mm as drawn on the plans… or matching the shower tray and enclosure we have sat in the hall, but is only 1100mm wide. Hmm, so I could move the wall (which would cause disruption in both rooms), or I could swap the tray and shower screen. On the bright side it seems the depth available would actually take a 900mm tray rather than the 800mm as originally expected. Better go and have a chat with the bathroom shop again. Get them agree to swap out the door for the enclosure for a narrower one, and the tray for a narrower and deeper one. (needless to say there is a restocking fee from the manufacturer of the bits, and the slightly less standard tray is more expensive – so all in all that exercise costs some days and £127). Oh, and the waste position on the new tray is different. So some more waste pipe wrangling there. | ||
| − | Content that the plumbing under the floor is now up to scratch we can set about the shower tray. Refit the floorboards (and make some new | + | Content that the plumbing under the floor is now up to scratch we can set about the shower tray. Refit the floorboards (and make some new ones since we have done away with lots of holes that are not needed). Make sure we have a cut-out for the shower waste, and that the height is set right for where the underside of the tray is likely to end up (there is a bit of wiggle in the pipe to allow some repositioning). Screw some ¾” ply well down on top. Then mix up some mortar and plasticiser and level that out on the ply. Now lob a couple of lengths of 20mm plastic conduit onto the mortar bed running front to back. That way the heavy stone resin tray can be set down on something that will keep it suspended above the level of the bedding mortar and slid into the right position (there is no way to lift it into place since the space is only open at the front, and it weights 40kg+). Once in about the right place, pull out the conduit, and drop the tray onto the mortar. Now stick a level across it and tap it into position and level. Clean up the edge and leave it to set. Finally we can attach the waiting waste trap to the tray and make sure that is all water tight. |
[[image:EnsuiteShowerTray.jpg|512px]] | [[image:EnsuiteShowerTray.jpg|512px]] | ||
Revision as of 10:58, 29 June 2018
Setting the scene
This is the saga of a bathroom replacement job. There are two adjacent upstairs bathrooms – one an ensuite to the main bedroom with a basin and toilet, and the other a full bathroom with basin, toilet, and corner bath.
The ensuite is functional but not a particularly effective use of space. It also encloses a large cupboard that would make a good sized shower enclosure if it were re-purposed.
The main bathroom, is looking rather tired with its “champagne” coloured fittings. The basin is OK but in a poor position, the glaze on the toilet is pretty poor and difficult to keep clean. The bath is too shallow, and too short, and no one likes it. In short, its lost its shine in more ways than one!
Then there is the floor – cork tiles, that someone later varnished over. So you have a floor which is shiny and slippery when wet, and always manages to feel sticky under foot when dry, while generally looking bad – what’s not to like?
Lastly you have the decor – whoever built the rooms originally decided to skimp on that, and used “tiling on a roll” for both rooms. Not a particularly convincing finish even when new and not peeling and lifting at the edges.
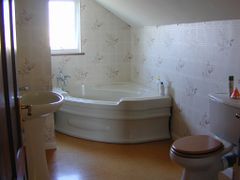
Old photo of the main bathroom (taken 10 years ago when slightly less "tired" than now)

Old photo of the ensuite
(with "charming" colour scheme)


So the plan is to completely gut and rebuild both rooms. Fortunately there is another folly working loo and shower room downstairs in the house, so that will take some of the time and logistical pressure off the work. However the build is going to try and keep at least some functionality in the upstairs rooms during the process, since the job will be spread out over many weeks of part time work.
The creeping requirements phase
Originally it was just the intention to add a shower in the ensuite. There is space for it after all, since there is a cupboard that was originally built to hold the a cold cistern, and central heating header tanks. Both now redundant and removed following updates to the heating and hot water systems some years previously.
There is also enough space in the room for a bath as well, so why not do that at the same time?
The main bathroom would also benefit from a shower as well as a bath, since the teenagers are reaching that point in their lives where soap and water are no longer scary.
So the scope grew over time from a relatively quick and no disruptive addition, to a full on building project.
The design phase

This was a protracted period, and sometime was spent discussing options and playing with several iterations of sketchup model to try and visualise how it would all work in practice. The main difficulty with the bathroom was where to put the shower. The tricky thing here is the lack of head room. The two rooms are built into a gabled dormer (part of a significant loft conversion by the previous owners of the house). They share half the space each, and so both have a section of sloping ceiling over half of the room. Doing the shower in the ensuite is easy with the existing cupboard space. However in the main bathroom the only places tall enough for a shower are along the dividing wall adjacent to the ensuite – and even that has a lump taken out of it near the window because the cupboard space that used to hold the tanks, was in effect space "stolen" half and half from each room.
In the end the best compromise seemed to be a shower bath along the wall.
Even then some careful design and product selection was needed to find a shower bath and screen that would work with the sloping ceiling (many screens need to swing out to allow access - they would hit the sloping ceiling here)

The design aesthetic for the ensuite was going to be very traditional, with a slight amount of ornamentation. The main bathroom was intended to somewhat more modern (but stopping short of being "on trend" to borrow that hideous phrase!)
The research and procurement phase
We visited our local bathroom shop, and described what we had in mind, and took away a set of three catalogues of bathroom stuff.
We also visited lots of tile places and lament the obsession with “metro” tiles and large marble / granite looking things that are about a metre square each.
After much deliberation, we ordered the main fittings for two bathrooms (with an agreement with the shop they would deliver it in two separate loads so that I did not run out of storage space). I Ordered loads of tiles, and some Karndean flooring, and stocked up on plumbing materials.
Finally had a chat with the local skip hire place, and agreed that I could order a six yard skip and keep it for longer than the normal 14 day hire period.
The plan of attack
Christmas is approaching so there will be a couple of quieter weeks with fewer interruptions (I spend a fair amount of time working from home). Alas after that it would be busy, so I will have to snatch a few hours here and there when I can.
I will try and keep things usable for as much time as possible in the process, but either way, this could take a while!
Building
The original plan was do one room at a time – mostly. There is another working shower room with wc in the house, so loss of the main room is not a show stopper.
However like most well laid battle plans, it did not survive long beyond first contact with the enemy!
Let the plumbing begin
Much of the plumbing is concealed under the floor. One easy place to start attacking this is in the ensuite in the cupboard since some of it surfaces here and it’s a handy place to work without causing too much disruption. There was also a small section of boarded floor that could easily be lifted to reveal lots of pipework.

The first task was trying to remember which pipe was which, and working out what they were now doing. When the heating and hot water systems were hacked about a few years previously, work was done hastily here to disconnect the bits no longer needed, and to connect up the bits required for the new system. This was not necessarily done in a particularly neat or pretty way at the time.
There was a cold feed that went to the old cold water cistern, and another to the CH header tank, a feed and expansion pipe to the CH header, a feed from the main cold cistern to the inlet of the HW cylinder, plus separate vent pipe for both the heating and hot water systems. Then was another dedicated cold feed to the shower downstairs.
Some of these were capped off and others needed to be looped back (e.g. the mains cold in that used to feed the header tanks, needed to be connected directly to the cold feed to the new mains pressure hot cylinder.
Many of these changes were done above the floor - in some cases a pipe would appear, only to join onto another and then disappear again. Needless to say all this extra pipework was sat in space where the shower was going to go, so it it all needed sorting out and installing below floor level.
There were some existing problems with water hammer causing some pipes to clank when the water was shut off abruptly elsewhere in the house. Plus the noise when a cistern refilled upstairs would sound rather like a jet taking off! (6 bar water pressure not helping either). A bit of investigation showed lots of redundant bits of pipe, and some interesting choices in pipe routing:

So getting shot of any dead legs as well as simplifying and smoothing out the general flow was the order of the day.
Many days were spent trimming out redundant pipe. Adding new bits (with bends rather than elbows where possible). Installing full bore service valves everywhere as work progressed allowed parts of the system to be worked on with on without need to shut off the water to the rest of the house.
I arranged so that the hot and cold water to the entire floor now came through a pair of common 22mm feeds.
The hot was already pressure reduced via the pressure reduction valve on the unvented cylinder, so I added a pressure reduction valve to make sure the cold was balanced with that. Much of the pipework could be nicely tucked into a stud wall behind the shower.
It soon became apparent that in places the plumbing for the rooms was too tightly coupled together to do them completely separately, so work spilt from one room to the other earlier than planned.
Demolition

Time to get shot of some stuff. Ripping the bath out of the main room meant there was now some access to another bit of floor, plus space to store the new bits for the ensuite.
Opening out the space in the cupboard in the ensuite as well, by getting rid of the walls we won’t need, made it much easier to see the space we are playing with.
New plumbing
After lots of grovelling under floors, we now have feeds for two basins, two baths, two showers, and two WCs ready. Plus waste pipe connections installed under the floor and surfacing for the two showers, basins, and baths. (these were mostly connected via strap bosses to the existing 110mm soil pipe that already runs under the floor.
I brought everything including the basin wastes up in 40mm waste pipe to reduce the possibilities of any under floor blockages, since access to these would be difficult later. They can be transitioned down to 34mm for basins at floor level).

On the subject of strap-bosses
A quick side note: How long does it take to install a strap boss on a 110mm soil pipe and connect up some 40mm waste pipe to it? Answer: most of the time – about 10 mins. However some of the time…
Well you start with wanting to cut a 52mm hole in the side of the soil pipe. You have a hole saw the right size, but this is all under a floor and between a couple of joists that also have a large RSJ running between them, so there is no way to actually get the drill far enough in there...
Try the angle drill; it only has 10mm chuck, and hole saw arbour is 11mm. Not only that, drill body will not go in the gap anyway.
Try the small 10.8V drill - that will fit in the gap, but same chuck problem...
Swap chucks on 18V and 10.8V drill as a temporary measure? Nope, don't fit.
Thinks, aha, I bought an arbour for the smaller hole saws the other day, I could "modify" that to fit the smaller chuck.
Stick it in the lathe, and turn down the 11mm hex shank to something round that will fit the small chuck.
Then find the mounting boss for the hole saw is smaller as well, and does not fit the 52mm saw. Argggg
Look at online catalogs to see if anywhere local sells extension bars that will fit the shank of the hole saw. Apparently not.
Look to see if there is a way of making an extension for the arbour. Realise it has a hole all the way though it (for the pilot drill). Contemplate drilling that out and tapping it to take some threaded rod.
Engage lateral thought - hang on, you can move that pilot drill by freeing a grub screw. What if you poke it out of the back? Oh look you can grip that in a chuck - if only it were long enough to poke out the back and the front at the same time! Eureka, swap out the pilot for a 150mm long 6mm bit - its a slightly lose fit in the hole, but close enough.
Time to drill hole 2 mins. Time to get started at least 2 hours!
Now fit the boss, solvent weld in a reducer, hook up short bit of pipe and 45 degree bend, and try to fit length that will connect to a bath waste that pops out of the floor under the bath. Then work out you can't actually get it all assembled working from just the ends, even if you could actually get the length of pipe fed in - which you can't. Hack through another 10 floor boards and lift them. Tit about for a bit and finally hook up pipe.
Now pour a few litres of water down it to test it, and discover it leaks slowly from the boss. Learn that the original soil pipe does not take to solvent welding at all!
It was a massive pain to get in place, and do up. Its now much harder to get undone because all the space is full of waste pipe that is glued into it. Finally get it free, and butter the back of it with "plumbers gold" sealant. Now refit the whole thing which is now even harder - laying face down on the floor, reaching round from an adjacent space with head wedged under a loo.
Get it done. Drop screwdriver and torch into void in floor, and then work out that void carries on for 9' or more almost down to the ground floor. Get cable rods with magnetic pickup on, and retrieve torch and screwdriver.
Re-test pipework - jobs a goodun, put off screwing down loads of floor boards til the following day.
Realise after the fact, that due to a quirk of the building design, I could have turned a corner with the waste pipe and installed the strap boss a couple of feet to the right where there was far more space to work on it!
So there, plumbing done….
Heating
Well not quite. Radiators. Needed to swap out a couple of conventional rads for nice combined rads / towel rails. Bit of fuss on the first as the new pipe centres mean moving the connection points “in” a bit. So rip up some more floorboards. Alas it turns out that puts one of the rad tails right over a RSJ with only a half inch gap between the top of it and the underside of the floorboards. Just as well "end feed" plumbing fittings are slim…
That’s one done. The next is a bit more tricky since there is a rats nest of copper under the floor near the tails which makes cutting in and extending the pipe work tricky. Eventually got that done. Then found a slight leak from the compression fitting on the radiator valve. Fix that (twice). Job done.
Then the lady of the house opines that having the rad on another wall would actually be better. To be fair she is quite right it would. So more floorboards up, and work out a pipe route. Oh look another RSJ in the way. Admit defeat and go buy a couple of lengths of 15mm speedfit barrier pipe so the pipes can be threaded past the RSJ. Get those round a corner and attached to some copper stubs with the rad valves on ready to poke through the floor.
So there, plumbing done? Well for the moment – but we still have nothing actually connected to any of it yet!
Back to building
We could get the loo and basin swapped out in the ensuite, but that is going to have the lower part of the walls boarded out with bead and butt jointed panelling…

So time to switch to some more woodwork. I had ordered and collected five packs of "bead and butt" tongue and grove panelling boards. These come half a dozen boards to a pack in great long 4.5m lengths. So to make installation easier, I chopped them to length in the workshop first rather than trying to do it in the small bathroom.
Stick a laser level round the room, and screw cross battens to the studs ready for the boards. Go buy some 1” EPS (Expanded Polystyrene) insulation boards so that we can add a layer behind the panelling on the outside walls while we are at it (enough to add a little extra insulation and also reduce condensation formation on the lower wall surface).
Design time: it was intended that the panelled sections would have a small ledge on the top – a couple of inches deep on most of it, but widening out to a 4” deep shelf on the wall adjacent to the bath (hence a place to park your shampoo etc).
To try and create a theme or style for the room, I modelled (another sketchup model) various ideas for edge details on the woodwork, since it would be nice if these were consistent in the room. For the board capping / shelf, there was a rebate on the underside so that it would sit over and cover the top cut edge of the boards (nicely hiding any slight errors in board lengths etc). We decided a decorative “cove” would be the main design element. It will be on the under edge of all protruding woodwork. It could also be used for decorative trims we would need to end the runs of panelling. So I designed another profile for that which will marry up with the skirting.
So some hours were spent in the workshop at the router table. Made up the profiled top shelves with rebate. A section of windowsill with the same decoration. The end stop profiles and some cove sections to fill in the corner details where the boards will meet at the corners of the room.
That done, rip out the basin in the ensuite, and get the first wall panelled. Prime that… and oh yes, we need paint.
So we trek off to a paint mixing place, with one of the ensuite shower listello tiles in hand to try and find a match for the colour. That done (lovely match Jonstone's "Periwinkle" – but *how much* for 2.5L of paint?), we can get the first coat on that.

Now, fit the basin. Hide an air admittance valve behind its pedestal (I did not want any glugging noises from that), and get it plumbed in. Note that a slight plumbing error under the floor managed to get the pipes rising behind the basin back to front with hot on the right rather than the left like intended. Fortunately the final connection to the mixer tap is by flexi tails, so swapping those is easy.

Rip out the old loo, and get the walls round that panelled. Prime, paint, and fit the new loo. Work out we don’t have quite enough panelling so order another pack.
Time to get the ensuite shower done
Let’s have a close look at the shower. The odd thing is, I measured the space really carefully several times, and used that in my computer models for the room.
However a brain fart seems to have occurred, in that the measurement for the width was made to the inside of the existing plasterboard. Alas that was only on the outside of the studwork on one side – the inside of that wall being unboarded. This means that the width available is not actually 1200mm as drawn on the plans… or matching the shower tray and enclosure we have sat in the hall, but is only 1100mm wide. Hmm, so I could move the wall (which would cause disruption in both rooms), or I could swap the tray and shower screen. On the bright side it seems the depth available would actually take a 900mm tray rather than the 800mm as originally expected. Better go and have a chat with the bathroom shop again. Get them agree to swap out the door for the enclosure for a narrower one, and the tray for a narrower and deeper one. (needless to say there is a restocking fee from the manufacturer of the bits, and the slightly less standard tray is more expensive – so all in all that exercise costs some days and £127). Oh, and the waste position on the new tray is different. So some more waste pipe wrangling there.
Content that the plumbing under the floor is now up to scratch we can set about the shower tray. Refit the floorboards (and make some new ones since we have done away with lots of holes that are not needed). Make sure we have a cut-out for the shower waste, and that the height is set right for where the underside of the tray is likely to end up (there is a bit of wiggle in the pipe to allow some repositioning). Screw some ¾” ply well down on top. Then mix up some mortar and plasticiser and level that out on the ply. Now lob a couple of lengths of 20mm plastic conduit onto the mortar bed running front to back. That way the heavy stone resin tray can be set down on something that will keep it suspended above the level of the bedding mortar and slid into the right position (there is no way to lift it into place since the space is only open at the front, and it weights 40kg+). Once in about the right place, pull out the conduit, and drop the tray onto the mortar. Now stick a level across it and tap it into position and level. Clean up the edge and leave it to set. Finally we can attach the waiting waste trap to the tray and make sure that is all water tight.

Walls

The shower and the bath in the adjacent room are going to be have a tiled walls. However I am not keen on using normal plasterboard adjacent to wet service areas, since any leak will rapidly cause the plaster board to crumble and fail. So I had ordered 15 sheets of Aquapanel (a glass fibre re—enforced cement based wall board that is water proof and also strong enough to tile on directly). Now seemed a good a time as any to fit some of those.
First problem – they are in the garage and need carrying up. Now it does say on each board “Lighter, easier, faster”, but it does not say compared to what! The reality is that in spite of being only 1200x900mm each they are pretty heavy. So a quick negotiation with some handy teenagers: “fancy earning some money?”, and a rate of 50p per board was agreed. (needless to say they did not think to check the weight of them prior to the agreement, and I “forgot” to mention it ;-)
Now how to remove the plasterboard in the main bathroom…? I wanted to part strip the bit of wall adjacent to the bath of its plasterboard (skimmed, foil backed) ready for the Aquapanel.
Having knocked the obligatory hole in it, I set about attempting to prise it off the wall now I had access to an "edge". Needless to say it was basically crumbling, and likely to reduce the removed boards to lots of smaller lumps. All in all messy, dusty, and time consuming. I thought it would be much easier if I only had to deal with one section between two studs at a time. That meant I needed an easy way to cut the board in place first.
So I thought I would give the wall chaser a go. Fitted with just one cutting disk (since I need a cut, not a wide slot), I set the depth of cut to basically just the board thickness. The run a cut floor to ceiling directly over each stud. (the disc sliced thought the occasional clout nail - but that did not seem to bother it. Then did a horizontal cut along the line of noggings. The vacuum on the chaser contained the dust from the cuts.
After that it was remarkably easy to prise free a whole section of board at a time - breaking away from the nails, and coming off in a single lump without too much mess. Took all of ten mins then to strip 2.5m of wall. Then a little bit more time with a nail bar pulling out the fastenings. Not much dust or general plaster board rubble / crumbs either.
(I did think about carrying my 16 odd sections out of the house a few at a at time, but then thought why not let gravity do the work - lobbed em out of the 1st floor window onto some grass, then went to collect them with a wheel barrow!)
New boards
The old plaster board was 12mm, but had a few mm of skim on it as well. I did not plan to skim the Aquapanel, so popped into the workshop to rip some very thin lengths of wood to use as shim material. One 3mm thick, and the other 1.5mm thick. That way the edge that joins the plasterboard on one stud can be shimmed out to match the finished level, then the next stud along can shimmed to half the difference. That way the transition from 15mm down to 12mm was spread over 800mm so it was basically not visible and there was no step change in surface level.
Fitted some of the boards in the shower as well, and then had to flip back to plumbing to fit the shower valve since it was a concealed mixer and had to go in before the boards were fitted. While I was at it, I also got the last bits of pipework in for the shower in the main bathroom since it is on the reverse of one of the ensuite shower walls anyway. That done the rest of the boards could be fitted, and an initial seal applied to all the corners and joins to the shower tray (belt and braces – the water should net get past the tiles and full bed of waterproof tile adhesive, but in case it does, it is not getting through any of the joints after! So that’s one shower ready for tiling. (Although the larger depth of shower tray probably meant we were now short on tiles. So a quick chat with the tile warehouse confirmed that more could be bought in small quantities if required).
Time for a bath
With all this DIY, a nice soak could be nice. So finish off the rest of the panelling in the ensuite, and fit its cap shelves and trims. Now we could get the double ended free standing bath into place. At least that would be the case if the floor were ready.
But floor comes first
The floor chosen for that room was a rustic oak effect luxury vinyl plank by Karndean. The idea being something that looks nice, is not too cold under foot, not slippery when wet, and hard wearing and easy to clean. Having decided not to opt for professional fitting (that needed booking many weeks in advance, and the room would need to be clear and ready on the day – not something my ad-hock schedule was going to allow), I grilled the supplier on the best fitting methods (which to be fair, they were happy to discuss even though I was depriving them of work). So the first job was some 5.5mm WBP ply all over the floor. Staggered joins, and well screwed down (basically on a 6” grid). Then I used some feathering compound to fill any gaps and all the screw holes. Then sanded that flush anywhere it needed it.
Fitting Karndean is supposed to be a “skilled trade”, but from discussions with the supplier, and watching some youtube videos, it looked reasonably straight forward for what I needed (i.e. nothing fancy, small room, straight planks with no difficult cutting in). If one wanted something more difficult with scribed in curves and inlaid patterns and borders, then that would not be such a good match for a DIYer’s first attempt!
The adhesive I had was a conventional type and not the pressure sensitive impact adhesive often used for this stuff. Its probably a bit easier to work with as it allows for a little wiggle and repositioning, but at the same time you need to take care not to move the tiles before they are set.
So having work out the laying pattern, and cut the first board down a bit so that the joins would not line up in the finished floor. It was time to get going. I glued up a few planks worth of floor working from a far wall, making my way back to the door. The glue is spread with an “A2” notched trowel (leaves a fine beaded finish). Lay on a board, then get the next couple in making sure all the joints are tight. The boards can then be “rollered” (professional fitters doing a large area will usually have a massively heavy (68 kg) roller). In my case with a smaller room, I opted for a smaller roller, that had an additional side handle to let you get some of weight behind it. The smaller area roller and the bulk of the operator means its easy enough to exert the same pressure as you would get with the large professional roller (although over a smaller area at a time). For the pressure sensitive adhesive this is really important to get a good bond. With the glue I was using it was a good way of making sure the board is fully glued down and flat – however it does not lock the board in place, so you need to take care not to shift its position when rolling. Worked my way back to the door. Straight cuts being done by scoring and snapping the boards with a Stanley knife. The round cutouts for pipes etc, I did with appropriate sizes of hole saw. I left a small gap round the edges that would later be covered by the skirting.
So back to the bath…
That looked easy enough! The legs are separate, so bolt those onto the bath. Each leg has a “foot” on the bottom of a threaded stud so that it the level could be fine-tuned. However the design is a bit odd, rather than setting the foot at the right height by twiddling it, and then screwing it to the floor, there are little “pucks” that one screws to the floor first, and the bath foot then sits on top of, and attaches to via a grub screw. This turned out to be a bit of a crap design! Since you can’t work out where the pucks need to go until you have the bath levelled and offered up in the final position. Alas the weight of the bath and any extra force applied on it when getting it level, tended to push the studs on the adjustment feet through the plastic part of the foot moulded on the end. This left the end of the stud sat on the floor, and the plastic bit which theoretically one would turn to adjust the height now just spun uselessly. After several rounds of taking the studs out and tapping (then later epoxying) the feet back on the ends it was obvious that this was a thankless task. I had a look about for a nut to thread onto the stud to stop it penetrating the foot, but had nothing to match the odd thread size used. Hence I needed to work out how to get it all in place and not put any weight on it while getting it set out. A small trolley jack did the job – take the weight of that bath, and get the levels set. Then screw the pucks down through the nice Karndean floor (hence why I wanted them *right* first time since any mistakes would be visible as there are no bath panels to hide any sins behind). Finally set the bath in place and fit the screws to hold it on the pucks. Now the pipes could be cut in for the taps (the supply stopped just above floor level with a couple of 22mm service valves). These needed to be cut exactly to length to allow them to sit in place and reach from valve to tap correctly. Next the waste could be hooked up (easy since it has a shallow trap, and any horizontal offset easily dealt with by adjusting the length of the pipe from the trap to the waiting riser just above the floor). Tada, we now have a working bath.
Back to the main bathroom
The current position of the loo is in the wrong place, so that needs to shift right a couple of feet so its clear of the end of the bath. So first we need to get the old one out. Needless to say all the fixings into the floor and wall are rusted and any attempt at shifting them just knackers the screw heads. Fortunately, a well-aimed thump with a nail bar removes the porcelain from around the fixing rendering it nicely exposed and easy to pull out. Note to self, broken edges of porcelain fittings are really sharp – even when wearing cut resistant gloves while carrying said loo to the skip. DAMHIK.
So we now have a cold feed for a cistern and unwanted overflow and a soil pipe connection all in the wrong place. So a quick look in the adjacent airing cupboard reveals that the soil pipe actually passes through that, before turning and penetrating the wall to the bathroom. Should be easy enough to pop open the fitting there, and extend it and bring it back in a bit later. However first the cupboard needs partially emptying (for some reason the lady of the house was not thrilled with the idea of me messing with a used soil pipe in close proximity to all the clean laundry… funny things women!) That done the shelving could be dismantled and I could get a close look at the pipe. Turns out the fitting was not push fit after all (no amount of pushing, pulling or twisting made any impression), but solvent weld! Off to plumbers merchant for another of those. Then there is the issue of the radiator that heats the airing cupboard. Alas its right where the pipe needs to go through the wall. So another partial heating drain down was needed and some titting about mounting the rad higher on the wall with longer pipes tails, to allow enough space under it for the soil pipe. While I was at it, I removed and capped off the overflow pipe (new loos tend to overflow into the pan), and extended the cold feed ready for the new cistern. That all done, and the shelving put back, and the laundry returned, I could go back to the bathroom and fit the toilet.
But floor comes first
Except at this point, that room is nice and “empty”, so time to repeat the exercise with the floor. This time I don’t bother with using the feathering compound just to fill the screwholes etc, but found its actually quicker to just skim the whole floor with it on top of the ply, much like one were laying latex self levelling compound.

Once that was dry, the floor could be glued down in there. (I was working to close margins in that room – since we had bought about 6 square meters (two packs) of flooring but there is 7 ish square meters of floor. However the bit under the bath won’t need doing!)
Of course the door would not close over the new floor, so that was trimmed before refitting (I had already taken it off its hinges to get it out of the way when laying the floor.
So floor down, the loo could finally go in – if it were tiled… grrrr.
Another bath
So might as well do the next bath since that did not need the tiling done first – this one was easier to set in and get level. Since it going against the wall, I also wanted it in before the tiling was done – that way the tiles can run down to just over it, and then be properly sealed onto the top of the edge. First I hooked up some lengths of 22mm copper pipe to get into the right place for the taps (they are in the middle of the side of the bath and make a final connection via a flexi tap connector since doing them up in place would probably be very difficult). Then I buttered the edge of the bath with plumbers gold (a hybrid silicone / modified silane sealant designed to stick and seal *anything*), and set it into its corner. I planned to come back later and fit the little metal brackets that hold it to the wall, but discovered the sealant had done such a good job there was no way it was moving again unless you wanted a lump of Aquapanel stuck to it! Hook up the waste and test fit and cut in the bath side and end panels, and we are almost done (final fitting of panels can’t be done until its tiled.

Basin
Next thing to get done is some of the prep work for the basin. I decided to pull that away from the wall by a few inches. This would mean the cabinet that was going above it would not be quite so “in your face”, and would also create a cupboard space under it where one could not only store stuff, but also gain access to all the service valves for everything. So I built some studwork for that and clad it in some spare Aquapanel. Then cut out and framed a couple of openings under where the basin will go for access doors to the valves. Alas can’t do the basin itself until the tiles are done. So that means:
Tiling
phase 0
So we are ready to tile… not. So having a close look at the wall above the basin in the main bathroom (i.e. the back wall of the ensuite shower enclosure) it becomes obvious that its not very flat! In fact it has about a 15mm dip toward its centre (in the space of about 1m). That’s not going to make a good surface to tile on. The culprit seems to be some dodgy studwork made from banana wood. The shower side is easy enough since there is currently no boarding on that side, de-nailing the base of one stud and shifting it a bit, plus some sawing, and tidy up work with a chisel and plane and its flat enough to board.
The bathroom side is already boarded, and I did not really want to have to strip and re-board it. So in the end I nipped into the workshop and cut a pile of small oak wedges. Then hammered these into the joint where the plasterboard meets the stud. This in prised the board slightly off the studwork and its fixing in a nice controllable way. Using a level and a bunch of wedges in different places it was possible to get a flat wall. I then injected some blobs of gripfill into the gaps created to “set” the surface in place and restore some strength to the compromised board fastenings.
Tiling – phase 1
Probably about 24m square of tiling in this room that actually needed doing (some under the bath could be skipped). So I set out battens with a laser level around the room (since there is no guarantee the floor is exactly level, its safer to work from a batten for the first row of tiles). Worked out my tiling pattern and position - hopefully not leaving any odd narrow strips near the corners, and got tiling. Did the first short wall (only about 5’ high) first. Worked my way around the room doing a few hours here and there as time permitted. Took several days to get it all in along with the edge trims on the wall ends and round the window. The sloping ceiling making for lots of angled cuts. Most of the tile cuts were easy score and snap ones, but some work had to be done on the diamond disc tile cutter where cut outs round pipes etc were needed. Once the tiling was up, I could start the grout-fest. (Handy tip, the mixing beater for a discarded hand held food mixer actually works quiet well in in the chuck on the drill for mixing up a couple of pints of grout at a time).
Basin and WC
Now the tiles are grouted, the new loo and basin could go in. The basin needed some nice trim woodwork to create a small surface behind it, and also on the adjacent windowsill. Since the colour theme was beige / cream with some dark brown glass and metallic highlights in the mosaic tiles I was using to bling it up a bit, I decided a nice dark rich wood finish would look good. There was some walnut board left in in the workshop, so with some careful re-sawing and gluing up, it created an illusion of a nice thick worktop and sill. Oiled with a few coats of Danish oil for water protection, and then waxed and buffed up with some dark Liberon Black Bison wax.

That left the cupboard openings below the basin. To match they really cried out for some walnut as well. So a trip to a local firm got a couple of boards on order – best part of £160 for the pair of them! I had forgotten how much walnut costs in the UK. A few hours in the workshop turned one of those into a pair of book matched raised panel doors in a cope and stick surround, all set in a nice walnut door frame.


Time for some electrics
Lighting in the main bathroom always was poor – now made worse by having the window now partly obscured with the bath end wall. So I did some experiments with LED tape lighting, but it did not really do what was needed. In the end three flush mounted LED downlights with a 90 degree beam angle did the job nicely. They were also colour temperature switchable, and that let one chose the right tone of light for the room. The middle position of 4000K looked good.
Pop round to the ensuite shower next door, and the ceiling void above it was to become the main wiring hub for everything else. A shaver socket in each room, plus concealed ducted extractor fans that could be independently switched (with timed run on) from each room. So that was a fun few hours, getting some twin wall flexible metallised ducting fed through to all the right places and connected up. It took a couple of hours of frustration before I realised if you shoved and hand and a fist into the end of it and flexed – you could stretch it just a bit – but enough to make it so much easier to slide over the spigots of the fans and terminals. The extract point was a chromed grill set in the ceiling over the shower bath, and then a combined inlet / lamp fitting in the ensuite shower.
That all needed hooking up to an outlet that I could just squeeze through the rafters to bit of soffit large enough. Romped up a ladder outside to cut a hole, and then worked out that the standard louvre outlet would not fit the space. In the end I had to chop off most of its frame, and then gripfill it over the hole with the duct attached to the back of it. Actually looked neat enough when done, and from 30’ away its perfect!
Fitting out
Now back to the bathroom, fit the bath panels, and start the mammoth silicone session. Did all the usual bits round the bath etc, and then the tile to ceiling and tile to floor intersections with a nice 16mm bevel of sealant. Also did all the internal vertical corners on the tiled walls so there is no possibility of a grout line opening up.
Now the rad can be connected to the valves (it would get in the way of the nice neat sealing job if fitted sooner!)
Fitted all the baskets, and soap dishes, towel rails, loo roll holder etc.
More woodwork
The main bathroom is now usable and getting close to finished. I needed to make up some custom architraves for both rooms though since there is only 2” of width available, but they need to be quite deep to cover the edge of the tiles in one room, and the panelling in the other. So these were knocked up with a couple of router cutters – one to put a crown moulding profile on, and then the second to take a large cove out it. Those could be cut in, and fixed.

Tiling phase 2
Now the shower in the ensuite could be tiled and grouted. As predicted more tiles needed to be ordered. However once done and sealed, all the shower furniture could be fitted.

Next big job get the shower door in. That is made up from a 700mm bi-fold door, and narrower inline panel to extend the width out to the full size. Needless to say there is no easy way to get this in other than by fitting one wall channel, and then prising the entirety of the remainder into place in one hit before fixing the last wall channel once in situ (having remembered to butter the back of it with sealant first)

Shower finishing
The shower in the ensuite needed a ceiling, which would also carry the duct light. I wanted that done in such a way that a part of it could be removed later for access to the electrics and ducting if required. So back to sketchup for a nifty panel edge design. Came up with something that looks a bit like a large cove or cornice, but also drops into a frame in a ply surround and fixes with a few concealed screws. It creates the impression of a slightly raised section of ceiling where the vent and light reside, while matching the aesthetic of the rest of the room.
Prior to fitting that, I stuffed insulation into all the likely spaces under the sarking of the roof above (this space had never been insulated previously).

Threshold strips
Made up a couple of custom threshold strips to transition from the hard floor to the carpet. These were made in oak and stained down a bit before being waxed, so as to blend with the floor.
Skirting
Next job, cut in the skirtings, and fit the corner trims. (I had pre primed and painted these in the workshop, so they only need touching in later). Fill all the screw holes and tidy up.

Painting
The main bathroom ceiling needed a coat. The back of its door re-varnishing to bring it down from the mahogany-esque finish to a walnut to match the rest. Same for its architraves.
The ensuite needed similar treatment except with white ceiling, blue panelling and highlights.
Last job in the main bathroom, fit bathroom cabinet and any accessories as required.
Conclusions
Easy huh? Only took 4 months of part time working ;-) (and probably a little be of ad-hoc tarting up after that)
If you ever wondered what bathroom fitters charge so much, you can probably see why. The biggest challenge with a bathroom build is you are typically working in a small space, on lots of interrelated jobs at once. Each of which require a different skill set, and require different tool sets. As a result it takes lots of planning to get anything done, and you can't finish any one job completely before moving on to others. Progress happens incrementally, with multiple job and trade changes for each stage.
In some respects a multi skilled DIYer has an advantage, since you can avoid the delays associated with getting specialists in (potentially multiple times) for each phase of the project.
Finished Pictures


See Also
- TBD