Dishwasher repair
Leaking exhaust hose (Bosch SMS 5342)
after 10 years of rubbing against the wall when water is pumped out the exhaust hose developed a hole ( appros 2 mm x 1 mm)
the initial repair was by filling the hole with silicone sealant bound down with Duck tape. This lasted approx 8 months. I think it failed because the duck tape was worn away in a similar manner. if doing it again I'd add something to relieve the rubbing ( ?polystyrene block ?)
The generic exhaust hoses from the sheds do not provide a water-tight seal with this model of Bosch dishwasher ( I suspect they don't with any model), even though the inside of the hose looks the same. I needed to order a Bosch-specific replacement.
the hose is held in place by a gripper where it runs through the frame of the machine. I prised it out with a screwdriver adn then removed the old hose. Feed the hose in and mark the position at the outside of the case. Then remove hose, fit gripper and replace. When starting it up it was clear (having gone through 1 cycle and getting stuck with 1 minute to go) that there was no water flowing into the machine.
My attempts with shed-bought exhaust hoses must have led to water getting into the bottom of the machine. Water in the bottom of the dishwasher activates an anti-flood water cutoff so the bottom of the machine has to be drained I turned mine onto its side through 90 degrees, anti-clockwise looking from the front (if you turn it the 'wrong' way something drains or fills and it wont work immediately - I've not idea what !) with a couple of towels underneath it.
When returned to the normal position, it worked !
SWMBO has taken the old hose to the allotment - something to do with it being the right size for bumble bees to live in.
Drain / Fill warning light on Miele G645 SC Plus
Many Miele dishwashers include a flood prevention (aka "WaterProof") system which is intended to prevent the dishwasher leaking water should something go wrong. They do this using a galvanised metal drip tray fitted in the base of the dishwasher that contains a float switch. If this float switch is activated, it will disable the machine, turn on the warning light and run the drain pump continuously. Hence any leak in the machine will trigger this condition. Also they also use a twin wall fill hose which has the main inlet valve at the end of the hose which connects to the tap, rather than the more common practice of including the main fill valve in the machine itself. This means that even if the inlet hose were to leak, this would also drain into the flood tray via the outer hose and trip the float switch, thus turning off the fill valve and stopping the leak.
A side effect of this is that even a slow leak in the machine will slowly fill the flood tray, and eventually trip the machine off. Tipping the machine back at an angle to allow the tray to empty (onto the floor!) will often result in it running again for a few washes until the tray fills again.
There can be a number of places where a leak can occur, however the fault finding process starts in the same way. This is the description of one such fault on a 12 year old machine.
Diagnosis
- Disconnect the machine from the power
- Remove the metal strainer over the sump from the inside of the machine. Use a sponge to remove the bulk of the water sat in the sump.
- Now tip the machine and lay it on its back to expose the underside.
- Remove the 4 screws holding the bottom tray on.
Inspection of the inside surface of the tray will usually show evidence of where in the machine the leak is coming from by way of scale deposit or other water marks on the tray. In this case there was a section to the extreme right of the machine (near where the inlet hose terminates) that showed evidence of leakage onto the tray. The hose connection itself looked sound and did not appear to show signs of leakage. So the next process was:
- Refit the drip tray.
- Return the machine to the upright position.
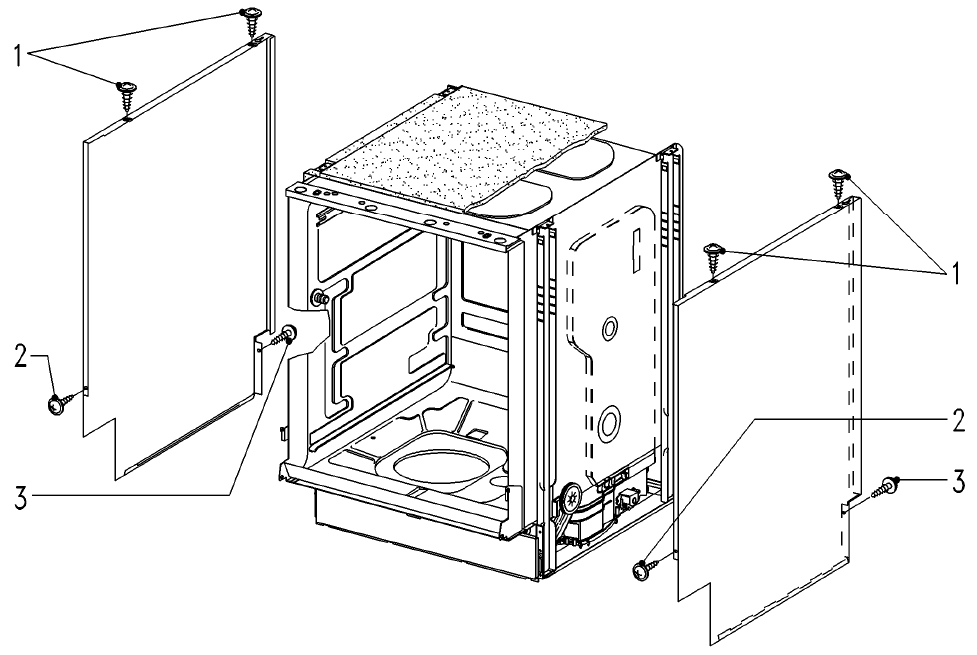
Remove the top panel (two screws into the underside of the top panel right at the front of the machine (accessible only with the door open). Once those screws are removed, it can be freed from the remaining screws at the back of the top by sliding forward half an inch an lifting it clear.- Remove the right hand side panel (two screws at the top then one at the front, low down and close to the door seal, then another on the back even lower - just above the floor - see items 1, 2, & 3 on diagram).
- This will reveal the main mixing chamber, with all the hoses connected to the bottom of it, and a solenoid valve about half way up on its left.
- Connect the machine back to power, and start a wash cycle.

In the case of the dishwasher described here, it was then immediately obvious that there was a small leak from the "hard water" solenoid valve on the left side of the mix vessel.
(the mix vessel is used to run the water softening system in the dishwasher. The valve on the side allows the dishwasher to vary the actual hardness of the wash water by allowing some of the incoming hard water to mix with the softened water it holds in its water softener).
If one then frees the plastic spring clip on the right of the water mixing vessel, and pulls the top of the mix vessel away from the dishwasher a little (note it may be slightly "stuck" to the black sound deadening sheets used all over this inside of the dishwasher). It should now be possible to unclip the electrical coil of the solenoid valve, and slide it off its shaft.
The shaft plugs into the mix vessel and is retained by a clip. Rotating this clip 90 degrees anticlockwise should allow the shaft assembly and its plunger to be removed. The shaft is sealed to the mix vessel by an O ring. In this machines case, it was this that was leaking. Cleaning the O ring alone did not fix the leak. Neither did a smear of silicone grease. However was possible to effect a temporary repair by winding a few turns of PTFE tape onto the base of the shaft and then refitting the O ring. This pushed it more firmly into the recess when the valve shaft was re-inserted.
Problem identified, ebay provided the source of a new O ring for 4 euros. Once this arrived one could remove the packing PTFE tape, fit the new O ring (which was noticeably more supple than the old one), and reassemble permanently.
Leaking from the rear of the main circulating pump. (Bosch Exxcel SGS43A12GB/42)


Push its hat back on. Apart from that, as Haynes say, "Reassembly is the reverse of disassembly". I have to say, I found this Bosch machine a pleasure to work on compared to many others. It's well thought out, things fit properly and are (mostly) readily accessible.