Spring balance
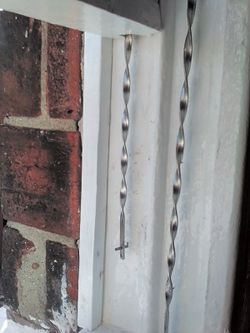
Sliding sash windows are counterbalanced in 2 possible ways. Most use weights, pulleys & cord. Less often spring balances are used. These are long thin tubular spring assemblies that sit in a large groove cut into the sides of the sliding sashes, located out of sight.
Spring balances are prone to problems such as breakage, mis-balance & erratic operation.
Each model of spring balance can counterbalance a limited range of sash weights. The spring is a helically twisted flat steel strip. Varying rate of twist is used to achieve the same upward weight balancing force regardless of position.
Failure
Failure most often is due to the spring disengaging from the sash at its bottom end. Putting it back & tensioning it is often enough. If the balance is not able to provide tension or stay in the slot, it's time to replace them.
Replacement
Spring balances don't last as long as weight & pulley systems. At some point they fail to do the job, and the upper sash has to be locked to stop it falling down.
The sash window frame has 3 runs of beading: inner bead (retains the inner sash), parting bead and outer bead (retains the outer sash). Inner & outer beads are generally held in place with a few pins through the beading into the frame.
To remove a sash, one side of the inner or outer beading is removed, allowing inner sash to be swung out of the frame. The bead is removed by putting scrapers between bead & frame, if necessary gently hammering them in, and using them as levers to get the bead off. They make weak levers and are easily bent - use 2 or more at once and don't push the scrapers too hard. Screwdrivers etc make dents in the wood, so are best avoided. If nothing else works, a screwdriver can be pushed in between 2 scrapers. The bead bends as it comes out, since top & often bottom can't move out.
With the bead removed, the spring balances are unscrewed at their tops. Ensure any tension on them is zeroed first by pulling the bottom end of the spring downward and unwinding its tension in a controlled manner. Unscrewing the top without doing this can cause a minor injury hazard as the balance with screw whips out.
Weigh your sashes, measure the groove diameter & measure the closed lengths of the spring balances. Buy replacement spring balances & reassemble the window for now. If you plan to add secondary glazing, add it before weighing.
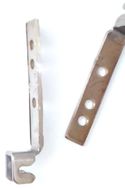
When the spring balances arrive, remove the sashes again & discard damaged balances. Check the bottom end hook is attached to the sash - or replace if needed. Top & bottom sash balances are different lengths, the bottom is longer. Place a screw through the top spring balance hole & put the balances back into the sash grooves. Just hold them there for now. With your 3rd & 4th hands, get the sash back into the frame. If draftproofing strips are fitted, use your 5th & 6th hands to ensure those sit correctly as you refit the sash.
Let the sash sit low in the frame while you begin to refit the beading. A suitable gap between bead & sash is important: too large & it will rattle and be draughty, too close and it will be difficult to impossible to open & close. Place a scraper blade between bead & sash and press on the bead to set the required gap. Hammer a pin in to fix the bead: always hammer each pin close to a gap setting scraper. You will of course need to move the sash up to set the correct gap for pins higher up. I would advise not putting a pin in less than about 8 or 9" from top or bottom of the bead, doing so makes it very difficult to remove it in future. Position the scraper blade so it also acts to protect the sash woodwork from being hit by the hammer.
Slide the sash nearly all the way to the top, this sets the position of the top of the spring balance. Don't be tempted to do this earlier in the process as even small errors can make the window jam or fail to reach the top at all. Drive the fixing screw in only enough to mark the wood frame, remove and drill a pilot hole for the screw. Now screw the spring balance in place.
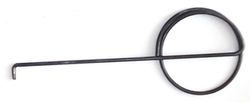
Raise the sash part way and lift up the spiral spring, letting it turn as it goes up. Use a tensioner tool to turn it before slotting it into the bottom of the sash, adjusting tension until the sash runs correctly. Always count the turns as both sides must be tensioned the same, otherwise the window will experience difficulty sliding.
If working from the inside, remove the inner sash before the outer, and replace the outer before the inner.
Usually repainting is also required, you will often need to board up the frame while this is done.
Tensioning
Tensioning, ie setting the upward force, is done by twisting the lower end of the spring before releasing it back into its held position in the sash. Tension shoud be adjusted until the sashes require the same amount of force to push them up as down, or they should move closed a little easier than open. (Force is always required to move the sashes due to significant friction in these mechanisms.)
If you don't have a tensioner tool these are readily made from 2mm iron wire.


