Mains power restored alarm, non contact
If you have installed a transfer switch and have access to a backup power source such as a generator or a battery bank and mains inverter, then you can safely switch power for the whole property between a grid supply, and your backup source. The transfer switch does this safely by ensuring the power transfer is "break before make" - forcing the disconnection of one source before the other can connect. This ensures there is no danger of your local power source attempting to back feed the grid supply - something that at best would overload your local generation capability, and at worst could kill or injure someone working on the grid supply.
One shortcoming of using a transfer switch is that once the grid connection is disconnected, how can you tell when the power cut is over? This article explores a small project to make identifying when the grid mains power is restored, easy!
Detecting mains power
When operating from your own power source, typically all of your installation is disconnected from the grid supply, and so checking if it working is more complicated just just plugging something in, or turning on a light. If you have an electronic electricity meter which has an integral LCD display, you may be able to see when grid power is "on" because the display will be functioning. However this is something you need to go actually "look at" to see. It would be nicer to have some kind of audible alarm that notify you when the power comes back.
Direct connection
One way to detect power is to make a direct connection to the incoming grid supply terminals on your transfer switch, since these will go live whenever the grid supply is working even if you are not currently switched to that supply. The difficulty here is that these terminals are typically before all of your local circuit protection such as the fuses or circuit breakers in your consumer unit. The only protection available here is that provided by your main incomer fuse (typically at 60A or 100A). Connecting to that typically requires meter tail sized conductors (usually 16mm² or 25mm² cables). So to safely make connection here, you would need a set of tails to feed a dedicated small CU containing a MCB or RCBO. Lots of extra complexity and expense. Alternatively you could for example install a simple neon indicator on the understanding that it is very low risk, but again you then have something that needs looking at periodically.
Non contact connection
If one can detect mains presence without making direct contact, this all gets simpler. Non contact power detection can be done by inductive or capacitive coupling to a live wire. Inductive coupling (often using a current transformer with a coil placed around a wire) can detect when current flows in that wire. However we can't use that there since there will be no load on the supply wiring at this point, and so no current flow to detect.
Capacitive coupling however will work, since this will allow the presence of a voltage to be detected even when there is no current flow. This is the same principle used by commercial "volt stick" style detectors. (in fact if you have one of these that can run for hours and not automatically turn off, then spring into life and beep at you when the power comes back on, you can stop reading the rest of this page now!)
Non contact capacitive coupling - theory of operation

Whenever you place two isolated conductors in close proximity, any voltage applied to one will tend to cause an accumulation of electric charge on it, and that in turn will result in an opposing electrical charge accumulating on the other conductor, forming a capacitor. This accumulation of charge on one side of the capacitor will briefly allow a current to flow into it as it "charges". However once charged, that current flow stops. You can however allow the charge to flow out again, so you will see a reverse flow of current as the capacitor discharges. While a steady direct current can't flow past a capacitor, alternating current can - since the continuous reversals of current flow direction can repeatedly charge and discharge the capacitor.
Proper capacitors have conductive plates with a large surface area separated by a very small distance, with a "dielectric" insulator placed between them to increase their effective capacitance. However two wires close to each other will also exhibit a capacitance, but due to the very small surface area of the "plates" the capacitance will be tiny (typically a few pico farads, where a pico farad is millionth or a millionth of a farad!) The upshot of this is that you can only draw a very very small current out of this capacitor, and that makes detecting it a little more difficult.
To be able to able to detect and use this coupled voltage, we need to amplify it massively first.
Prototype 1
The simplest form of electronic amplifier is a transistor. This electronic component behaves like an electrically controlled "valve", where if you allow current to flow in one of the wires, and it will progressively "turn on", allowing a current to flow between the other two wires. Crucially however a very small current flow in this "base" control wire, can allow a much larger current flow (could be several hundred times more) in the other two "collector" and "emitter" wires.
One transistor alone however is not going to have enough amplification or "gain" to cope with our tiny signal. So one way to get substantially more gain is to use a configuration known as a "Darlington pair". Here one transistor is used to boost a signal, which is then used to drive a second transistor which boosts it again. Like this the gain of the transistors are in effect multiples together. So if one transistor can make a signal 100 times bigger, then next makes that 100 times bigger again, or 10,000 times more altogether.

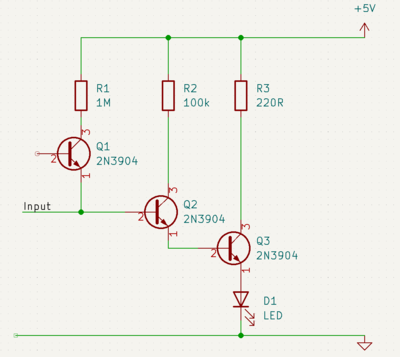
So I built a prototype using some common NPN transistors configured as a Darlington pair, with one additional transistor just used as a final "switch" to turn a LED on.
The theory of operation is the input is connected to a sense wire or plate that is placed near to the mains voltage carrying wire. In each half cycle when the voltage reaches high enough to "turn on" the first transistor, that turns on the next, and that will then fully turn on the final transistor. Switching on the LED. The LED will in effect blink at mains frequency, but that is fast enough that it will appear to be "on" to the eye.
If one were to look at the voltage at the bottom of R3, you would see 5V any time Q3 is off, and then it will fall as the transistor turns on and current flows though it a voltage drop will appear across R3, and the voltage you see will fall.
If you replaced the LED with some form of buzzer, then you could get this circuit to give an audible indication of a mains voltage.
Prototype 2
Experimentation found that this circuit worked, but was not very selective. Sometimes being way too sensitive, and other times not enough (it turns out there was an added complication that I became aware of later!)
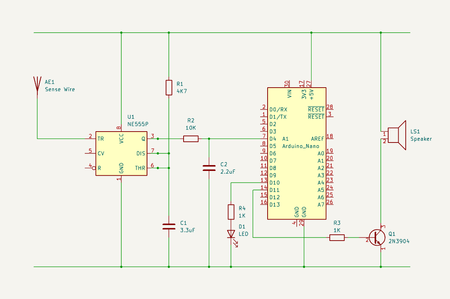
Looking in the parts bin for something else to try as a detector I found the venerable 555 timer IC. These highly versatile devices can be used in all sorts of ways as detectors, counters and timers, just by choosing how they are wired up and by the selection of the discrete components you connect them up to. For this application the "trigger" input of the device is in effect connected to a very sensitive comparator circuit, which can "turn on" the IC when a voltage is sensed on the pin. Some people use these are non contact voltage detectors since the timer output can be used to drive a speaker or sounder directly to create an audible "buzz".
Odd results
Testing the new circuit showed it was "better" than the first one,but was still not giving the results I expected, and it was quite difficult to nail down what was wrong. Half the time it would trigger even if nowhere near a mains lead, or fail to detect being right next to it.
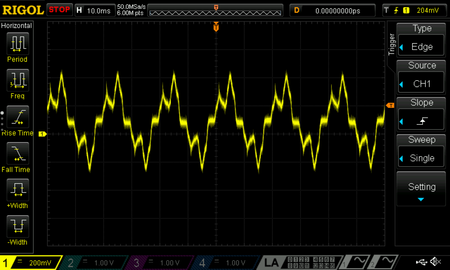
Eventually the thought occurred to be to wonder why commercial non contact voltage detectors work so well, but this one was working like I wanted? So I grabbed my multimeter that also includes a non contact voltage detection capability and waved that close to me detector. Much to my surprise it lit up like a Christmas tree anywhere near my workbench. In fact it appeared that the whole bench was "live" (quite an achievement for something made mostly from veneered chipboard!). Presumably this was a result of being close to too much electrical and electronic kit, lights, and USB leads etc that might have questionable switched mode power supplies at their end.
Now I realised why I was having a hard time, just moving the circuit to the other desk a couple of feet away was enough to make it all work as expected!
Snazzing it up
So having a working circuit on a breadboard, I though now would be a good time to add in a micro controller! This would allow me to do more sophisticated detection, and create some more "crafted" audio alerts, rather than just a continuous buzz.
